Mastodon

31.8.11

First year done and slow mech progress


Oh my, I just realized that I started this silliness of blogkeeping in last August! Confusingly I've managed to keep this up for an insanely long time (in my own opinion) and at a decent ~once a week pace. That's noticeably more than those "maybe ten if that much" posts I had thought of when I started. I don't think I was doubting for no reason but apparently mumbling about these has gone nicely, anyway. How confusing.

But that's that, who cares? To the point!


My agenda for the last couple of days has been more of playing Borderlands (second playthrough with Mordecai) than tinkering. I mostly blame the weather for that. Several details have been added, though, so I haven't been completely useless. Firstly I attacked the tools of destruction: flat aluminium to the ends of the laser guns and the insides of the AutoCannon barrels. Over those I applied a black wash to a) make the lasers look a bit different than the torso and b) make them stand out less in general.

While I was fooling around I attached the hip to the torso as I was done with airbrushing, there was no longer a need to keep them separated. Until I'm done with the logos, I'll keep the legs separately, for convenience and simplicity.


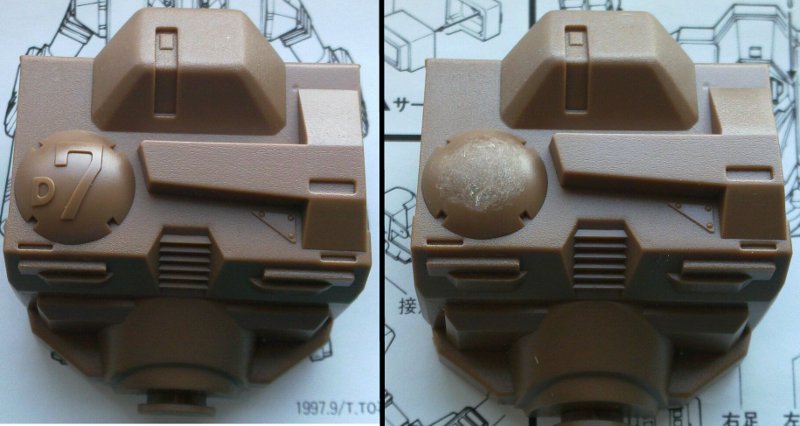
I'm not sure how good an idea this was, but we'll see. I cut a slice of transparent plastic from a bigger container I saved for this purpose. Then I did a couple of passes with a coarse sanding paper to give it a bit more interesting texture while keeping it mostly transparent. After a bit of dry-fitting and half a dozen of tiny slices I got a nice plate that fit into the "mouth" of the searchlight. Maybe it looks very cool when it's in its own place.


As the evening sun was (too) rapidly fading away I painted a bunch of areas yellow. Tomorrow I'll add the black stripes to complete the caution pattern. Because all the missile pod doors got a noticeable caution strip on them, I decided to keep the rest smaller and few. This was to avoid making my Warhammer looking like a circus vehicle (or a tank of one of those weirder Warhammer 40,000 factions)...

26.8.11

A calm return back to my projects

Last Tuesday I went and dug some plumber's tape from the deepest depths of the store. While I was checking how to use it I was getting slightly concerned: does this frail looking stuff work at all? To try it out I applied a single round of that tape on all the male parts of the connections and then screwed on the next piece. That was repeated thrice and it was time to turn the thing on. Himmel, it worked!


I don't have the faintest clue of why I was surprised, but I was. The main thing is that I was positively surprised. While I was at it, I painted my Warhammer's torso all green. In the end - despite suboptimal evening lighting conditions at this point of the summer - I didn't end up having too many parts requiring later touching up.


There wasn't much to do with the legs anymore, I applied the black wash on and later I added the red splashes here and there. This time I was a bit more liberal with that red than with my Marauder. The rest of the detailing, which means all the logos at this point, is still mostly not done. I had started working on the Omega Galaxy's logo by painting the yellow planet part. All the rest will be done pretty quickly, if everything goes like the last time.

10.8.11

Verdammt doch mal

The pieces I filed so eagerly were done so I spent a while one evening priming them with the gray spray primer. This time I learned that when the amount of paint in the can is awfully low, it doesn't do much good to the model anymore. The last areas I covered were a bit off, the paint didn't spread in a nicely thing veil as it usually does. I spent a good while filing that stuff down the following evening. Live and learn.

To my joy I noticed that the vast majority of the seams I had been working on were just like they were supposed to: unnoticeable. A couple of them needed a bit of puttying and resanding (and repriming a bit later), but in general things went pretty nicely.

Instead of marching to a hobby store to get another can of spray primer, I thought of doing that with my brand new compressor and the tiny gray primer bottle I got earlier for some reason. To begin with, I rechecked the instruction sheet just in case, attached both(!) adapters, the hose and the airbrush itself. Power on. The machine itself wasn't awfully noisy but there was an extra sound of air flowing in an unexpected way. Those bastards were leaking. Not completely unexpected, for the shopkeep had mentioned it as well as did the instructions.
Ok. I should apply some plumber's tape to the leaky parts. Obviously I don't own any and at some point I have to go to a hardware store to ask for that. In finnish it has many different names (and offensively many ways of typoing it *grumblegrumble*) so even googling it took a nice while but now I know where to go and what to say.

My quick fix with painter's tape didn't fix anything well enough. That would've been too easy I guess.

Anyway, I'll be more than busy this week so I'll do my tape-shopping on my last vacation week. I've got all the time in the world but still I'm a bit disappointed because I didn't get to try my new toy out.

To get something useful done I painted the legs and hip parts just like the Marauder. They're still waiting for a black wash and the red splashes before I get to have another go at freehanding all the logos and stuff.


The kit piece that's supposed to be an antenna and is to be attached next to the cockpit looked way too awkward to my liking, so I used a black bristle from a 0,4EUR brush I got to be used exactly in these cases. It looks like an antenna to me 8) While I was at it, I drilled the torso machine guns open so they look a bit more decent now.
Oh, the half-done searchlight can be seen in the picture! It's missing the protective glass because I'll attach it after the green has been sprayed on the torso. And when I've come up with a plan but let's not tell that to anyone.

3.8.11

Project 4/2011


My Marauder won't get to be alone on its shelf for too long for I started almost immediately working on the Warhammer IIC's variant "something". Let's see what happens with this one. This time I knew that there are certain things that are to be avoided because I did them with the last project. In general I should remember to fuss around less and ponder more... I should.

The model consists of very few parts and the instructions are pretty short again. If I remember correctly, the total part count is about 40 and they're divided into two sprues. Not a problem, I can fail with those if I really tried to :P


As usual, I obediently started from the beginning. First ones were the arms with their guns. The gun barrels tried to grin a bit so I taped them shut to keep them nicely, I didn't think that pegs would be needed in this kind of light bending. For a while I considered the possibility of opening the SRM-6 doors and then scratchbuilding the missile tips inside. But then I decided that my tools weren't fine enough and I'd just ruined the pieces - and I didn't really trust in my abilities in building new missile bay doors out of polystyrene just like that. So those doors stay shut this time. While I was building stuff, I glued the top parts of the legs together.


I almost kept building more and more but then I remembered that no, that's not how this goes nicely. The last time I had just assembled everything and I realized that the seams were awful way too late. Now I filed all the seams of the built pieces down, before joining them to other pieces. While filing around in general I removed the D7-text out of the back of the Torso. That place could be decorated with the Clan insignia or some other Important thing.


Fixing stuff went nicely so I went on with the searchlight that'll be attached to the left shoulder. Laurentius had told me that he opened it in his model and built the insides somehow. That was a really good idea so I had told that I'll steal it - and that's exactly what I did. I started by drilling a bunch of holes around the edges and then cut/punched the piece away. Now I just need to decide how to build the insides and how to get all this painted nicely with no more than one painting run.


Yesterday evening I assembled the rest of the legs and filed down the new seams as well. After doing things like this there shouldn't be any ugly lines remaining. Though I have to say that the cockpit has a rather psychotic "%D"-face on it... maybe it'll look more decent after a couple of layers of paint. I'm afraid that I don't have lenses small enough for those tiny flashlights, but maybe we'll survive somehow.


Oh my, I almost forgot! Last week I visited my Toy Shop a couple of times and bought myself this, the latest warhead in my arms race against myself: a compressor to power my airbrush! Now things are looking good indeed 8)