Mastodon
Showing posts with label Ban Dai. Show all posts

5.9.11

Warhammer IIC - a custom variant

There's not much to say about the last phase of this build, other than that the "glass" I made works pretty nicely and that cockpit jeweling / blending isn't my cup of tea. Or at least I don't do it even decently at this point in history. As a bonus difficulty multiplier I tried to do red, which turns pink with white and looks like crap. After repainting the big window that looks like a mouth and the smaller windows on the "forehead" did wonders but is still far from looking cool.
Practice makes perfect and I have a lot of practice to do (though, I have to say that my attempt at green eyes for the Atlas in my Model Expo 2009 diorama wasn't too bad). So maybe I'll use a different colour for that next time.


This beast of a 'Mech didn't end up being wysiwyg (those two guns in the head aren't in, the torso guns are all of a different size and so on), unlike the Marauder. You can't always win but you can charge them while alpha striking! That is always both Right and Beautiful.

I add the specs below, some people may find it more interesting and useful than some others:

Mass80 tons
Tech/EraClan / 3055
ConfigBiped 'Mech (Level 2)
Movement4 / 6 / 0
Internal structureEndo Steel (122pts)
Engine320 Fusion
Heat Sinks20 Double
ArmorFerro-Fibrous (230pts)
Weapons & Equipment

TypeLocHeatAmmo
LB 5-X ACRA120 (RA)
LB 5-X ACLA120 (LA)
SRM 6RT415 (RT)
Medium Pulse LaserRT5-
Medium Pulse LaserLT5-
CASE
Combat Heat36 (40)

This thing ended up being nicely filled: the tons are all used and only one Critical Slot was left unused. The original design carried a couple of ERPPCs and other neat toys, but as I had originally decided that this one's an AutoCannon carrier... For some weird reason bigger than Class-5 AutoCannons didn't fit so that there was any space left for more guns. I decided to, for the sake of fun and sportmanship, to use the LBX (shotgun) variants instead of Ultra AutoCannons like the ones used in my Marauder.
Those LB 5-X's are decent for crit-seeking, even though they aren't as enfuriatingly good at it as LB 20-X guns are... My two sets of triple ER Medium Lasers are maybe a disturbing option, even though it's nothing compared to Nova Prime's twelve ERMLasers... now that's one sick config. The only thing I left is the SRM-6 launcher, no fooling around with Streaks or anything due to lack of available tonnage.

Right above the lasers on the left torso you can see the number of this unit: 825. That being the next one from Marauder (824). I'm used to pulling the unit numbers from my magical hat without any kind of a plan or anything. Maybe in the future I could do something more german, such as Trinary number (1-9), Star number (1-3), Point number (1-5) and I think that should be enough for the Clan, Galaxy and Cluster are always known and don't need to be indicated with numbers. This particular Cluster doesn't have any special logo or pattern that can be used as an identifier but then again, making the numbers even longer would end up being a bit stupid.
I've used a similar numbering (Star/Point/Plane) with my 9th Falcon Talon Cluster's AeroSpace Figthers points but not with 'Mechs. Maybe I should do something like that in the future.


31.8.11

First year done and slow mech progress


Oh my, I just realized that I started this silliness of blogkeeping in last August! Confusingly I've managed to keep this up for an insanely long time (in my own opinion) and at a decent ~once a week pace. That's noticeably more than those "maybe ten if that much" posts I had thought of when I started. I don't think I was doubting for no reason but apparently mumbling about these has gone nicely, anyway. How confusing.

But that's that, who cares? To the point!


My agenda for the last couple of days has been more of playing Borderlands (second playthrough with Mordecai) than tinkering. I mostly blame the weather for that. Several details have been added, though, so I haven't been completely useless. Firstly I attacked the tools of destruction: flat aluminium to the ends of the laser guns and the insides of the AutoCannon barrels. Over those I applied a black wash to a) make the lasers look a bit different than the torso and b) make them stand out less in general.

While I was fooling around I attached the hip to the torso as I was done with airbrushing, there was no longer a need to keep them separated. Until I'm done with the logos, I'll keep the legs separately, for convenience and simplicity.


I'm not sure how good an idea this was, but we'll see. I cut a slice of transparent plastic from a bigger container I saved for this purpose. Then I did a couple of passes with a coarse sanding paper to give it a bit more interesting texture while keeping it mostly transparent. After a bit of dry-fitting and half a dozen of tiny slices I got a nice plate that fit into the "mouth" of the searchlight. Maybe it looks very cool when it's in its own place.


As the evening sun was (too) rapidly fading away I painted a bunch of areas yellow. Tomorrow I'll add the black stripes to complete the caution pattern. Because all the missile pod doors got a noticeable caution strip on them, I decided to keep the rest smaller and few. This was to avoid making my Warhammer looking like a circus vehicle (or a tank of one of those weirder Warhammer 40,000 factions)...

26.8.11

A calm return back to my projects

Last Tuesday I went and dug some plumber's tape from the deepest depths of the store. While I was checking how to use it I was getting slightly concerned: does this frail looking stuff work at all? To try it out I applied a single round of that tape on all the male parts of the connections and then screwed on the next piece. That was repeated thrice and it was time to turn the thing on. Himmel, it worked!


I don't have the faintest clue of why I was surprised, but I was. The main thing is that I was positively surprised. While I was at it, I painted my Warhammer's torso all green. In the end - despite suboptimal evening lighting conditions at this point of the summer - I didn't end up having too many parts requiring later touching up.


There wasn't much to do with the legs anymore, I applied the black wash on and later I added the red splashes here and there. This time I was a bit more liberal with that red than with my Marauder. The rest of the detailing, which means all the logos at this point, is still mostly not done. I had started working on the Omega Galaxy's logo by painting the yellow planet part. All the rest will be done pretty quickly, if everything goes like the last time.

10.8.11

Verdammt doch mal

The pieces I filed so eagerly were done so I spent a while one evening priming them with the gray spray primer. This time I learned that when the amount of paint in the can is awfully low, it doesn't do much good to the model anymore. The last areas I covered were a bit off, the paint didn't spread in a nicely thing veil as it usually does. I spent a good while filing that stuff down the following evening. Live and learn.

To my joy I noticed that the vast majority of the seams I had been working on were just like they were supposed to: unnoticeable. A couple of them needed a bit of puttying and resanding (and repriming a bit later), but in general things went pretty nicely.

Instead of marching to a hobby store to get another can of spray primer, I thought of doing that with my brand new compressor and the tiny gray primer bottle I got earlier for some reason. To begin with, I rechecked the instruction sheet just in case, attached both(!) adapters, the hose and the airbrush itself. Power on. The machine itself wasn't awfully noisy but there was an extra sound of air flowing in an unexpected way. Those bastards were leaking. Not completely unexpected, for the shopkeep had mentioned it as well as did the instructions.
Ok. I should apply some plumber's tape to the leaky parts. Obviously I don't own any and at some point I have to go to a hardware store to ask for that. In finnish it has many different names (and offensively many ways of typoing it *grumblegrumble*) so even googling it took a nice while but now I know where to go and what to say.

My quick fix with painter's tape didn't fix anything well enough. That would've been too easy I guess.

Anyway, I'll be more than busy this week so I'll do my tape-shopping on my last vacation week. I've got all the time in the world but still I'm a bit disappointed because I didn't get to try my new toy out.

To get something useful done I painted the legs and hip parts just like the Marauder. They're still waiting for a black wash and the red splashes before I get to have another go at freehanding all the logos and stuff.


The kit piece that's supposed to be an antenna and is to be attached next to the cockpit looked way too awkward to my liking, so I used a black bristle from a 0,4EUR brush I got to be used exactly in these cases. It looks like an antenna to me 8) While I was at it, I drilled the torso machine guns open so they look a bit more decent now.
Oh, the half-done searchlight can be seen in the picture! It's missing the protective glass because I'll attach it after the green has been sprayed on the torso. And when I've come up with a plan but let's not tell that to anyone.

3.8.11

Project 4/2011


My Marauder won't get to be alone on its shelf for too long for I started almost immediately working on the Warhammer IIC's variant "something". Let's see what happens with this one. This time I knew that there are certain things that are to be avoided because I did them with the last project. In general I should remember to fuss around less and ponder more... I should.

The model consists of very few parts and the instructions are pretty short again. If I remember correctly, the total part count is about 40 and they're divided into two sprues. Not a problem, I can fail with those if I really tried to :P


As usual, I obediently started from the beginning. First ones were the arms with their guns. The gun barrels tried to grin a bit so I taped them shut to keep them nicely, I didn't think that pegs would be needed in this kind of light bending. For a while I considered the possibility of opening the SRM-6 doors and then scratchbuilding the missile tips inside. But then I decided that my tools weren't fine enough and I'd just ruined the pieces - and I didn't really trust in my abilities in building new missile bay doors out of polystyrene just like that. So those doors stay shut this time. While I was building stuff, I glued the top parts of the legs together.


I almost kept building more and more but then I remembered that no, that's not how this goes nicely. The last time I had just assembled everything and I realized that the seams were awful way too late. Now I filed all the seams of the built pieces down, before joining them to other pieces. While filing around in general I removed the D7-text out of the back of the Torso. That place could be decorated with the Clan insignia or some other Important thing.


Fixing stuff went nicely so I went on with the searchlight that'll be attached to the left shoulder. Laurentius had told me that he opened it in his model and built the insides somehow. That was a really good idea so I had told that I'll steal it - and that's exactly what I did. I started by drilling a bunch of holes around the edges and then cut/punched the piece away. Now I just need to decide how to build the insides and how to get all this painted nicely with no more than one painting run.


Yesterday evening I assembled the rest of the legs and filed down the new seams as well. After doing things like this there shouldn't be any ugly lines remaining. Though I have to say that the cockpit has a rather psychotic "%D"-face on it... maybe it'll look more decent after a couple of layers of paint. I'm afraid that I don't have lenses small enough for those tiny flashlights, but maybe we'll survive somehow.


Oh my, I almost forgot! Last week I visited my Toy Shop a couple of times and bought myself this, the latest warhead in my arms race against myself: a compressor to power my airbrush! Now things are looking good indeed 8)

28.7.11

Marauder IIC - custom variant


I'm doing my best to keep my BT builds (these models and the miniatures) as wysiwyg so I had to fool around with the specs of the Marauder. My main problem was if all the crap I wanted to have in was going to fit for real. In several posts I've been talking about the ERPPC:s in the arms, as well as the MPLasers and the AutoCannon that sits on top of the machine (not caring too much if it's a normal AC, an UAC but at least I never thought of it as an LBX varian). Oh, and the Jump Jets were talked about the last time, if not earlier.

That was a good starting point, the result was a custom variant of Marauder II C because none of the more official configs didn't provide exactly what I wanted. So this is what I ended up with:

Mass85 tons
Tech/EraClan / 3055
ConfigBiped 'Mech (Level 2)
Movement4 / 6 / 2
Internal structureEndo Steel (130pts)
Engine340 Fusion
Heat Sinks21 Double
ArmorFerro-Fibrous (221pts)
Weapons & Equipment

TypeLocHeatAmmo
ER PPCRA15-
Medium Pulse LaserRA4-
ER PPCLA15-
Medium Pulse LaserRA4-
Ultra AC/2CT145
CASE
Standard Jump JetRL
Standard Jump JetLL
Combat Heat43 (42)

That filled my tonnage pretty easily but there were something like eight or nine open Critical Slots. The last tons I spent on an extra ton of ammo for the UAC/2, just in case... Of course I could've fit an UAC/5 but for some reason I chose the /2. Maybe it's the plain range so it can work with the ER PPC's. As a small touch I moved a set of Heat Sinks to arms, on top of each ER PPC, so it'd be like in the model. Those JJ's didn't fit in the torso sides, so they had to go on the legs, but you can't always get what you want.

Fascinating, isn't it? I would be pretty curious in playing with that someday, I'm going to have my arse handed to me in any case, no matter what my 'Mech is. Maybe my "Death to the Freebirth scum! ROAAARGH! Alpha strike!" isn't the safest one? But then again, it's more ClanLike than a safe, cautious style. In any case: as long as it's fun, it's all good.

24.7.11

Detailing the Marauder

For some reason I couldn't wait more than a couple of minutes after publishing the last post. So I continued working on the details on Thursday afternoon/evening. The Galaxy logo was on its place already and I wanted to add a vehicle number and a couple of Clan logos around the 'Mech. After turning the thing in my arms for a while I decided that both sides of the torso will get a logo each and the left leg will get one. Then I just had to come up with a good place for the number (and I had to come up with a number, too). In the end that number found itself from the rear part of the right leg.
I don't think I'll start worrying about the Point insignia (from Point 1 to Point 5) nor the pilot's rank insignia :)

Freehanding the Clan logos was a bit easier on this kind of a large model than on the tiny tabletop miniatures. It's obviously not 1:1 copy of the real logo but it looks recognizable and that's what I was going for. Besides, I just can't draw that (or any other) thing accurately on any scale anyway ;)

The right side

Rear view  with the unit number

The left side

Front view, the PPC & Medium PLas lenses are installed as well

I also tried how that Tamiya's Burnt Carbon pigment works on the AC. Guess it works somehow. At this point all that's left is to install the arms properly and that's all I can think of right now. We'll see if I manage to do that before I attack the Warhammer...

As usual, I took the photo against the light, but you should be able to see the barrel's end anyway. Somehow.

21.7.11

Going green again

Since the last time I've painted the torso and arms of my Marauder with Vallejo's German Green and the end result looked a lot nicer than my previous spearmint-approach. Maybe the extra plates will end up bothering someone but they don't bother me so they'll stay. And I'll use the same scheme on my Warhammer, when I get that far.


While airbrushing around I noticed that the canned propellant starts acting funnily during use and the less there's propellant left, the quicker it starts acting up. I guess it's because the propellant cools down a lot and when it gets too cold it just doesn't push the paint out of the airbrush anymore. With a new can you can paint for a good while but as this one's on its last ~20% I could only paint one arm before the paintflow died away.
This causes extra pauses and excess worrying: "Do I get to paint this piece or does it die in the next two seconds?". The solution is, as I pondered last autumn: a compressor.

Maybe before I go for the second half of my summer vacation...


While I was fooling around with the upper torso, I finished the paint job of the legs. Just like Camospecs (and my initial post) says, the feet and shins need some red paint splattered on them as if it was the blood of the Steel Vipers. This time I tried not to get carried away with all the gore...


When all these key components had dried, I finally got to tinker around with the details. In my opinion, Battle- and OmniMecs just have to have some caution stripes (you know that cool yellow-black warning pattern), otherwise something vital is missing and that's never good for the model or its builder. In any case I had decided to take it easy and I chose a couple of key points where the caution striping fits. As a helper I used the surface details of the hull.
Both of the gun pods get two for each side and left/right torso, where the arms go attached, get narrow stripes on the front and rear sides. This way they'll stand out but don't steal all the attention.
While I was working, I painted the pieces I decided to call the nozzles of the Jump Jets, the thing in the rear hull I call a Heat Sink and the gun ports with Vallejo's Oily Steel. The Heat Sink I'll cover with a thin layer of brown ink, the rest will stay cleaner. As the grand final I painted my own version of the Omega Galaxy's logo on the outer side of the right leg. I think it ended up pretty neat.


That thingamagick on the nose needs something but I'm not sure of what. Because it's supposed to be a cockpit window, I guess I could paint it glossy black and maybe it looks good enough that way. Other than that there's not horribly much to do anymore, just a bit of touching up and freehanding some Clan logos and Point numbers. Oh, and the jewel-like things but they'll be the absolute last ones to go on the model after all the painting is done.

14.7.11

Fixin' the mistakes - or trying to, at least

That's how scabby the upper torso and gun pods are or were a day ago. Not good enough for me, not by a long shot. Though, in a sense that kind of a mark could represent something that was gently caressed by an azure bolt from a PPC or a beam from a LLaser. In any case I slapped pieces of 0,5mm polystyrene to cover the scabs and filed the edges down a bit to make them stand out a bit less.


It doesn't look any worse, at least. Last evening I went and rebasecoated the whole thing because this had gone beyond reparation with mere painting skills... Not that those pieces bother me, this isn't supposed to look like it just walked out from the assembly line ;) One of these days I start repainting it with some german panzer green, hoping it looks better than my previous attempt. We'll see soon!

7.7.11

That moment between vacations has begun again

The first set of vacations came and went, the trip to almost-in-laws ended with a bit of bringables, as it's a sign of a good vacation. To fix the Marauder and to prevent the same ones happening with the Warhammer I got some Tamiya's Putty and 0,5mm polystyrene sheets. Of course I tried first if a quick re-application of black wash helped. It didn't. So I'll take and repaint those couple of things completely again, what else can I do? Maybe I'll lay a piece of plastic to hide some scars on the Torso and gun pods. We'll see, though as long as the weather stays as hot as it is and the calendar tells me it's not a weekend, I'll do something else because spraypainting in the balcony under the evening sun doesn't work for me right now...

Naturally I had to get something new as well, it's not fun otherwise. In one of the shops I saw a model of the Kugelblitz but as it want to support my favourite toy/hobby shop in Gijón (Capua Hobby's), I skipped it. During my hobbying years I've built the main types of the Tiger series so next in line are the Panthers, at least the Panther and Jagdpanther. The latter being the latest entry in my TODO-queue.


At the moment my plan for that beast is to do a triple colour camo and on top of that I'd apply a light "field applied" whitewash, just like with good old Hobbes. This time I'll make it even better.
As if :P

16.6.11

Suffering for my "art"

The contents of this post is supposed to be little and short, for a change. We just had a neat heat wave in here combined with a very nice summer flu and that didn't really invite to tinker around in the kitchen's corner. Obviously the main reason was the flu, because I quite enjoy assembling and painting in the bright sunlight.

Those stupid-looking seams started to annoy me quite a bit. At first I tried to file them flatter but that didn't really go anywhere. So the next logical step was: take the Dremel out and start dremeling!
The end result wasn't quite as smooth as I had hoped but then again, is that really a horribly bad thing in a warmachine? Not in my opinion. Anyway, I started repainting the surfaces (top torso, gun pods, legs) once again.

Now that I look at how my fixing attempt looks like on the green elements, I just feel like throwing all that crap out of the window. Damnit. I really, really wouldn't want to repaint the whole model or anything... But we'll see what happens.

Maybe it's a good thing that I'm going for the first half of my summer vacation and I can just leave a couple of more random posts to be automatically posted at some point, so this thing stays alive and I don't need to stress about it at all.
Not that I *needed* to post once a week or anything :P

8.6.11

An attempt at the pattern of the Omega Galaxy

To celebrate a Monday afternoon I attacked Hobby Point in my quest for plastic jewel-like things. They've been recommended in the CBT-forums as focusing crystals for energy weapons, mostly on the miniatures but I thought that I'd give them a try with these two models, should I manage to actually find something suitable. It's been said that they look better than flat pieces of plastic painted with different colours, even with skillful jeweling (that article talks about cockpit jeweling but obviously it works on other parts, too). After a bit of asking around, this is what I got:

Of course I had to try them out! I dropped one of the bigger blue pieces in the slot and to my amusement it fit like a napalm bombing in a forest. Excellent. Then I tried one of the medium sized red pieces in the smaller opening. That one fit snugly, too. Lucky me. With the primer that red jewel didn't really show too well so I tried with a green one instead. That one was a lot more visible.
The point with all this is that the energy weapons need a focusing lense, -crystal or something similar. Of course I could've just got something lense-shaped and smooth but for some reason I felt that a diamond cut would look a lot better. With the colours I could tell what kind of a weapons this model has. Obviously PPCs have blue crystals and different sorts of lasers have their own colours. So far I've just painted all my miniatures' laser nozzles plain red, without any regard for the size (Small, Medium or Large) nor the type (normal, ER or pulse). I've never thought that I'd make normal lasers and pulse lasers look any different, so I guess I could go with small = red, medium = yellowish, large = green. According to the specs this 'Mech has a pair of Medium Pulse Lasers so I'd use yellow/orange crystals in the gun pods.
It works.
Later I checked that yes, the red crystals are clearly visible as well, after the gun barrel was painted with Flat Aluminium.

Next I had to test if the Omega Galaxy's pattern would work or if it ended up looking awful. So I started with a couple of small pieces and painted them with Tamiya's Flat Aluminium:

After that had dried I washed it with an ancient (I bought that paint more than a decade ago) Citadel Green Wash:
The first thing that came to my mind when I saw that was a Spearming bubblegum... not good. I let it be overnight and washed over it with GW's Badab black and at least that part looked a bit better that way.

Next I went and painted the rest of the torso and arms with Flat Aluminium and greenwashed it later. While applying that green wash, I decided that some AutoCannon parts should be left plain metallic to give the whole 'Mech a bit more detail. To me it looked more stylish this way.


After all that had dried nicely I applied a layer of Badab black on the whole set. In addition to that I also applied another layer of GW's Devlan mud over the metallic pieces.

I'm afraid I have to file those insane seams a bit, they look bad. Should've done it earlier, but for some reason I didn't. Oh well, they won't offer much problems, I assume.
After that I shall start working on the legs, maybe basecoating them with either Oily Steel or Gunmetal, followed by a black wash to keep a bit more uniform look on the whole model.

3.6.11

Project 3/2011


Finally the Marauder and Warhammer that I had received in January, had gotten to the top of my FIFO-based TODO-list. Unlike mr. L, who attacked his Warhammer first, I went directly for the awesome Marauder that I've "always" wanted in one scale or another. Sadly the playable BT-scale Unseen Marauders are pretty difficult or impossible to obtain, so these'll do just fine at this point.

So, I started on Wednesday evening by opening the box and wondering, what it contains. Three spruefuls of pieces, an eight-step instruction sheet and a sheetful of waterslide transfers that I archived away immediately. This walking tank is not going to be a silly anime toy but the emperor of the 31st century battlefields: a Marauder IIC.

Firstly I snipped pieces off the sprues, cleaned them up and built what was to be built, just like the instructions told. While I was test-fitting the foot pieces I noticed that because they're movable, it wouldn't be a good idea to leave the insides like they are. I quickly painted just about all the insides of the white pieces black so that I wouldn't end up swearing my lungs out when I finally noticed that despite all the time spent painting this thing nicely, all I could see were the insides of the war machine, being white as fresh snow...


After a while I decided that finished arms, legs and the hip piece were enough for the first spring, so I documented my doings and packed my tools away. For the next round.

While I was tinkering around the next evening I noticed that the instructions suggested somewhat weird things with the wrist pieces. The gun pods would turn sideways and that'd leave them in a ridiculous angle when the guns point wherever. So I mengelified the nicely glued seams with my x-acto knife so I could pry the pieces off without causing heavy, permanent and irrepairable damage. With a bit of heavy swearing and support-taping I got the arms fixed the way I wanted them to be. In hindsight: I should've played with the pieces a bit more to see how they'll end up being to prevent this happening yet again.

While the arms were drying I attacked the Autocannon that's located on top of the torso. As the piece was a long one, it had to be taped to keep it tightly connected while the glue dried. I also decided against cutting the gun barrel open and I just left it as it was, I didn't see it worth the hassle.

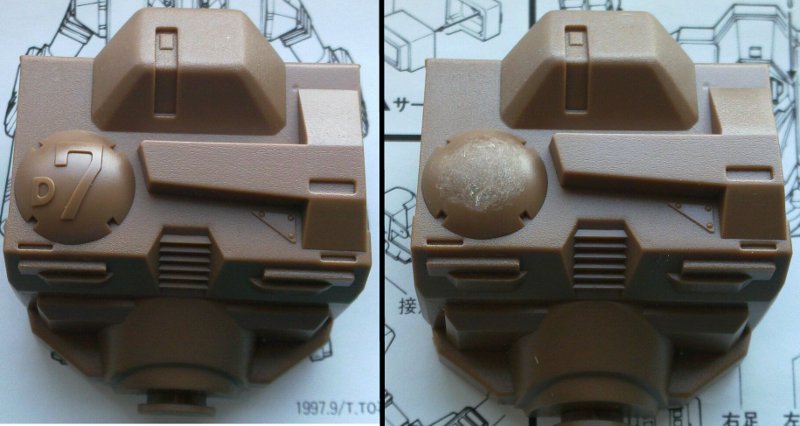
I added the rest of those decorational and supporting pieces to the torso. I can't even guess what that spherical thing in the front was in the tv-show but in this model it'll be a sensor window or something. Or at least I'll try to make it represent one :P

Of course I had to test-fit them a bit, after the pieces had dried for a good while. Looking good, though the bottom could be a bit heavier to give some more balance to the model as a whole.

Because there were so few pieces missing from the torso, I decided to add them too. All that was missing was a couple of antennae and the Jump Jet pieces. After this all the building was done, nothing was missing from anywhere anymore, the arms and legs don't need to be glued to the torso at all.

Today I eagerly started basecoating the pieces - while waiting for the Duke Nukem Forever demo to be downloaded. They all were done nicely in two sets: first the top and sides, and after a few minutes for the paint to dry, the last surfaces. After yet another paint drying break I tested if the pieces still fit together. It still looks nice. Himmel, I haven't met many models that are this quick to build! Though, as we remember from earlier Spring and the experiences with the Imperial X-Wing, it doesn't matter how quickly it's built - it'll take a while to paint it anyway. But that time is really nicely spent :)


Now I really have to ponder what to do with this thing. Personally I'm such a fanatic Jade Falcon supporter that I was going to paint these in my "own" unit's colours. That's Gamma Galaxy's 3rd Falcon Talon Cluster, but my game master Viiru said that "I don't approve of old junk to be painted in the colours of a Frontline Cluster :)" and he's actually quite right with that. He suggested painting these in the Star League Defence Forces pattern, but after consulting a couple of sources I have to say that the SLDF pattern is a bit boring and as I said, my Crusader heart beats for the Clan Jade Falcon.
To my joy I found a reference that lists the Jade Falcon Touman after the Battle of Tukayyid, if I remember correctly. For a while I searched for a proper unit for both of my 1:100 'Mechs and then I found it: Omega Galaxy - 8th Falcon Regulars
, apparently a Second Line Cluster. It's more than likely that their view of Clan politics isn't something I'd tolerate but I'll worry about that a bit later. This way I'd get both of these tin cans in the same Cluster, Trinary and even the same Star(the Talon Star of the Trinary Charlie). Not bad.

The most important thing to find out right now, is what colour they'd be, if I chose this Galaxy and Cluster. According to Camospecs the pattern would be a "metallic emerald green on top and a steel finish on the lower halves of their equipment. This symbolizes Jade Falcon`s superiority over Steel Viper. Red paint is splattered on the feet and shins of their 'Mechs to indicate their intentions with the Viper Clan". I may have to browse a site or a couple, not to mention several pdf's before this is settled. But right now it sounds decent.

These are very, very important details.