Mastodon
Showing posts with label Star Wars. Show all posts

11.11.24

Miniproject VII/24

Executor

Yesterday was the Father's Day in this corner of the globe, and what I've shared in the 'Mumblings about that was anything silly, like this time. The Return of the Jedi 40th anniversary block -decorated set was quickly built, all its six hundred-ish bits. Then it was moved to safety from the cats.

My construction proceeded like an AT-AT on Hoth.


Long stints of greebling was done, that was fun. I guess there could've been more asymmetric parts, but I also didn't remember the movie model that perfectly anymore, so I guess it was pointless to yap about it :D


Finished

It ended up looking fine. Even the cats didn't try help more than by biting the plastic bags.

Right after my quick and silly photos we moved the Executor to sail the space over the bookshelves, right next to MP-36 Megatron. This was good.

15.11.23

Project III/23

Running in the Death Star trench

The Autumn side Father's Day brought, in addition to the mumblings-unrelated things, some Lego! This has been a good theme for years and I was more than happy to build things.

It was an action diorama. I remembered seeing someone building (or upgrading) this one as an automata, but it could also have been a yet another fake memory of mine.


The trench

Building this set was quick and hassle-free, just perfect for a quick afternoon build. It only had almost 666 pieces so the expectation was "almost done".

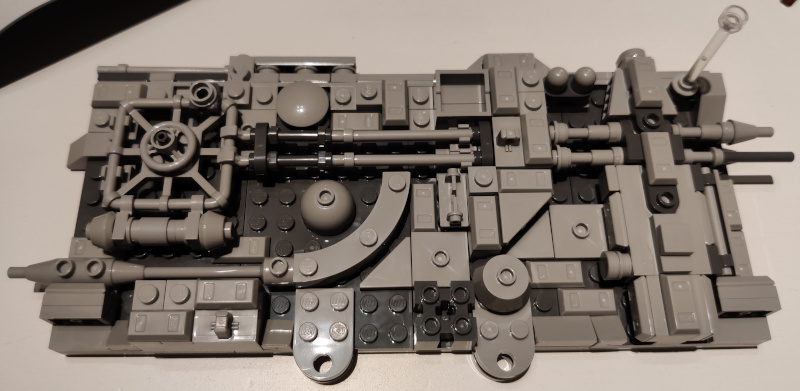
With the first bag's baseplate done, the next couple were full of greebling at random places. My set was missing one light grey ingot (99563) from the center-middle, that I could complain about to the Danes and get a replacement. I just wasn't familiar with the process and wasn't sure if I wanted to bother.


With the floor of the trench done I moved on to the sidewall, that received a good amount of greeblies. In the middle you could see a couple of the claws that I had set 90° wrong, but I fixed that as soon as I noticed.


The completed sidewall sat sturdily on the baseplate and it got then impaled into it with two (for some reason of different length) studs. Undoing this might be interesting, but I didn't see that appearing into my calendar anytime soon.

Black squadron

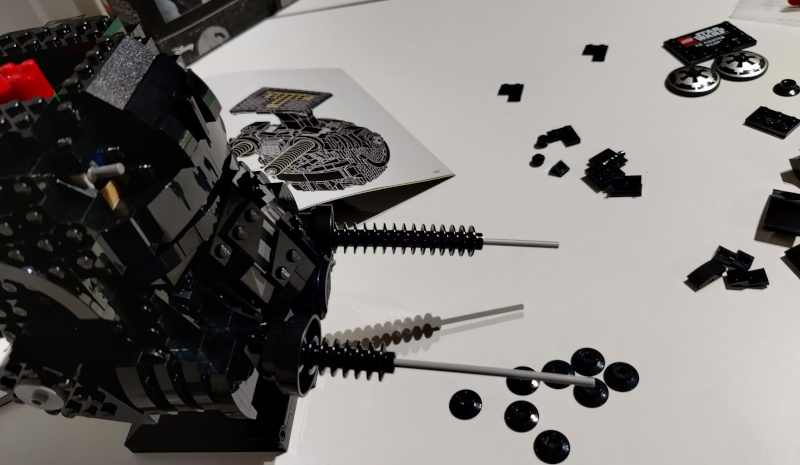
In this scene Darth Vader was escorted by two wingpeople, both in TIE/ln starfighters. Unlike what the instructions said, I set the green laser blasts a bit offset for both of the firing units, because I just found it more visually appealing than the dual-firing ones.


To get the best-looking and most active scene I might have to fine-tune the angles of these a bit still.


Red 5

Then the baddie of the scene, flown by the Red five from the Red Squadron of the space terrorists, his Incom T-65C was a pretty decent representation in this scale. While building it I was wondering a bit why the spaceframe's front and back halves were only connected with two studs instead of all the four available, but maybe it looked better this way, greeblie-wise. The S-Foils were not adjustable: the split-wings were going to stay open so you couldn't use the fighter on a more calm scene just as it was.


Diorama

With the fighters built and installed only the Taim & Bak XX-9 heavy turbolaser turret was missing. It was a pleasantly poseable piece, even though it didn't have any green turbolaser blasts for the barrels. As befit the scene.


We were running seriously low on space on the shelves with these various Lego sets we had accumulated over the years :D

30.3.22

Project I/22

Darth Vader's meditation chamber

This year's first Father's Day, always on 13th of March, brought something to build, a Lego set! Of course I started building the same afternoon.

The couple of first bags concentrated on the floor block and the pedestal of the sphere. The stairs were pretty neat, very imperial as they ought to be.


Executor's captain, admiral Ozzel, looked a bit concerned. As far as I knew the previous failures of his weren't told yet, but I expect that to be handled by a story or a few. In the end, he paid for his incompetence with his life in the middle of a tcon.


Next up was the lifter of the upper hemisphere. This setup felt pretty damn flimsy when I was testing it by itself. When the top half was attached, it worked just fine, which wasn't really a surprise.


Finished: Project I/22

This one ate two weekend afternoon build sessions mixed with everything else in a normal weekend. It was a fun and fun-looking set. The Project Assistant 2 took care of playtesting and enjoyed lots. All tests passed.


11.11.20

Father's day 2020 (Project V/2020)

A TIE Pilot's helmet

The father's day took place again and brought some Lego with it. I had seen a couple of photos of these helmet or bust sets before, but I wasn't sure if I had witnessed one with my own eyes. Not that it told much during this corona season, as I spent even less time in toy shops than before. The helmet was going to be stylish and at this point it was spread out into six bags of pieces.

The front of the box

The rear side of the box

Instructions and a sextet of bags

Constrconstrconstrconstr

Of course I started building the same evening, and in my delusions of grandeur I thought I'd be done in one sitting. The first bagful of pieces resulted in a colourful core of the helmet.

Bag 1: the helmet's colourful core

The second bagful gave us the stand and the neck curve for the helmet. Some dedicated builders have been doing these round shapes just for fun, I found it pretty complex work.

Second bag: the back of the skull

While building the subassemblies I didn't guess that these were going to end up as the forehead and the lenses of the mask.

Bag 3: another earful

Interestingly the grimacing Stormtrooper-mouth was a bit difficult to keep in check, thanks to the angles and many hinged connections. It behaved decently in the end, even though I managed to drop those off a couple of times later on.

Bag 4: face

When I was wrapping up the first evening I had reached the end of the left ear/cheek/chin section. This was pretty slow work, but I wasn't rushing, because I wanted to enjoy building in peace. The pilot was missing her chin, while there were a couple of part bags left still.

Face progress

Evening 2

On Monday evening I sat again to build. Taught by the left side, the right side went much quicker and easier, as these symmetrical builds tend to go. Again the biggest problem was the jaw-complex's final part that had to be installed much deeper (closer to the mouth) than what I imagined from the picture in the instructions. That's why I had gotten the mouthpiece fall off a few times while working on the left jaw.

Working on the air hoses

The most beautiful printed radar dishes ever were to decorate the forehead of the pilot. I could want a few spares of these pieces, just to own a few.

Imperial emblems

Everybody here knew that the Imperial Navy's gorgeous TIE series ships did not, according to the old canon, contain life support so the pilots had pressure suits. At this point the jaw's air pipes looked a bit more like the insulators one can usually see next to high-voltage power lines.

Air pipes

Air pipes

Air pipes done

Finished

After a bit more than two hours of tinkering the bust was finished. These shiny black pieces were impressive-looking, they just left me wondering if I had left too many fingerprints. Just like with the Metal Earth Models, an extra source of concern.

The completed helmet

A top front view of the completed helmet

Right side view of the completed helmet

A top front right view of the completed helmet

A top front left view of the completed helmet

A rear-left view of the completed helmet

By the Emperor, it was magnificent!

Low front view of the finished helmet