Mastodon
Showing posts with label F-16A. Show all posts

19.8.15

Finished: Project IV/15

The flying green man in his mysterious plane


Project time: 3h

So there, the flying thingie without any national markings got finished. I guess you couldn't not notice those numbers hiding inside the square brackets. With ease they were supposed to be recognized as an accumulating minute counter, the last one ending at 180. No, I didn't check the time spent with a stopwatch, but got a believable estimate of active time spent.


Why did I start fooling around with something like this? Because that's what gets asked surprisingly often: "How long does it take to do one of these?". My default answer has been "A handful of hours actively but months if you look at the calendar, depends on the model and who knows what else". This one, as I clearly stated in the assembly post, I slapped together like a rabid beast and it went pretty quickly, if you look at the minute counter. All the nonsense in June-July ruined my original speedbuild idea.


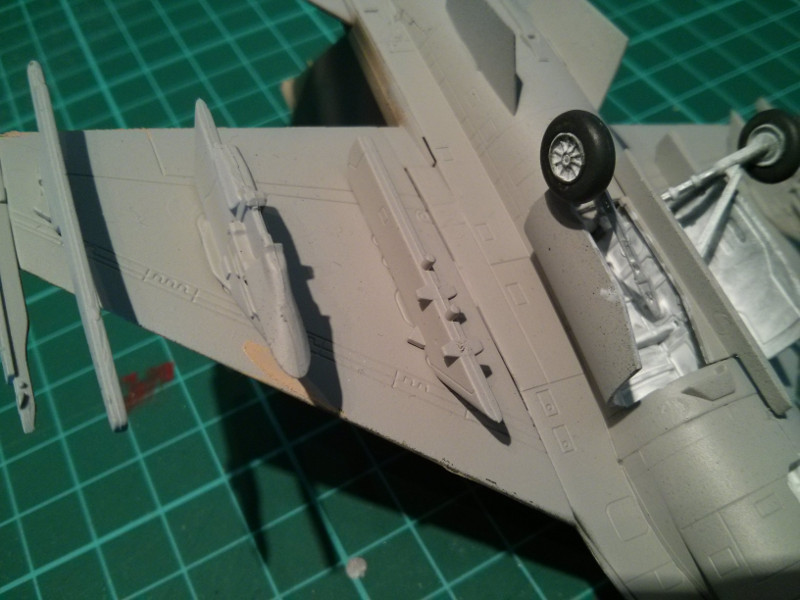
Of course one can tell with their eyes closed that I didn't do things, especially some details as carefully as they would've deserved. Just look at those drop tanks. I guess there are some gaps in the airframe itself as well, if looked at very carefully. Some puttying and sanding would've been enough to make the result that much better and I don't think it'd increased the completion time much, not even an hour.

Almost OOB but not quite

This Fighting Falcon could've ended looking ok without the rocket pods, but a totally toothless (the M61A1 doesn't count) would just have been very boring and wouldn't have fit the theme at all. I did think of adding two more pods, but when I looked at the pylons, to me they looked like the missiles only -kind, so I let it be, so that the ones who actually know something about semimodern planes wouldn't laugh themselves silly ;)


64th Aggressor

One thing I really have to improve is my photography. Or at least the backgrounds. I tried to achieve the same position and look where the MiG-29 looked really cool to me (and apparently some others). Maybe I should've taken a look at my older stuff instead of always trying to reinvent the wheel.


12.8.15

New methods

Washes

All the camo-painted surfaces I washed with Vallejo's Model Wash for grey & dark vehicles (76516). The remaining grey parts I then washed with their Model Wash for light colors (76513). Previously I had already applied a bit of my beyond ancient (bought in the very late '90s) Citadel's Blue Glaze, which is still alive and working. The effect is very subtle, if even noticeable. Then again, you could say the same about the tips of the rockets in this scale, so I didn't bother worrying about it.


[135]

Clearcoat

The trickery department's tip of the Project was as follows: first the clearcoat, then the decals, finally the dullcoat. This was supposed to eliminate the ever so annoying silvering effect completely and help with who knows what else. If I did my weatherings more variedly than what I do, there'd be multiple coatings between each step.

Big boys have been yelling around the world that "this is the only way to do things, you hear?", I thought I'll give it a shot. First I applied a clearcoat (Vallejo Gloss Varnish (70510)) on the model, so it and the washes would be protected from the water, if nothing else. This would've been a good idea with the proto-hog already.

First thing in the next morning I took a look at how my model looked like and I was a bit disturbed with the glossiness. In the best case everything would be different the next morning, but still. Well, someone had to be the guinea pig and the wheel of misfortune stopped on the Falcon.


Oh myyy...
[140]

I still hate decals

My preparation for the decal part of the project was traditional. I threw all hope from the window and assumed that the model would follow very soon after. I decided to trust the mumblings in the net that claimed that the silvering would indeed not be a problem, so I didn't cut them off as paranoidly as I have previously done. Otherwise you couldn't - maybe - tell the difference between this method and my traditional approach.


Awesome. The second decal (between the canopy and the refueling slot signs) got bent and slightly tangled thanks to its annoying zigzag-shape. With a bit of swearing and frustration I got it straightened up somehow and soldiered on.


None of the other "NO STEP" signs gave me no problems, as long as we ignore that I put one of them (the rear one of the right wing) facing the wrong direction. Of course noticed way too late to fix it. There was nothing going on to the bottom, except a strange four-part red line behind the extra wing-thingies. Then the drop tanks got two red dots and two markings I assumed to be for some "lift here" info. Of those I ruined both of the ones going to the middle of the drop tank, they just went all spaghetti on me and I just couldn't salvage them no matter what.


This decal sheet had no 'murican roundels, just a couple of Belgian ones. I had no use for them, so I let it be with this thought "it's a make-believe enemy, so it'll be a flying green man".

[170]

Dullcoat

Applying Vallejo Matt Varnish (70520) was my last item on the list. Before that I dabbed the model carefully with a cloth to remove any potential water residue. Then I started brushing on the coating. I started on the bottom, from the rear of the plane, going from the center outwards. This way I could hold onto the tail fin and keep the model nicely supported while working on it and the weird angles.

When done, I flipped the model around on its tyres and kept applying, still holding onto the fin for support. Now my brushing approach was the opposite: from nose to tail, from outer edges inward (to make sure that the tail fin was the last one to be processed).

In the middle of all this I noticed that the varnish had started to dry on the forward areas and I got really excited because the plane started to look just like the interwebs folks had claimed! It's almost shocking that there's some forum stuff that actually is true.


I took a couple of photos the next morning to see how things were going. It wasn't looking bad at all. The trickery department didn't fail but was actually useful. Yay! I could even go as far as declaring that the 'mumblings approve of this method.


[180]

5.8.15

The gunnery dept

An enemy plane should look like an enemy, to make it more believable in the war games, I guess. There were a couple of really fun-looking bombs in the AtG box, that I assume to have recognized as GBU-8 bombs with the friendly assistance of Google. Somehow they didn't feel like this Falcon for me, but more like the Hog. I decided to leave them in the box for the time being. Good old iron bombs also didn't have the feel, but rocket pods...

LAU-3


The nineteen-rocket capacity LAU-3 was something that I liked an awful lot in the OFP's helicopters. I built two pods to begin with and pondered if I wanted a double amount just because of the attitude. My main problem with these (and every other modern aircraft weapon) was the compability of the weapon and the plane's hardpoints and pylons. In the end I decided to leave my fancy plans and stick to two of these and the double drop tanks. And if I really needed to, I'd be able to set up two more pods pretty quickly.


The pieces were primed along some other stuff and later on I painted them light grey just like everything else on the bottom side of the plane. The faces and the rocket tips I painted metallic and later on I applied a bluish wash on the rocket tips (assuming that they don't play their war games with live ordnance).


[110]

The weapons platform

At this point I tore the canopy masks off. There had been a bit of leakage in a couple of places, but I scratched the thin sandy coloured mess off without any issues.


There were some comments about the pylons in the Finnish version. I did check the instructions and I had been wrong with my memory. The innermost pylons were for the fuel tanks and the middle ones for something else. I assume that the LAU-3 pods are ok to install on those and if not, tough cookies. The unexcusable sand-coloured mess I painted over just afterr taking the photo.


Paintjob finished

The last part to be painted was the engine nozzle. That I simply painted with Gunmetal Grey (VMC 70863) to the best of my understanding. I decided that this was it, all I needed to do anymore was to attach the tools under the wings. Next I'd move on to the washes, clearcoat, swearing with the decals and finally dullcoating the whole setup. At least that's what I had thought in my sick mind.


[120]

29.7.15

Camofalcon 2: the return of the pattern's revenge

Additional colour 1

Last Wednesday I finally got to sit down next to my model and I happily airbrushed a couple of wide brown (VMA 71125 USAF Brown) bands across the plane. I had not planned on the pattern in advance, as usual. This time I felt that the form-breaking worked much better than in my unpublished test version titled "let's just see how the colours play together".


[95]

Additional colour 2

My original plan was to use just a little green (VMA 71124 USAF Green) and even then on a limited amount of surface coverage. Somehow it looked odd with those small patches. The final result can be seen below. Of course the masking tape obscures everything a bit, I just didn't bother tearing them off for just one photo.

[100]

Extramumblings

The radar (and whatever else) protecting nose cone needed to be painted with dark grey or even soviet green. After a quick search I found a pic of an Aggressor (a F-15 if my memory serves), that had a light grey nose cone and a very similar-looking pattern. With that I decided that I'd do that myself.

First of all I masked the nose cone and I also protected the nose wheel, as the front landing gear bay door had got a bit of overspray and needed to be touched up. I'd just take care of the last paintjob during one quick session.


The result looked good to me. Next I'd need to either wash the model or apply a clearcoat before proceeding to decals and other nonsense.
[105]


15.7.15

Detail work

Hand-painting the details

As I had pondered earlier, I picked up a paintbrush and painted the landing gear bays the old-fashioned way. The white I have been using (VMA 71001 White) is clearly in the end of its lifecycle and usefulness, but it's been there for a good bunch of years already. I wouldn't consider letting that in my airbrush anymore, but this method was still ok. Besides, slightly uneven and "used" result kinda worked here pretty well.


I had already painted the wheel hubs white, so I just glued the missing main wheels on at this point. After that I proceeded to the metallic areas (VMA 71065 Steel). From a certain point of view some of these should've been painted before the assembly, but it worked this way too. I didn't start adding special weathering or chippings, as my idea was to go for a plane that could maybe be just out of full maintenance.


The engine exhaust nozzle I painted white on the inside, just the way my sources claimed it would be until its first flight. For some reason the tube wouldn't stay white for long, while operational. I didn't get to wash the business end of the engine yet, as the steel paint was still wet.


To wrap up my session I painted the wheels themselves black-grey, as my basic approach has been. This time I didn't file or sand the bottom arcs of the wheels flatter, just to do things differently. Maybe this was a horrible idea and my model would end up shaking like a see-saw, but that'd be a consideration for another day.


[90]

8.7.15

Camofalcon

A safe choice for the bottom

I started the actual painting on the belly of the plane, as I hadn't been able to decide what the pattern should be. My fingers kept itching so I did something at least. I did my work on the belly, racks/pylons and the unattached drop tanks with light grey (VMA 71121 USAF Light Grey). Somehow a light underside sounded like a safe option, no matter what the rest would end up like.


The landing gear bays and the landing gears themselves I left intentionally untouched and most likely, for a bit of manual painting. Of course I could spend a good while applying a "sick paranoia"-level of masking and paint these few parts white with a couple of quick puffs from the airbrush, but I think it'd be quite a silly way to utilize my limited time resources.

The actual camo pattern

After a horrible amount of headscratching and pondering I found out that if I wanted to avoid a boring greyscale setup, the only actual, factual apple-pie flavoured options were the salad-y European I or the much less restrictive Aggressor team pattern. Of course they all were camo-painted all around, unlike what I had done.

Not that redoing some painting would be a bother, but as always, the point is what I want to do. The mess of greens didn't look nice, something more desert-like sounded much more interesting. After a bit of googling and whatnot a "red team" or the opposing force part of a wargame had used some of these desert patterns.

[70]

64th Aggressor Squadron

Wonderfully these folks use the Soviet/Russian patterns and those, those did include what I was looking for. The most important thing in my dislike for greyscale is that it's not fun or interesting. So, a couple of browns and some green added in for good measure - that's much more exciting in my opinion. Oh, and the planes of the our eastern neighbour had lighter coloured undersides (I didn't start mixing up a Kolkhoz Blue anyway) so this'd work just fine.

First step first: I toned down a sand paint (VMC 70819 Iraquian Sand) and sprayed a few form-breaking bands around the plane. These were done pretty widely and without too much worrying, as the other two colours would be controlling the area more. I just wanted to avoid a "paint by numbers" approach with bothersome gaps in the pattern.


Then I accidentally did something stupid and had to take four weeks off. Sigh.
Whenever I get to paint again, I'll be using brown (VMA 71125 USAF Brown) and green (VMA 71124 USAF Green), a setup I felt being pretty close to what this thing is supposed to look like.

[edit]  There had been a mixup with my spare part order, and I didn't get what I needed. We pondered about all this and we assumed, that the R-004 Fine Tip that they did have, could fit in the airbrush and might only affect the spray pattern somewhat. I decided to take the risk and I invested in one of those. Later that evening I tried it out and it wasn't too good. First the air didn't move one bit, but by loosening the spray regulator (the piece in the tip with a ] -shape) air started moving by the press of the trigger. I knew I'd have to repaint everything but I wanted to see how the colours worked out. The result was looking fine, if you forgot the splotchyness.

R-004

The same evening I emailed my royal supplier and ordered the specific part I needed (R-003 Ultra Fine Tip). Now we'll just have to wait and see when they get those in stock. If I'm very lucky, it happens before I leave for my vacation but most likely it takes another four weeks (for some reason they don't deliver stuff every day :) ), but I've got my vacation and I can tinker on other things meanwhile.

[75]

1.7.15

Painting confined spaces

Painting tightly

I approached the cockpit cautiosly, to say the least. After a bit of thinking I decided to paint all the interior spaces with the trusty black-grey, completely ignoring the instructed light grey. Why? Because there won't be much to be seen from the window and what can be seen was going to be very dark anyway. So: irrelevant. I did paint the ejection seat's padding olive green, as suggested.


Decals

Cockpit decals were the best-working ones in the previous plane, so I decided that if nothing else, I'll use those. The armrests got a decal each and the instrument panel got a small one. The rightmost decal I had to cut a bit because the joystick was a bit on the way.


All three went on nicely and effortlessly. After I was done with the decals I white glued the targeting glass piece while I remembered its existence. That's all the interior work I did and left the cockpit as is.

The canopy

Thanks to the shape of the transparent pieces I followed my gut feeling when I masked them. I left an open strip in the front of the rear piece, as it felt like the best place for the canopy seam. Maybe I did it wrong, but it's way too late to worry about it now.


After the masking was done I painted the insides of the non-masked areas with black grey, just like I did with the N/AW project. The next day I white glued these pieces onto each other and the plane, sealing the fate of my Falcon's cockpit. All the blackish lines you can see in the photo are on the inside, as I didn't think it made any sense to start spraying the primer on top of the curing pieces yet.