No, I didn't have enough time to finish the FlaK. I'll finish it next year, it made no sense to ruin the model by hurrying too much.
I continued painting the camo with the green and kept using the same stencils. The wheel hubs ended up being awesome - the rest didn't. Both the fenders and shield halves look more like mouldy bread than parts of a war machine.
Sigh.
Anyway, the idea works, I just have to improve the stencil so it works better with the pieces I want to paint. This "one masking piece works everywhere" doesn't work too well, apparently. It wasn't a horrible defeat, it just requires a bit more work. And not horribly much of that, after all, just some modifications. If I remember, I'll post some proof next year.
Now completely off-topic for the whole blog: tomorrow we'll take a flight somewhere else and we'll see if the yule goat brings something nice for my hobby or if I have to go and get everything myself :) Eating well at those latitudes is a given, at least for someone like me who doesn't exaclty love the traditional foodstuffs.
May the next year be more active than this one - for each and every one of us 8)
21.12.10
16.12.10
First mottling attempt
Earlier this week I got this thought in my head that the air can that I started in the summer might not be that good anymore. So I took and changed it to the new one. And himmel, the new one shot air like a storm wind unlike the previous one that was closer to a lungless chainsmoker... If those cans run out that quick with my ways of working, a compressor might not be a bad idea at all. As long as they don't cost monkeys covered in chocolate.
The main thing is that now the model is nicely covered in Dunkelgelb and no basecoat is visible anywhere. *cough*

So I decided to take and attempt the "mottle camo" idea I was talking about the last time. I also happened to have a bunch of small cardboard pieces that were protecting the photo-etch pieces. They were a bit big for what I had thought, but then again, it's better be safe than sorry. Especially knowing how my experimentalism usually ends up.
Anyway, if that ends up looking even half-decent and keeps the rest of the model clean, I'll call it a victory. To begin with, I decided to start with the brown and maybe go for the green tomorrow when everything's nicely dry. Unless I have to go back and cover everything with dark yellow again. Judging by the stencil itself after use, maybe I should've adjusted the airbrush head to be a bit smaller, to avoid wasting that much paint:

The wheel hubs were the first victim of mine, they ended up looking pretty fine to me. Encouraged by this tiny victory, I turned my attention towards the shields and the fenders. They didn't end up looking as nice, but we'll see how it all goes when I've added the green as well:
 You can see some splashes and shit, some of the blots aren't quite what I was going for but then again, this was my first attempt and if you don't count the wheels in, all the pieces were a bit "funny" to paint by their shape / size. I believe this'll be a lot more doable with testing and developing (a couple of dozen iterations maybe?) and quite nice looking, too :)
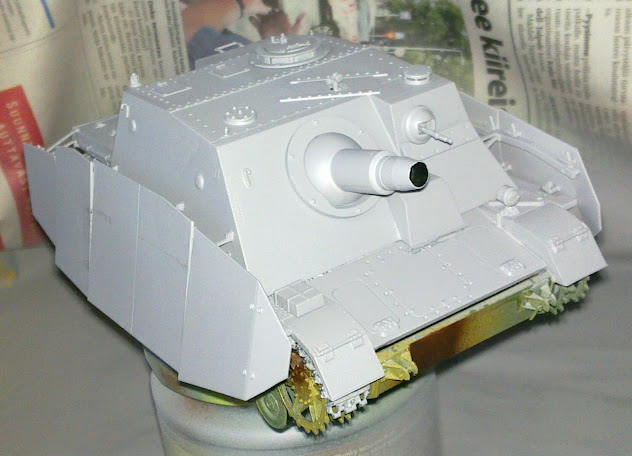
To finish up my evening's painting session I took my paintbrush and started painting the gun's barrels back - again. I'm afraid I have to throw that brush away or redelegate it to weathering, because it's not useable for small details or finishing touches anymore. Oh, I had almost remembered to attach the armour pieces to the barrel-thingies that I forgot to use ages ago. You can see them in the photo, but for some reason I managed to take this pic from an angle that mostly hides one of the left side barrels.
But these aren't final pics but just stuff I take on the go to post here, so who cares at thise point? For that same reason I don't modify them more than just cropping and downscaling.
 As a nice end a photo of that damn gun from another angle, that traditionally shows that no, there's not enough paint inside the muzzles after all. How the hell does this always happen?

If I get to "finish" this model on the weekend, as I'm insanely half-expecting, good. Otherwise it's going to be finished next year.
How exciting!
The main thing is that now the model is nicely covered in Dunkelgelb and no basecoat is visible anywhere. *cough*

So I decided to take and attempt the "mottle camo" idea I was talking about the last time. I also happened to have a bunch of small cardboard pieces that were protecting the photo-etch pieces. They were a bit big for what I had thought, but then again, it's better be safe than sorry. Especially knowing how my experimentalism usually ends up.
Anyway, if that ends up looking even half-decent and keeps the rest of the model clean, I'll call it a victory. To begin with, I decided to start with the brown and maybe go for the green tomorrow when everything's nicely dry. Unless I have to go back and cover everything with dark yellow again. Judging by the stencil itself after use, maybe I should've adjusted the airbrush head to be a bit smaller, to avoid wasting that much paint:

The wheel hubs were the first victim of mine, they ended up looking pretty fine to me. Encouraged by this tiny victory, I turned my attention towards the shields and the fenders. They didn't end up looking as nice, but we'll see how it all goes when I've added the green as well:

To finish up my evening's painting session I took my paintbrush and started painting the gun's barrels back - again. I'm afraid I have to throw that brush away or redelegate it to weathering, because it's not useable for small details or finishing touches anymore. Oh, I had almost remembered to attach the armour pieces to the barrel-thingies that I forgot to use ages ago. You can see them in the photo, but for some reason I managed to take this pic from an angle that mostly hides one of the left side barrels.
But these aren't final pics but just stuff I take on the go to post here, so who cares at thise point? For that same reason I don't modify them more than just cropping and downscaling.


If I get to "finish" this model on the weekend, as I'm insanely half-expecting, good. Otherwise it's going to be finished next year.
How exciting!
10.12.10
Trickery of random quality and some painting at last
So I finally got the basecoating redone (as I had originally intended). Because it's so damn cold and dark in the balcony at this point, I decided that the kitchen is a really good place to paint with the airbrush. I mean, those Vallejo model air paints don't really smell, unlike that sprayable primer.
The first pic shows the gun right before re-basecoating. I had to do some trickery to get those photo-etch pieces stick. A trick that I had come up with with my OmniMech projects: my modeling glue and some white glue. If you use a thin layer of white glue on the other metallic piece and and some liquid glue on the other piece, they set very quickly when they get in contact. It's pretty handy with pieces like this that don't have much contact surface to begin with. And when the liquid glue either dries too quickly or way too slowly.
Maybe it looks a bit silly from a certain point of view, but who cares if I get the thing done so you can see at least something in the first place? :P
 First I had to clear some space on the desk, then dig up for all the junk like the canned air, my breathing mask and the painting box. Something was missing. That damn airbrush of course. Back to the storage room it was.
Luckily this apartment is so small that you can't really lose anything forever (sarcastic reference to my military passport, wherever the hell you are).
I had decided earlier, that the FlaK shall be mostly painted in dunkelgelb, with a couple of camo stripes on the shield halves, fenders and the wheel hubs. The biggest single parts, that is. When this dark yellow is fine enough after a couple of layers, I'll repaint the gun barrels black and then go for the camo.
Maybe I'll try to come up with a stencil of sorts to make a ridiculous attempt at a mottle camo, I saw that in FSM's rss feed, regarding the mottle camo on a Luftwaffe plane. I think it sounds cool and I should maybe try.
 The rest of the pieces:

The point is to make a stencil and keep it slightly off the model while you paint with the airbrush. This way you end up nice, soft edges to the camo. At least that's in theory and what the übergurus accomplish. I'm not a guru, as we've noticed quite a few times already...
And now that I think of it, I'm almost in a hurry already if I want to get this project finished this year! The last 1,5 weeks I'll be abroad and I guess that the last days before flying will be busy enough so I won't have that much time to waste with silly things like this. We'll see.
The first pic shows the gun right before re-basecoating. I had to do some trickery to get those photo-etch pieces stick. A trick that I had come up with with my OmniMech projects: my modeling glue and some white glue. If you use a thin layer of white glue on the other metallic piece and and some liquid glue on the other piece, they set very quickly when they get in contact. It's pretty handy with pieces like this that don't have much contact surface to begin with. And when the liquid glue either dries too quickly or way too slowly.
Maybe it looks a bit silly from a certain point of view, but who cares if I get the thing done so you can see at least something in the first place? :P

Luckily this apartment is so small that you can't really lose anything forever (sarcastic reference to my military passport, wherever the hell you are).
I had decided earlier, that the FlaK shall be mostly painted in dunkelgelb, with a couple of camo stripes on the shield halves, fenders and the wheel hubs. The biggest single parts, that is. When this dark yellow is fine enough after a couple of layers, I'll repaint the gun barrels black and then go for the camo.
Maybe I'll try to come up with a stencil of sorts to make a ridiculous attempt at a mottle camo, I saw that in FSM's rss feed, regarding the mottle camo on a Luftwaffe plane. I think it sounds cool and I should maybe try.


The point is to make a stencil and keep it slightly off the model while you paint with the airbrush. This way you end up nice, soft edges to the camo. At least that's in theory and what the übergurus accomplish. I'm not a guru, as we've noticed quite a few times already...
And now that I think of it, I'm almost in a hurry already if I want to get this project finished this year! The last 1,5 weeks I'll be abroad and I guess that the last days before flying will be busy enough so I won't have that much time to waste with silly things like this. We'll see.
5.12.10
Swearing and crawling ahead
That photo-etched shield has been a huge problem. Damnit. Maybe this can be salvaged somehow, but it doesn't look too bright at the moment.
To compensate for the slowness of the shield building, I started to work on the carriage. I haven't got too far with that, either, but at least I've got something done for real instead of regluing metal pieces back together after they've broken off for some stupid reason....
Photos? Haven't bothered taking them because the slowness annoyed me too much. I mean, "yay, I got four pieces built" doesn't really make cool pics. Maybe next week.
26.11.10
Love 'em, hate 'em
Photo-etched parts.
I can't get around how weird they are. They're awesome with all the details and true-to-scale size, at least moreso than plain plastic pieces. Bigger parts like grilles, handles and armour plates have never been a problem of any sort, they're nice to work with.
But those 1,5mm x 1,5mm buttons that are to be bent with some dark magicks to form a couple of 90º angles and after that they need to be glued to the model - when the glueable surface is close to nothing... Or those slightly longer but somewhat narrower pieces that should be bent as well and then connected to the aforementioned part. Flaaaaa.
Usually those things are done with more or less swearing, and done, not skipped. More or less twisted but hey, I don't own any precision instruments for these things - yet. From the PE pieces of this kit a few have made a nice "ka-zing!" sound followed by some clicks when they've fallen on the floor, never to be found again. Oh well, what can I do? I tried, then gave up and the vacuum cleaner shall solve the problem of the lost pieces.
Now, after another deep breath, I'll keep reporting.
In the early week I fixed the ammo cartridge holders (it was somewhat frustrating at times). Maybe a couple of the separators went wrong but I imagine I'll get to fix them if needed. If not, I'll claim that the crew broke them. You know artillerymen and how they are ;)

Next I attacked the targeting equipment. Nothing awful happened, building was fun and quick. At least if we forget that the PE-crosshair device broke off at least five times, that's why it's missing from this photo:

This evening has seen me fighting with those ridiculously tiny pieces and while a bunch of them were drying, I built the base of the gun (all seven pieces). I also tried if the gun even fits on that thing, it did. Goody.
This photo has the upfolded loader's chair-thing drying. The left one shall wait in peace, because I had to mengelify those pieces off, they weren't designed to be reattached... so we'll see how they end up. Or where.

The model looks a bit weird at this point, but it's just because the flat gray basecoat is a bit difficult for the eyes to get a hold of. Or that's what I tell myeslf.
I really, really shouldn't have said that this is almost done in the previous post :P
20.11.10
A piece at a time
I got to build over a couple of days, but didn't get too far anyway. A piece at a time, so I don't have to go for a new project too soon. Doesn't look like this'll take horribly long build-wise, it has so few pieces. Maybe planning the painting will take more time than the rest of the project together?
Famous last words, anyone? Maybe I'll get to regret them the next time already...

There's nothing too special about these photos: barrels are attached to the rest of the gun and the base is more or less done already. Mostly that seems to be just the controls for aiming the gun in x and y axises. Being quite uneducated about AA-guns, I assume that the x-axis traversal is being controlled with those pedals:

Now if I could remember, what's going to end up hiding that hole on the rear part of the cradle, I'd be a lot less bothered by this picture. I also had to cut a couple of extra pieces off the "platform", looks like that went well for a change.
 I got to the photoetch-parts, as you can see. Those still need some extra pieces in them, but I'll wait until the glue keeping the boxes together dries first.
Only when I was checking the latest wip photos, I noticed that the left and right side guns are not pointing at the same direction. Got to do something about it.

It'll be awesome 8)
Famous last words, anyone? Maybe I'll get to regret them the next time already...

There's nothing too special about these photos: barrels are attached to the rest of the gun and the base is more or less done already. Mostly that seems to be just the controls for aiming the gun in x and y axises. Being quite uneducated about AA-guns, I assume that the x-axis traversal is being controlled with those pedals:

Now if I could remember, what's going to end up hiding that hole on the rear part of the cradle, I'd be a lot less bothered by this picture. I also had to cut a couple of extra pieces off the "platform", looks like that went well for a change.

Only when I was checking the latest wip photos, I noticed that the left and right side guns are not pointing at the same direction. Got to do something about it.

It'll be awesome 8)
11.11.10
A new beginning - again
I've been neglecting painting and other methods of modeling because the holiday trip and hunting for the flights has eaten plenty of time. All that results in a somewhat slow and easy start for my newest project.
That project is, as planned before, Trumpeter's 1/35 20mm FlaK38 AA-gun. I've only built one Trumpeter model before, a Nebelwerfer 42, which was awesome and one of the best models I've ever built and painted, in my own opinion. Completely unlike Italeri's awful 15cm Panzerwerfer 42 auf Schwerer Wehrmachtsschlepper... Maybe I'll get some pics of those posted at some point in the future.
But to the point. This is the box before the official openage:

And the contents of the kit:
 There are a bunch of sprues and it looks like the sprues are pretty sensibly arranged, with three sets of photoetched parts. Who knows what's going to happen with those for I've never done much with pe-parts to begin with.
I had started with cutting off a couple of "start with these"-pieces, such as the four gun barrels the two pieces where they get connected to. Today I marched to the cold and dark balcony and sprayed the basecoat on the sprues and the pe-sets. A couple of them consisted of pieces that let me spray the other side, too. Less of a hassle the next time. Of course I'll need to fix the basecoat of the pieces because all of them are connected to the sprues, I just wanted to get the most of that done as quickly and effortlessly as possible. Yeah, I was feeling lazy. Besides, painting all those individually is painfully bothersome.
 After that I went and painted the end parts of the gun barrels with black-gray. The barrels I had filed clean earlier this week, so there were no injector marks or anything to ruin the experience. The reason why I decided to paint these parts at this point, is that if I don't, they'd be impossible to make good-looking later on when they're glued to the structure. Not that I expect to get them perfect this way, either, but at least I've eliminated one source of problems early on.
 That's it for this post, maybe this project gets some speed now that I have got it started for real. Could be that I won't be able to paint much on the weekdays because it's getting so dark so early and I'd have to do all that on the weekend. Not going to paint inside in this apartment and the balcony is difficult to get nicely lit. Anyway, I intend to do most of the painting with the airbrush because I got a new can of air and I also have to learn to use that damn thing. And I sure as hell won't learn anything if I don't do anything :P
That project is, as planned before, Trumpeter's 1/35 20mm FlaK38 AA-gun. I've only built one Trumpeter model before, a Nebelwerfer 42, which was awesome and one of the best models I've ever built and painted, in my own opinion. Completely unlike Italeri's awful 15cm Panzerwerfer 42 auf Schwerer Wehrmachtsschlepper... Maybe I'll get some pics of those posted at some point in the future.
But to the point. This is the box before the official openage:

And the contents of the kit:

I had started with cutting off a couple of "start with these"-pieces, such as the four gun barrels the two pieces where they get connected to. Today I marched to the cold and dark balcony and sprayed the basecoat on the sprues and the pe-sets. A couple of them consisted of pieces that let me spray the other side, too. Less of a hassle the next time. Of course I'll need to fix the basecoat of the pieces because all of them are connected to the sprues, I just wanted to get the most of that done as quickly and effortlessly as possible. Yeah, I was feeling lazy. Besides, painting all those individually is painfully bothersome.


1.11.10
Announcement: Project 3/2010 is completed
Sturmpanzer IV / Brummbär in the american vocabulary, my first tank project in years (and just about the only scale model in something like five years) is now completed. The tank has been put in the shelf after a bunch of photos had been taken. Those photos have a ton to improve, just like the model itself. But this is how it goes and maybe the long lost semi skills return with more practice. Maybe.
I'm afraid I ramble a lot about the same things all the time, but I tend to do that. Nothing new under the sun.
Anyway, I took a bunch of photos on last Friday with the big camera (D300), for the sky was clear and offered some natural light. I didn't have to wait for it that long after all. Surprisingly even that amount of autumnish late afternoon light wasn't quite enough... But had I waited for a sunny weekend, we'd be talking about the next February.
I don't dare to post more than a few photos from the new set. It's the same hunk of plastic anyway. These are just supposed to be a bit less "work in progress":


If someone's wondering, what the hell that A + w in the largest pieces of the Schürtzen means, the reason comes from the history of the model itself: the thing was brought as a nerdy souvenir from Asturias and this Cruz de la Victoria is quite elemental in the local history. It's a symmetrical cross with letters that I always assumed to be alfa and a small omega (and while writing this I checked it from wikipedia - I was correct). So I thought that I'd join the place this model was bought from with the model itself and what a handier way than to combine the Balkenkreuz and the Victory Cross together.
If I remembered any better how the Condor Legion was fooling around in the Spanish civil war, I would've set up a backstory of how the crew had been there and all that. But I didn't do any of that, at this point anyway. Maybe we'll see some progress with the Project 4 of the year, as the plastic pieces have the same backstory, this one's year just happens to be this one and not the previous one.
This blog-like thingie has surpassed my weird and unbased thoughts of how it'd go and how I'd keep updating. There are more than ten posts and I've managed to ramble a bit every single week! I'm quite shocked. Maybe I've gone old.
Oh, the other two projects of this year: the first one is the "let's attach the shelf for the projector to the wall" that took about six months to complete. And the second one, nazi ufo (a Haunebu II Gerät) was started and fucked up in April), but let's not go there...
25.10.10
Done at last!
I guess I should complain out loud a lot more, I'd get stuff done. The jack got painted along with the whatevertheheck metal stick, then dirtified (as in "my feeble attempt at weathering" with the dry ground colour). Then I messified them a bit more, especially the jack, with the mud-type weathering stick I was talking about yesterday.
In hindsight, I should've finished the tools on their own and attached them to the hull last. Maybe next time. But then again, as I've complained many times, this is the first tank model I've built in years.
The nozzle of the howitzer was blackified a bit as well, I think it looks pretty fine live, but it's not too evident in these photos. The local weather isn't that good for mobile phone photos at the moment and the artificial lights aren't too handy, either. I mean, my N900 is pretty awesome but the camera doesn't do miracles, the photos get noisy if the lighting conditions aren't optimal.
So I'll be waiting for a bit clearer day for the final photos of the Sturmpanzer IV. Or I'll get tired and start playing with the real camera and the tripod. We'll see which happens first. I believe it's going to be the second option :)


Next I'll start with my next project (a Trumpeter 20mm FlaK 38). That's in a sense a very interesting and handy target, for I can continue with that in the future by bolting it on a truck, halftrack or the hull of a Flakpanzer. I just hope that I'd be luckier with the vehicle than with Thor, which was a halftrack with a 10-barrel Nebelwerfer mounted on top of it. That was a horrible model, didn't like it at all.
24.10.10
Almost there, almost there... again
Because of all some everyday hassle, the Sturmpanzer hasn't progressed much this week. Not that there's much to do anymore anyway. During this week I've mostly worked with the extra road wheels and fixing the odd paint splotches around the model. All that's left in my opinion are drilling open the MG (I hope I don't break it accidentally), painting the tools and the muzzle of the howitzer.

It could be fascinating to invest to some pigments, to make the model look a bit more lively. At least more real than what I can accomplish with paints only. Or maybe I'd just make more of a mess :P
Maybe I should give them a chance. At least "everyone" is praising the Mig products, but then again, the Tamiya mud stick was pretty fine to me, too. Hmm.
I can already smell the faint smell of an arms race. And it smells good...


14.10.10
Easy does it
This week's theme has been damage control, also known as "fixing the fuckups". One day I realized that I could build a couple of extra road wheels and hang them on the backside of the tank. More random junk, it makes the thing look less boring. I hope :P Now they're camo-painted and are waiting for the next steps, whenever I have the time for that.
Weathering has to be done more as well, track links are to be fixe more (they failed, I'll do better next time) and all these random things need to be attended to. Bah. That's what you get for second-guessing yourself and your methods...
No new pics this week, not much has changed from the last post.
5.10.10
Easy peasy
Easly week went again with random fumblings...
I tried to get the Balkenkreuz painted on the hull (after all I decided to add ones to the front and rear sides as well), this time using the stencil method. That's something I've never tried before, so it was yet another weird thing to be tried. So I cut the waterslide transfers, because they had the correct sizes. From one I cut away the center and from another one the sides.
The project begun with four outer crosses painted white. Two of them went bad because the stencil wasn't placed well enough. Bah. "Doesn't matter anyway", I thought, for I was going to fill the center pieces with gray-black later, "that ought to hide some fuckups". Once again a couple of those ran a bit, the others worked better. In the end I fixed the logos with a paintbrush.
Next time I paint I guess I should fix the outside-leaks with the camouflage colours. Oh well. Maybe I learn to do things better on the first try at some point. Or not.


Later I weathered the bottom part of the tank and the tracks with some dried mud colour. After that paint had dried up, I tried my luck with the Tamiya weathering stick (mud) that I had bought from the Model Expo 2009. The end result looks like dried, blobby mud. Pretty neat!

1.10.10
Almost there, almost there
I've been playing a lot with all these details. My first attempt at spraypainting a camo on the tank was a bit on the failed side of the spectrum, surprisingly. That's because of my own stupidity for I hadn't cleaned the device well enough, so I can't blame anything else than myself. The end result looked more like the floor of the nearest train station because the airbrush was spitting more than I would've liked.
So I had to start fixing the pattern I had made up. It doesn't look as good as it could have, especially if you look too closely. But then again, you're not supposed to be looking at it up close, it's supposed not to be seen from a distance. And in that kind of a scenario, maybe it'd work nicely in an autumnish forest or something. Maybe this isn't a complete disaster.
The extra pieces on the nose are going to be painted black during the next set of small detailing-steps and weathering. Maybe I should pop by my modeling shop and get some b&w paints so I can paint the Balkenkreuz with a stencil. We shall see how that idea ends up working...
This post shall be a bit shorter because there's not that much to be told about making a mess. So I'll end with a bunch of photos:


27.9.10
Trial and error
I finally got the tracks done (my good friend "I'm not used to doing this anymore" was bothering me again), the left side was done in almost one go. When I had the last track links in their places and the glue had set overnight, I started fooling around with my paints.
 Just in case I decided to start my painting project with the outside of the armour skirts. I got the awesome idea of using the track sprue as a support for the skirt pieces, because my experiences with the through-sweated painter's tape that I had used in the summer weren't too good: that damn tape left some annoying glue marks in the skirt pieces while I was basecoating them. My main point was to see that the airbrush didn't spit around or misbehave in other ways either. After that I could move on to the Sturmpanzer itself with a bit easier mindset.
That was easier said than done. A couple of times I had to turn off the airflow from the air can because the paint stopped flowing completely. I admit, I'm at a complete loss with that thing sometimes, in my previous attempts I managed to make that thing shoot extremely cold air instead of paint - just because I had opened the air valve a bit too much (how could I have known?). This can be marked as another lesson learned. Maybe my today's failures were because I hadn't cleaned the airbrush too well after my brief and unsuccesful painting attempt yesterday. That's yet another thing I have to learn with these things.
Now my Brummbär is happily green, next I'll use more brown and yellow to get some kind of a form-breaking camouflage applied. My biggest problem will be how to paint the Schürtzen reasonably. Maybe it's enough that the "insides" are just plain green while the outsides have the camo pattern? I mean, no one's really supposed to see the insides anyway because they're so low and close to the hull of the tank. As long as the insides of the armoured skirts aren't painted with plain Panzergrau or any bright colour, this should be fine.


The last photo shows pretty weel how the front of the hull is bad. Of course I noticed that way too late because of my apparently silly order of building. I decided to cheat and cover the hole with extra track links. As you can see in the photo, the leftmost one wasn't glued well enough (as I had suspected) and the airflow of the airbrush just blew it away. Obviously I reglued it after I had taken the photos.
There's still a small gaping hole on the right side, I have to come up with something for that, too.
I'll paint the tracks last, for at this point it'd make no sense at all. Either I'd try to mask them (and notice that some paint leaked anyway) or I'd try to avoid painting on them with the camouflage colours. Fat chance it'd work as I want. So I'll paint as usual and work on the tracks last, just before I start applying some weathering to them. Before I start with weathering I'll have to remember to paint a bunch of modified Balkenkreuz on the hull and the Schürtzen..
Maybe this'll end up being something...
22.9.10
n/a
This seems to be such a busy week that my progress has been minimal. At the moment the right track is missing a couple of links, which can't be attached because the latest pieces are still setting. Just a couple of pieces, maybe dozen. It's not the first (or the last) time I misjudge those damn tracks...
Maybe I'll get more done on the weekend or next week?
Maybe I'll get more done on the weekend or next week?
17.9.10
Small steps
All kinds of random things have delayed my progress lately. The armored skirts managed to take a bunch of painting layers and joining the upper and lower parts of the hull were problematic. I shouldn't have followed the construction manual too closely. Bah. I should just and build these things the way that feels the best.
Live and learn.
Luckily the skirts were easy and handy to cut in pieces. Now I can customize the setup however I feel like (I can drop the badly fucked up ones away and no one will now). So maybe the project is still salvageable:
 Both the front and the rear parts have, as you can see in the photos, some stupid holes. The forward part can be nicely fixed with a piece of tracks but the rear part? Who knows? Maybe painting the whole hull distracts people's eyes enough. Otherwise I have to come up with another way to cheat everyone... Damn.
I also started working on the tracks, the right side is about 2/3 done but I didn't get to finish because a migraine tried to ruin my day. So I'll finish that a bit later. When the right side is done, I'll know how many pieces the left side needs - more or less - and how it goes in general. I haven't built these in years so my skills are a bit rusty...
Anyway, when the tracks are done and dry, I'll start painting the hull. While I'm painting I can play some time to come up with a way to hide the fuckups in the construction. Oh, and I need to paint the Balkenkreuz in four or five places at least: three in the hull and two in the skirts.
There won't be any Zimmerit because I totally forgot it, so this is a really late model of Sturmpanzer IV, after OKH decided that it can't be used because of the false fear of the Zimmerit coating catching fire. Maybe it's not a problem. And if I had wanted to set up the Zimmerit coating, I'd needed more tools and materials.
It'll be all right 8)
Live and learn.
Luckily the skirts were easy and handy to cut in pieces. Now I can customize the setup however I feel like (I can drop the badly fucked up ones away and no one will now). So maybe the project is still salvageable:


I also started working on the tracks, the right side is about 2/3 done but I didn't get to finish because a migraine tried to ruin my day. So I'll finish that a bit later. When the right side is done, I'll know how many pieces the left side needs - more or less - and how it goes in general. I haven't built these in years so my skills are a bit rusty...
Anyway, when the tracks are done and dry, I'll start painting the hull. While I'm painting I can play some time to come up with a way to hide the fuckups in the construction. Oh, and I need to paint the Balkenkreuz in four or five places at least: three in the hull and two in the skirts.
There won't be any Zimmerit because I totally forgot it, so this is a really late model of Sturmpanzer IV, after OKH decided that it can't be used because of the false fear of the Zimmerit coating catching fire. Maybe it's not a problem. And if I had wanted to set up the Zimmerit coating, I'd needed more tools and materials.
It'll be all right 8)
13.9.10
Progress!
There has been some progress even though it doesn't always sound like it.
As my next goal I ended up working on the top hull, which ended up being less of a hassle than what I was expecting. Most of the whole crap was two huge pieces and a buch of smaller details. Surprisingly I decided to glue the gun to its place, without the possibility to move it around for posing. Usually I want to be able to adjust all the pieces that I can adjust, so I get my photos as I want them to be.
There wasn't anything special about this phase of the build, just attach the pieces and put the next ones on the line. I painted the insides of the fighting compartment just in case you can see inside from a crack in the hull. Such as the opening for the periscope. At least there's something that looks like it should, without the real interior.
In the following photos the top hull is more or less finished:

Shockingly the light had its electric cable already in the cast piece so I didn't need to go for my thin metal wire and try to make one up. For a change.
The tail isn't much worse than the front:

At that point all the small details - like the jack - weren't attached to their places. With all the busyness of the end of the week I didn't get to post about this phase so I continued my work and tell about it here. The last missing pieces are the supports for the Schürtzen and some random gadgets on the deck.
The rails where the armor skirts will be attached were a problem because I didn't realize that I shoudl've measured the anchors with the rail pieces to avoid any corrections later.
I had to pay for my stupidity and ended up bending some already glued and dried pieces off their places to get them attached to the rails. The only real problem was the last piece on the left side, for the toolbox was slightly on the way (in addition to the supports on the superstructure being a bit off) and I couldn't attach it at all at this point. Maybe it'll be fine today as the glue has set and I have to fight with only one piece anymore...

This third photo was taken in a hurry and in suboptimal lighting conditions (it was a rainy day and apparently the worklight I have isn't enough). So not enough light for the camera of my N900 :|
There's not that much left, the armored skirts need a bunch of holders and then I could basecoat the whole thing and start slaving with the tracks themselves.
Of course I could and maybe even should cut the armor plates off so my Sturmpanzer would have a bunch of individual plates hanging on the sides instead of two huge plates with just a small recess to show where the different parts are supposed to go. I believe it'd look slightly more realistic, even.
We'll see that later today!
3.9.10
It ain't easy
So my first attempt at painting went how it went... The paint I used was of third grade and despite my attempts at thinning it it went blobby. The results were really weird and either too thick or too thin - without me adjusting the paint at all! It didn't get stuck to the model even accidentally. Sigh. We're off to a good start. So the next day I marched to a shop to get some more stuff.
I decided to modify an old Ju-88 A4 kit box (project Lemmy) to make a painting studio (or whatever those are called) to contain the mess in a certain area. Besides, what can't you macgyverize with some tape and cardboard? The paint that you can see in the photo is just some ultra-thin paint that I used to test how the damn airbrush works.

My trip to my royal provider of toys ended with 4 small Vallejo paint pots and a spraycan of basecoat paint. I mean, those 17ml things would run out several times if I used those for basecoating... The main idea was to get the panzer colours (green, brown, yellow) in the Vallejo Model Air format, for all the details and weirdnesses I'd still paint with a paintbrush or something. But just in case I got a small potful of that basecoat-gray, just in case I had to fix something small, quickly.
All in all, the week was surprisingly busy so I didn't get to paint that much. The base of the tank is now slightly green. I'm pondering on what to do next for real. Maybe I'll try to paint the camo pattern and then continue building the pieces.
In any case I'm facing the danger of running out of compressed air already, especially if my lack of skills is going to end up in results that can be seen in the next photo that may require plenty of fixing...
But more about that next time.

31.8.10
Let the learning commence and so on
I have to admit that my projects tend to take some time, usually a random amount. The time I need for whatever I'm planning to do depends on a million things and it appears to be more than less...
Sometimes I get a fuckton of stuff done in a rapid pace and sometimes a fifteen minute task ends up being delayed for six monhts. Based on that, I assume that my posting will follow a similar pattern.
Of course you can try to guess if I manage to make more than ten posts or is my attempt at blogging going to share the fate of so many others. Time will tell. Sooner or later - time will tell.
Anyway, to the supposed point of this thing.
A long while ago - after xmas 2009 - I got an airbrush from my girlfriend's father. I have never even touched one of those or had anything fit for painting. My last year's souvenir model was still untouched in its unopened box.
Spring came and I started working on my aforementioned Dragon Models 1:35 Brummbär (SdKfz 166) Late kit. Naturally all random projects like the Model Expo 2010 struck and the panic project I tried to build to present in the Expo went wrong in all the hurry. I was quite busy at work so I felt like taking it easy at home -even though all this tinkering is the best way to take ones mind out of work, but as to me building and painting are heavily dependeng on my inspiration, they just didn't advance in a long while. Even my latest batch of OmniMechs are still waiting to be finished.
In summer I managed to get yet another souvenir model (a german FlaK 38) that only made my work queue even longer and improved my motivation in its own way. Just like the set of new Dremel bits that I got as a birthday gift, they were begging to be used!
Now that I've spent my summer holidays and the autumn is pushing forwards, I'll start learning how to use the airbrush. Luckily I've moved away from the enamel paints to Vallejo acrylics so the smell isn't going to be a problem and the paints are easily thinned with water, if need be. This should be simple, not V2 science.
Of course I had to get some breath masks because I don't want to cover my dear lungs with plastic, even if said coating would be done in a cool Wehrmacht three-color camouflage.

That image is the starting point. If the spraying only ends up in a mess and a sad painter after several attempts, I'll return back to my paintbrushes. To me that has been enough so far so I wouldn't mind that much, for I don't suffer from AMS :)
My masterplan is to try this thing out on the lower hull and wheels, mostly with Panzergrün and maybe some small blotches of Panzerrot & Panzerbraun. After that I intend to work on the rest of the hull and paint that more or less as it should be. And just before I join the bottom and top pieces together, I'll put the magic tracks in. Unless the piecetracks are awful, I'll order more Friul tracks and swear even more. At least those look awesome.
Or not, depends on how it feels when I work on this project, I haven't done these in many, many years. I'll change my plans as things go.
I'll return when there's something to say. Or maybe I'll just blabber about Borderlands. Who knows what will happen?
Subscribe to:
Posts (Atom)