Mastodon
Showing posts with label BM-21 Grad. Show all posts

8.3.17

Finished: project II/17

At long last my rocket launcher truck was in a publishable condition. Then I took the final photos (and while moving the model around I managed to snip the cursed left wing-mirror off yet again and just couldn't even care anymore) and am now revealing those to you. Oh, and the excuse for the whole setup, I guess I ought to type it here too.

Backstory

Everybody knows that our "dear neighbour in the east" has been invading a part of Ukraine for a good while now. Early on there were news of these green men, unmarked soldiers. In my madness I decided to tie my vehicle to these semi-recent happenings, as soon as someone had suggested doing a digicamo instead of a more traditional one.

Even though the digital camouflage is not a new idea, it's gotten some wider use pretty recently. Against that background the Ukrainian happenings were a very fitting match for this project. Also, the Guards emblems on the doors matched (well enough) those that have supposedly been sighted* in there, although on somewhat heavier and more modern launchers. Maybe the 438th Guards Rocket Artillery Brigade had a couple of older BM-21 launchers just waiting to be used and they didn't have enough GPS/ГЛОНАСС equipment to go around. So they could easily claim that the Grad had just gotten temporarily confused about  its whereabouts and so ended up in the wrong side of the border...

Photos

Here's a bunch of my traditional clockwise-running photos of the truck from the cardinal and the intercardinal directions. And some higher up views just for the show.


The strange bonus angles


There's the bottom so you can see that it was done properly as well

The final photo of the engine. I almost started making working hinges, but I wasn't quite insane enough.


*) I'm not able or interested in guaranteeing the validity of some random internet sources, especially considering this sort of a topic during these false news and propaganda filled times.

1.3.17

Last haily details

The wing mirrors and the windshield wipers

These were the last pieces that were still waiting for their installation. Especially the wing mirrors were obscenely flimsy, so I left them whichever way they wanted to settle in. Either the driver had been driving like a pig (typical) or the driver was in the middle of a most peculiar twist-reverse maneuver.


Filth
After I was done with the solid pieces I washed the engine compartment with Citadel's black (Nuln oil). Then I drybrushed the leaf springs with Oily Steel (VMC 70865) and later washed that with Citadel's brown (Agrax earthshade). I used the same brown was on the axles and whatnot that I had painted grey much earlier in the project, to make them appear properly dirty.

While I was fooling around with the metallic paint I also painted the exit ends of the rocket launcher's barrels. I din't apply any sort of a wash there, I'd most likely do something else later on, if needed.

At this point I would've really loved to use the Vallejo motor oil stains -type of product that I had seen in some propaganda material at some point last year. But I had never encountered them either here or in Hobbyscapua, what could I do? In the Vallejo site it was called Engine Grime(73815), in the very end of the page.


The problematic glass pieces

I had spent a good amount of time pondering on the destinies of the clear pieces. Either I'd glue them in at the very last moment and left them perfectly clear and clean - or then allowed them to get a bit dirty and used-looking under the general layer of crap. The latter option sounded much more intriguing, so I painted the bottoms of the transparents with the appropriate colours.

First I painted the reflectors of the headlights and the extra light with steel (VMA 71065 Steel). Then I painted the GP pieces before I detached them from the sprue: break lights with red (VMA 71085 Ferrari Red), all the blinking lights with orange (VMA 70733 Orange, fluorescent) and if I didn't say it before, the rest I left clear. As soon as the paints had dried I detached them and glued them on with white glue, as always.


At this point I remembered to do the only two decals that I needed. I had applied a  bit of gloss varnish on the doors. This time the decals behaved nicely and that always manages to surprise me. A bit later I finished the decaling up with a layer of matt varnish. I wished it was always this easy...

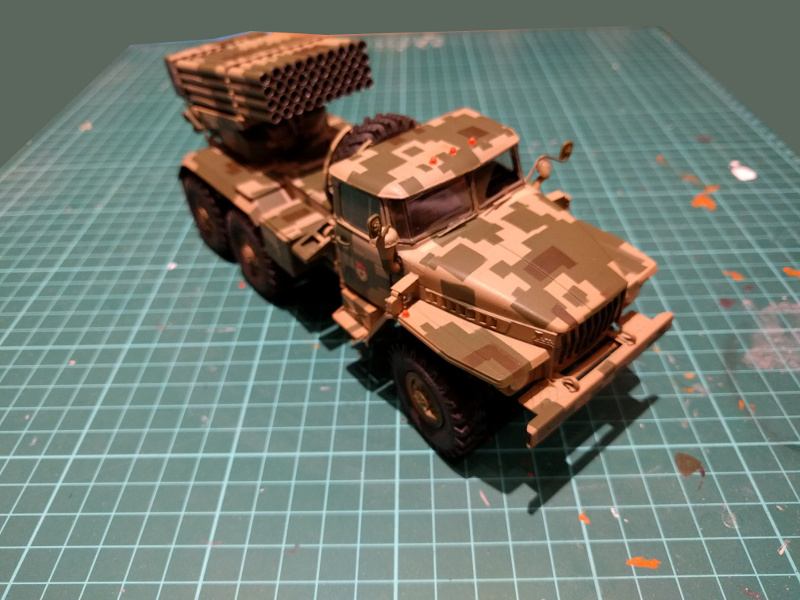
I googled around to find out if the insignia was Soviet only (Soviet Guards) but ha! after following a few weird detours I found myself on a site that showed the same markings on the door of a bit more modern rocket launcher (BM-30 Smerch). What made this even luckier was that, according to this article, this rocket launcher was invading Ukraine, so that fit perfectly into my original theme of the little green men! Of course my vehicle was a version or two older than the one in the photo, but in my "what if" scenario the 439th Guards Rocket Artillery Brigade were using older equipment so that they could more easily claim that they were not Russian, as just about everybody had some of these trucks... which couldn't be said about the BM-30s.


The glass pieces looked good, great even. I really couldn't swear that the rear lights setup was completely authentic, this was the best I could do with the reference images I found. The same bit contained both the brake light, a blink (or turn signal) and a white reverse light. To be honest I couldn't honestly imagine why they'd have all these set all these blinking bright orange alarm lights and whatnot on a war machine, but as I always say: what do I know?

More filth

As a silly idea I cut off two windshield wiper -wide arcs off the masking tape and set them on the windshield so that the wiper's axle was in the center point of my arc. The result looked like a psychopathic Cars character knockoff from China.


I airbrushed dirt (VMA 71133 Dirt) around the truck from a good distance. As I may have said earlier, the idea behind this was to use it as a filter that'd even out the contrasts and maybe bring a bit of a natural look to the whole model. Or it could just make it look dull and boringly brown, but you can't please everyone.

But as I said, I started with the dirt colour but then thought that I could use some darker, fresher stains to the lower part, nearer the ground. I loaded my airbrush with some Camo Medium Brown (VMA 71038) and had at it. This darker shade was mostly applied on the bottom third, especially in the wheel wells or whatever they are called.


After the paint was dry I finally slipped the rubber pieces on to complete the wheels and took the photos you can see above. And no, I really am not interested in counting the times I knocked the wing mirrors off.

Pigmentage

Now I was under the assumption that the Russian truck was finished as far as the painting was concerned. So I dug out my pigment jars and the pigment binder and started making even more of a mess. I brushed some Carbon Black to the front and top end of the Field Rocket System, then applied some Fresh Rust to the moisture traps, nooks and the frame in general. Then I used at least Burnt Umber on the roof, the decks and stepping surfaces. All these were from the Vallejo pigments line, from the Tamiya Weathering Master set I used sand on anything that people'd walk on. Then I used some tiny amounts of fresh sand on a few highlight surfaces on top of the machine. And the wheels, those I messed up with hopefully liberal amounts of different browns.

Maybe a bit of all of those pigments actually stuck instead of flying around the airspace under the blow of my airbrush. I did use a much less lower pressure and airbrushed from further away, just like when I applied the Dirt paint. But this was the second time I tried this so I have plenty to learn still.


22.2.17

Camo madness

First of all I have to say thanks (or scream obscenities) to my coworker Iiro, a bank of Soviet stuff knowledge and the benevolent dictator of Presaleztan. As I had been pondering about my early camo pattern thoughts out loud at the office in the lines of "I should check how those Green Men invading Ukraine are camouflaged so I could make this look like their equipment". He suggested a digicamo and in all its insanity it sounded interesting enough for my brain to get locked into the idea.

Before I started anything mad I glued the doors into their places, so the cabin interior was just about sealed now. The doors fit in perfectly, like mushroom clouds in the horizon, thanks to my previous and well-planned dry-fitting method with multiple chekups.


A pixel at a time

I decided to utilize my both Tamiya masking tape rolls (10mm and 18mm) and cut off some squares with the aid of my cutting mat. Because the 18mm tape and the 10mm grid didn't always align perfectly I just cut 2mm off every other end of the squares (that is, the external ends of the bigger pixels were cut along the gridlines and the near ends so that I ended up with a ~4mm strip between them). Out of these 4mm bands I then cut some smaller pixels to provide more variety to the whole show.


It looked pretty weird at this kind of an early stage but thought that I'd try a few more pieces. And if that didn't work, it wasn't going to be a catastrophe.

Session 1

After about half an hour I had achieved this. I also noticed that the wheel centers had to be pixelated too, but I just didn't get to do more than the spare wheel yet. At this point I was a bit amused by the whole idea. This was slow, slow work.


I kept on building up my pixel mask slowly, piece by piece. While playing with the tape it occurred to me that maybe it'd been better to start masking off the parts that were not going to be green instead of saving the greenery. So keeping that in mind, you shouldn't consider the mid-results in the photos below as anything definite. It was going to take quite a few more tape pieces so there was plenty of space to maneuver still, especially the rear end was completely "open" as in I didn't have a proper plan for it. The rocket launcher, on the other hand, was clear as day to me. I blame that on the shape of the truck, they just didn't inspire me with camo ideas.


Session 2

In the early next evening I spent about an hour cutting and placing more tape pixels. At some point I decided that I was done. Of course I wished that I didn't need to fix any of the painting but I was still mentally prepared for that, being something of a pessimist with my experiments.


Checking the results

I airbrushed the truck and the launcher separately with a sandy colour (VMA 71122 desert tan 686). The shade wasn't maybe the most authentic representative of what Ivan uses but I have never been hysterically anal about those details. My only concern was the possibility of the result being too "loud".

Peeling off the tape pieces took a ridiculous amount of time. The result was pretty neat, I liked it. I had earlier envisioned a three-tone pattern but maybe that wasn't going to be needed after all. I'd have to think a bit about this.

As my first and totally random attempt at making a digicamo this felt succesful. The general look would be a bit calmer after I had airbrushed a gentle layer of "dirt" (just like in the IS-2 project) to filter and bring some more dirtiness. Just like the name suggested.


I changed my mind after all

Hah! I decided, after all, to utilize a third colour in the camo, a dark brown. To help me in choosing the approach I for reference pictures and the example in this photo felt like the smartest way to do it in this project. I wouldn't be adding a third large pixelset but some individuals and/or miniclusters here and there.

Just like before, I sliced masking tape into strips and squares to create shapes for the larger pixels and then I put them into certain key points. As usual I went with the gut feeling and tried to make the whole look more random (which is an issue with the human mind, pure randomness is so difficult). For the doors I cut off some stuff off from the center of a square cut out of a 18mm-tape. That was something I thought to be quick and an easy way to add those simple pixels into somewhat narrow places.


I was slightly concerned that I was going with a bit too few pixels, but on the other hand, it'd be easier to do more than to remove excess ones. Just like it'd be easier to undo a few instead of three dozen bad ideas. Still I trusted in the future good results and that I wouldn't have to be undoing anything later on. Just like the Americans love to say: no guts, no glory.

As my third camouflage colour I chose the darkest of the three browns I was looking at (VMA 71040 burnt umber) and then I airbrushed that carefully but with decent coverage. There wasn't much to paint so this phase was completed pleasantly quickly. After an unusually short paint-drying break I tore the masks off and took some photos, this time remembering the rear side as well. I was still pleased with how it looked like and I had even avoided any happy accidents.