Mastodon

30.8.23

Nonmetallics and jade highlights all around

German Grey

40% of my Star had already received the metallics and the cockpit canopies, of course I did those for the rest. The base idea for the Star was clear, I would simply follow on the path I had started on.

Gargoyle

Getting this Assault monster decorated was the most painful subprocess, because it was just so insanely ugly. I painted the AC barrels in the arms, and the laser barrel in the chest. The air intakes and the missile launcher ports also got painted metallic grey. In the legs there was loads of space, so from the front I painted the knee joints. To get something else done here I also painted the shoulder joint, it didn't look too stupid in the end.
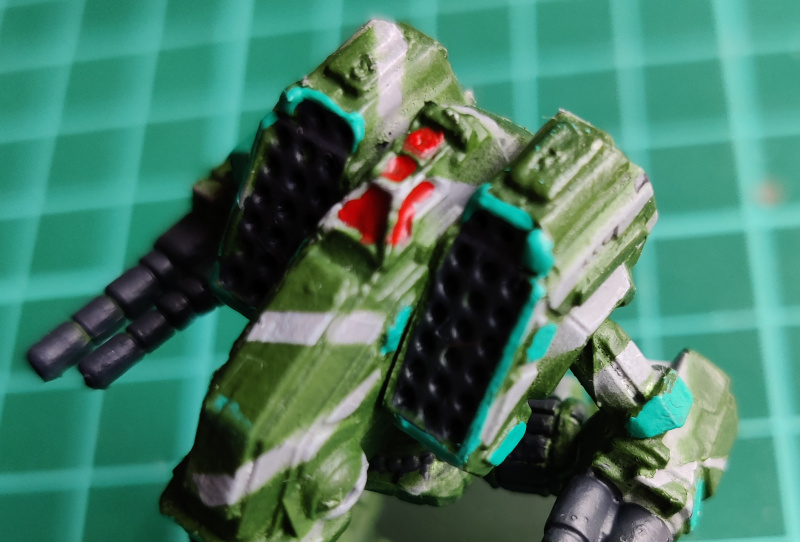
 
The backside hadn't got much more than some joints and grilles to be highlighted. At leat the gun pods in the arms looked nicer with these changes.


Mad Dog

Finally something more interesting to look at and to paint. My first and most obvious detail were the faces of the LRM-20s and the laser barrels. For a moment I thought if the upper arms should have been painted metallic, but I decided against it with the large entities on the upper hull already done that way. So I painted the hip bit and the ankle joints instead.

On the back side I had a number of grilles, vents and Jump Jet nozzles. Maybe I could've painted some more on the legs themselves, but I didn't want to go overboard.

Hellbringer

Last but not least, Hellbringer got to the painting station. As expected I painted the missile launcher and the searchlight or whatever sensor pod's face, the ERPPC barrels and the side torso's lasers, without forgetting the knee joints. I was pretty happy with the asymmetric detailing on the Hellbringer, that made detailing it more fun.

Unlike the other ones, with Hellbringer I thought that if I painted the upper arms metallic they wouldn't stand out too much. So I painted them. It worked nicely in my opinion.

Jade highlights

Now my full Star was more or less in the same point, except for the canopies. I decided to leave them for later and first do the jade highlights on each of them. I remembered that my VMC jade was a bit thick so I started by thinning it a notch. If I only had also had the time to buy new small paintbrushes as well.

As always, I chose the highlightables more or less randomly and followed my own usual guidelines, such as  painting the edges of missile launchers and so on. When I was done with the highlights, I foreached through the minis and painted a few new metallic (still using German Grey only) parts.


Cockpit admiration and metal highlights

Those done I painted the cockpit canopies with the same RLM red as earlier, and while I was painting these I also touched up the two LRM launchers that had visible missile tips. These ended up looking much better now.

Then I mixed up a lighter and much thinned-down grey, that I then poked or stippled randomly into all the dark grey parts. In this scale the trick didn't work quite as nicely as in 1:35, or my paint ended up being a bit different this time.


The next step from here was to do some freehanding, and I've always sucked at it. I still wasn't feeling like ordering a dozen decal sheets from FPG. If they (or someone else) had airbrushing stencils, I wouldn't hesitate at all.

25.8.23

It's a teenager now

The thirteenth mumbleful anniversary

When I started drafting this post I thought I hadn't completed practically anything during the last 12 months. But when I started checking what I had posted about, I had almost a handful of completed things, at least on the modeling side.

V/22: SL-17 Shilone

Shilone, an additional extra bonus in the Clan Box was almost entering the AeroSpace forces of the space Swedes, but at the last moment I decided to relocate it to the service of the mighty Dragon. My dirtiness effects may have gone a bit further than needed, or not too far, but at least the kite didn't look like it had rolled off the assembly line fifteen minutes ago.

Maybe I could've tried to do something more interesting with the cockpit canopy glasses, and with the laser lenses too. I only dared to try to create some sort of a glow effect in the easier and safer choice, the engine, and that gave me some excitement and maybe even some courage to try the effect on something more visible. Or that's what I thought at this point in life.


VI/22: Time Machine

Of course I had drooled at the Lego Time Machine for ages, so when I finally got it delivered home, I was completely beside myself but in a good way. Sadly we didn't have that much shelf space in order for the customized DeLorean getting a fantastic place to be displayed.

VII/22: Galaxy Explorer

The little ISD would've been almost as excited about this set as the middle-aged ISD. Somehow I was the only one in the household who loved the ship, even though the Project Assistants were happy to play with it when allowed. And if there was no good show-off space for the car above, there was less space for this one.

VIII/22: Jagdpanzer IV

The Tank Destroyer was a peculiar project, the model was ridiculously simpler than the really detailed Königstiger from the previous year, but still I burned almost as much time on it. The years were of course very different from each other, and I did try lots of new stuff on this model.

Again, I was really happy that I finally tried out the oil paints and I also lamented because I had been dragging my feet and even discarded the whole thought for years. "Live and learn", they say, and they also say "better late than never". They do say a lot, I've noticed.


On a side note, I managed to get much nicer wrap-up photos now that I relearned some basic image editing.

I/23: Very incomplete OmniMechs

Then we had this supposedly quick and simple snack project – painting and weathering fie miniatures – completely in the middle of itself. Camo patterns themselves were progressing nicely but they were just the primary shapes now and would require more work to look decent and presentable. Could I be halfway done now, with all five being painted grey-green and I was only missing the details?

Greetings from about two weeks ago

And the rest

My Python3 Doom story generator hadn't progressed anywhere in the last months. Any of my Pygame things had also not found their way to the top of my work queues in a long while, I guess I just hadn't had the excitement to do coding after workdays.

The Steam Deck has, on the other hand, activated me on the gaming front with something new (the remake of System Shock; Mechwarrior 5: Mercenaries with two handfuls of mods), which has been fun. Nothing too keyboard-intensive should be played with that device as is, based on my gaming minutes so far, as not every function in the BattleMech cockpit has a direct button and I didn't manage to figure out how to call in air strikes against my foes, for example, until I just randomly poked the d-pad in a random mission.

On the Nintendo side the randomly played Breath of the Wild had reached the point where I had just the final boss left, and before that I should've bought my pockets full of arrows and cook all the best meals just to make the most likely supertedious multistage multitrick boss fight even survivable for my nerves. Oh why, oh why hadn't I felt like playing it that much then? On the other hand Tears of the Kingdom was in the most fun exploratory phase where every corner and rock hid something new and interesting, so I've been playing that one instead.

23.8.23

Masking and camouflaging the fifth Point

Mummification

So, I had already masked half of a leg and now I had to mask the rest of it. I followed pretty much the same approach as before: I cut 2mm lenghts of tape and connected them on the miniature however I felt at the moment. I painted the Hellbringer the same way as the other four, mixing a slightly lighter shade than what the olive green was. For the fun of it I mixed the even lighter highlighting shade into my airbrush and did a bit of a zenithal blast with it.


The green wasn't still as light as I wanted, but they sold those for money, so I wasn't going to change careers into a paint mixer just yet. The next steps would, of course, make the mini a bit more interesting.


16.8.23

Two more Points being camouflaged

While setting up my airbrushing station in the kitchen I noticed that I had not finished the Hellbringer's masking, it only had half of a leg done. How had I managed to forget something so essential?

Swearing didn't help here so I mixed my Badger's paint cup a new batch: first some thinner, then olive green and yellow ochre to get a nice-ish shade of green. It had occurred to me a few times that maybe I should've documented my mixing ratios somewhere to be able to reproduce a shade. The I was doing things I had a slightly different paint every time I mixed something.


Now that I knew that the tape masking worked the way I wanted to, I drybrushed these with a slightly lighter (or yellower) green. After a bit of curing I tore off the shrouds.


These ended up nice, the Mad Dog was – of course – the better-looking one. Now I just had to get the last one on the table, so I'd get the quinted ready for the next steps.


9.8.23

Two-Point detailing

The first details

Now that I had got up to speed with two Points, I felt like I should work more on them while the other three were waiting for their camo patterns. With the large parts done, I moved to the metallic parts of the 'Mechs, and I felt like trying out a new thing in this scale. In the previous project the dark grey + thin, mottled lighter grey on it worked pretty nicely as a metallic surface without using metal paints. I wanted to see how it worked in this scale and there was only one way to find out.

Dark grey metal parts

On the front side of the Dire Wolf the metal areas were pretty obvious (of course everyone had their own opinion on what should be "metallic" on a 100-ton walking tank and so on), at least they felt obvious to me and my so-called style of painting 'Mechs. I started with the Left Torso -mounted LRM-10 launcher's faceplate, then I painted the large gun pod barrels (2x UAC/5), and after those I painted the smaller four tubes around the UACs (4x LLas, 4x MPLas) including their lenses. Those intakes by the cockpit and the ankle joints in the legs got painted dark.

On the back side I decided that some smaller entities were metallic, such as different vents, grilles, elbow joints, and some moving bits in the hip and knee joints. This felt like a good amount.
 

Selkäpuolelta tulkitsin metallisiksi vähän pienempiä kokonaisuuksia, kuten eri jäähdytysventtiilit ja kyynärpäiden nivelet sekä lonkka- ja polvinivelien liikkuvia osia. Päätin niiden riittävän oivallisesti.

On the Summoner's front side I also started with the faceplate of the LRM-15 launcher, and the arm-mounted LB -10X and ERPPC barrels, then the knee joints from the legs.

From the back side I painted the grilles and vents, and the jump jet nozzles in the shins.


Canopies

Each of the cockpit viewport panels I painted with a bright red (VMA 71003 Red RLM23). I wanted the cockpits to be clearly distinguishable and a bright red really jumped from the green on the earlier miniatures. Maybe this was a bit more comic-like apporach than the flat black I used years ago, but I felt this made them look more impressive, even if less realistic. As far as you could consider walking tanks the size of a detached house and armed with insane amounts of weapons, painted in garish colours, anyhow realistic.


At this point I made the mistake of trying to paint the missile tips red with the horrible brush I was using. Those were to be fixed later, now there was more red on the faceplate of the launcher than on the missiles themselves.

2.8.23

Greening the first two Points

Customizing paints

The Olive Green was way too dark as it was, compared to what I was looking for. I jsut didn't have a good medium green, so I had to start mixing up this crap myself. I added some Vallejo's green (VMA 71007 Olive Green) into my airbrush, then I brightened it with some yellow ochre (VMA 71033 Yellow Ochre) and some Vallejo's thinner to improve the application.

Green Dire Wolf

Apparently the Dire Wolf had taken "the first mini of the queue" slot, so I painted that one first. The masking tape bits stayed on pretty nicely, but I wasn't also going to pull the hair off my head if there was some overspray.


Green Summoner

Painting the Summoner went the same way, I left the Autocannon and ERPPC barrels with less coverage, as they were going to be metallic anyway.


After demasking

To see the intermediate results of the masking I tore off the tapes from the Dire Wolf. I wanted to know as soon as possible if they didn't work like I expected so I could stop wasting time on a thing that didn't work. For the same reason I didn't mix up a lighter green for drybrushing, even as I knew that it would become messier without the masks.


The pattern was pretty tight, it felt like it worked nicely. Next I was going to jump onto the Summoner but now I mixed the lighter paint and drybrushed the Summoner completely. The highlighting shade could've been a bit lighter still, but it worked.

Drybrushed

As these photos showed, the greens weren't that much different, but you could see the shading. I also wasn't looking for a comic book -like super strong edge highlighting. With the mummy wrappings Summoner looked a bit funky, but as soon as I got the tapes off, it improved greatly.


Maybe this was the way I had always done freehand camo, but when looking at these photos I got a feeling that said "they always look like this". It didn't really bother me, it was funny to notice that I have had a pretty similar approach to breaking shapes for many years. These sharp edges between colours seemed to work nicely, I was pleased with that.