Mastodon

29.12.21

Painting the Henschel turret interior and the KwK

A creamy turret

My simple plan for the interior painting was pretty much this: "just follow the instructions". Without any better knowledge on my part, I thought it was wise to not make stuff up.

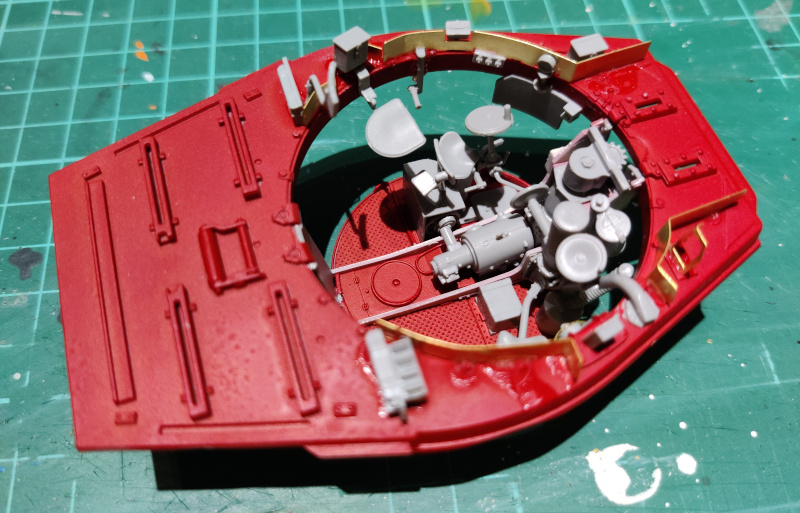
I started this by basecoating the only primed bits from the turret, the Panzeregranate shelves, and the tail end of the cannon with white, now with a different shade because my VMA Grauweiß bottle's cap had cracked and the paint had dried a bit too much to flow nicely through the airbrush. As a replacement I used the paint I had actually ordered for this project, the cream white (VMA 71270 White) that worked just great.

The outer walls of the ammo racks I painted red brown (VMA 71271 German Red Brown) like I did with the hull's outside facing edges. My paint coverage wasn't perfect but that wasn't my primary goal, I just wanted to make my paintbrushing stage that much simpler. While I was airburshing around, I changed my mind again and, after all, painted the bottom of the turret's basked red brown to follow the general directions better. Any overflow and badly made maskings I was still going to fix by hand.


Detail-level tweaking

The next time I was painting some various details that caught my eyes and that I felt like emphasizing inside the turret. On the loader's side, on the rear arc there was a set of angular pieces that I believed to be related to the shells for the Nahverteidigungswaffe, which I then painted with metallic black. After taking these photos I also did the same for the coaxial machine gun's ejected shell casing capturing funnel (?)'s insides.


While working on the turret's basked I fixed the edges between the creamy and red-brown areas and the surfaces I had oversprayed with the airbrush. Despite the instructions telling me to paint the seat complexes completely black, I decided to leave the parts that I thought to pose more of a knee-bump risk as white, while the cushions and "step on this to climb" parts were painted black.

Of the central machinery I painted some of the floor-based pieces with engine grey, in my attempt to reach even a low level of uniformity. The control wheel edges I painted black, for accessibility purposes instead of leaving them monocoloured.


At this point I thought the tank cannon 43 was pretty much completed. The lock I painted red brown, and its immediate neighbour areas I painted with gunmetal, as instructed. Now I noticed that the gun sight's eyepiece should've been painted black over a larger area, so I had to remember to to that the next time I was painting.


Of the inner turret I mostly painted just a couple of silly details, like the edges of some hatch handles that I painted metallic black. I took the same approach to this fire extinguisher as below the deck: the body was bright red, the attachment collars and the top vent were metallic black. This individual had a creamy white bottom support, I could've also done it red, I guess.


I didn't spend as much time with the coaxial machine gun as I did with the radio person's machine gun. Just for the fun of it I tried how it looked like in metallic black instead of flat black with drybrushed gunmetal. It looked good too, perhaps a bit less weathered. That worked well in the theme, as this machine gun was mostly going to live inside the turret. Or that's how I felt when I was spinning the protostory of this tank in my mind.


Ammo painter in action, part II 

The turret's ammo rack was going to be done a bit differently from the hull's racks. I didn't want to follow the instructions and make them all black-green. Instead, I decided that they both would have mostly black shells and a few copper-cartridged ones to bring more life to the setup. In the photo below I had a single layer of both metallic blac and bright brass on the cartridges.

Oh boy, this was going to take some time. The brass was likely to require at least three layers to look like something better than this garbage. The grenades I would most likely paint in a single quick action, unlesss I got some more "great ideas" in the middle of it. After I had those finished I'd just paint the racks themselves white and then I would just need to fix the missing or mispainted red brown edges.


Attaching the cannon

Before trying to do anything else I attached the white-painted cannon holders onto the cannon. Getting them nicely on was difficult as the fit was tight and the coaxial machine gun was just a bit on the way (I should've thought of it and glued it on afterwards). As soon as I got the angles and positions ok, I glued the bits onto the turret.


Weathering a bit

So that I wouldn't forget it completely, while I was fooling around with flat black (the gun sight's underpainted end) I drybrushed some black in choice spots to the end of the cannon, and around the turret control surfaces. I started pondering if the breech block's manual raise/lower lever should get painted red or (dark) yellow. These things had some use in a real situation, which is why I felt it could benefit from a bit of a highlight.


This pure and clean area needed something, like light staining all around and paint flaking especially near the ammunition storage. Should my old Vallejo Weathering Effects oil stains and such still be alive and useful, they'd love to live in here. Lightly applied, of course, I didn't want my precious tank to look like a trashbin of an abandoned fuel station's outhouse.

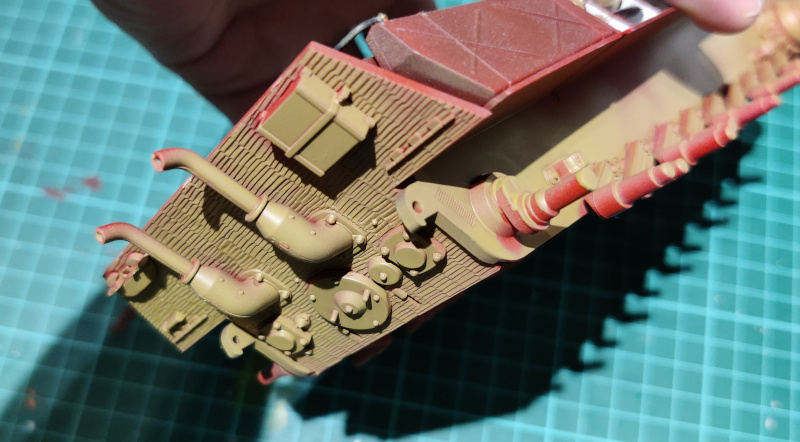
Paint chips and engine grime

For the chipped paint effect I dug out a piece of foam from my random crap -stash and tore a rough-edged triangular piece. I dipped a corner into grey paint (VMA 71056 German Dark Grey), wiped most of it off and dabbed around in places that felt that would be subjected to lots of bumps and hits. The end result was to be a chipped / flaky paint effect.

In a text block earlier I was thinking of my Weathering Effects products, the fate of the oily one (VWE:Engine 73813 Oil Stains) had been grim: over the years its components had separated and too much of the solvent had evaporated. No matter how stronly I shook and rolled, I didn't manage to revive it. Pity, as it was fantastic stuff.

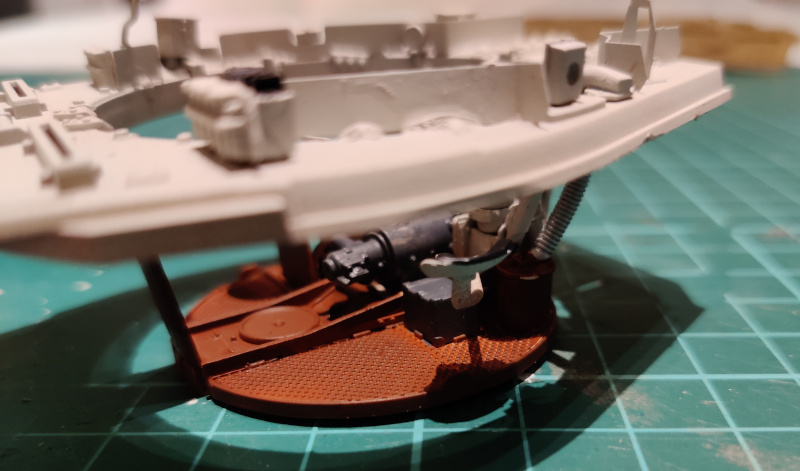
The other one (VWE:E 73815 Engine Grime) was in a much better state and that I applied to the cylinders and on the outer edge of the PE rim you could see in the bottom center of the next photo. It wasn't quite as awesome as the oil stains, but nicely shitty anyway!


I had also pondered earlier whether I should paint the lock's lever red or not, but I decided it wasn't that dangerous (also, based on my limited experience with field guns, they weren't made to look scary) there was no need for an alarming red here. Not very shockingly I painted the lever with dark yellow, to make it stand out enough in a rushed space, but not too much.

Ammo racks

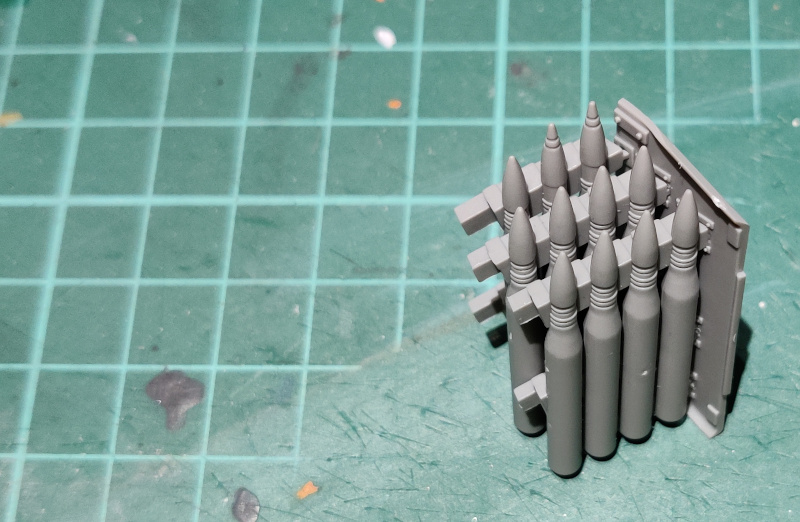
The other evening I spent about fifteen minutes fixing the ammo racks, I mostly painted the racks themselves white (using the same VMA Grey White I had used as a base white earlier in this project), and checked that the shell tips were as they were expected to be. The black-cartridged shells had a steel ballistic cap, the brass-cartridged had a black one.

After I had glued the last ammo racks into the back end of the turret, I noticed that I had made a silly little mistake when painting the inner edges of the turret's inner wall white - I had meant to paint them red-brown like the outer edges of the shell racks. This way the turret and the hull would have been painted the same way.


Luckily that was just a tiny tweak, and none of them should ever be visible to anyone, but as always: I would know they were done right. The way I planned.

22.12.21

Creamy royally tigerish workspaces

Off-white for the combatants

Inside the turret

The turret's shell had spent a good amount of time painted white on the inside, but as I had reprimed the untouched parts the last time I now blasted them all with off-white. This wasn't the first time I was shaking my head at my earlier as-if-optimizing.


The turret's bottom and basket with its machinery got their first white paint layers. I knew I had to paint the bottom and rear plate of the basket by paintbrush anyway, but so I would be painting the machinery as well, so it was all the same at this point. The cannon's axle-attachment pieces I had painted separately so that I wouldn't ruin their attachment surfaces at an unfortunate moment.


Untextured cannon

Basecoating the tank cannon was simply as the whole thing had to be white. The gunner's sight and the coaxial machine gun were the noticeable not-white bits in this set, and they weren't large entities themselves. Of course I was going to attempt to make this more believable with the handles and bars, but colour photos of this stuff for reference wasn't really lined up by the thousands.


15.12.21

Starting with the priming and basecoating

Dark yellow at long last!

The lower hull

These photos ended up being taken out of order, this time the first text had the newest photos. I started this part by carefully airbrushing the lower hull with Dunkelgelb (VMA 71025 Dark Yellow). The lower hull could've been basecoated weeks or months ago already, but I had left the external painting on purpose until now.

My plan was to keep the bottom and the sides of the Panzerwanne dark yellow and implement any sort of camouflage to the road-, idler wheels, drive sprockets, the front and rear glacis plates and to the upper hull and the turret.


The turret

My painting session had been started by priming the turret from the outside (VSP 70642 Pure Red) and the inside (VSP 70627 Skeleton Bone). While the primers were drying, I painted some other pieces and finally, while I still had some Dunkelgelb in my airbrush's paint cup, I painted most of the turret's outsides as well with the basecoat. After the first run the coverage wasn't perfect, and that was expected.


The upper hull

I had been patching up the upper hull's unprimed bits (the engineer tools at least needed priming) with the red primer. The upper hull I also painted flat dark yellow, even as it could've been basecoated with brown just as well, as I was going to do a three-tone camo. Somehow I had just gotten used to the dark yellow as the base, so I didn't even think much.


The cannon and the inner turret, round 1

This subset I knew I'd be priming and basecoating at least twice before I got anywhere. You could tell from the photos where I had been holding from while doing the priming. The rear end of the cannon was surprisingly fun to paint despite all the weird shapes it had. Painting the ammo racks for the turret was going to be mostly paintbrush work, the best I could do with the airbrush was the starting point.


I ended up priming the turret complex with the bone primer, because the amount of red-brown was going to be so small that worrying about the old red primer made absolutely no sense at all. There were a few of the attachment points that I was going to have to clean up later on, just like the photoetch pieces I had to remember to retouch on the next round.


8.12.21

Krupp 8,8cm KwK 43 L/71

The beginning and the end of the tank cannon

I was actually a bit surprised when I turned the page after assembling the ammo racks and found myself from the very end of the instructions. This final building stint started by assembling the first part of the barrel, almost paranoidly staring at the piece alignments. Keeping the barrel halves in place was facilitated by the support bit for the recoil damper double cylinder.


These holed wings had an undoubtedly important role in reducing the weight of the cannon while keeping it sturdy. I knew absolutely nothing about that business, I just glued them in place. The rightmost one sufferd a small fracture, while I was detaching the thin piece from the sprue.


This rear plate brought more sturdiness to the construction and once again I could only hope it was properly aligned. There were no useful guiding pieces to ensure it automatically.


To the rear end of the cannon's barrel I built a box with jaws, between which I was expecting to install the breech block pretty soon. I hadn't been checking the steps ahead so far, so I was running on my traditional "that's how it's been elsewhere" line of thinking.

Next up the jaws were covered all around with a block that had the space for a lowerable breech block. The block I installed as closed, even though there should've been space to keep the lock open as well.


At this point the cannon's part that lived on the inside of the turret was at its maximum length. Again I was mostly worried about having the main pieces aligned straight, as it would be somewhat annoying to find out that something was decisively off-angled when I was installing the weapon inside the turret.


Coaxial machine gun, a

Onto the right side of the gun's barrel a sturdy-looking support setup needed to be built, so that the coaxial machine gun could be installed in place. The imagery of the instructions was again a bit interesting, so I had to spin the pieces around quite a few times to be absolutely certain that I wasn't installing something upside down or to the opposite side of the barrel.


Funnily enough the second MG was much simpler to build than the radio operator's ball-joint MG. This was nicer, though, as the sturdier bullet-sprayer was going to need all the help it could get to stay attached by the two silly attachment points it had.


Protective plates and the gun sight

I know I said the gun was lenghtwise done, but it was still missing a few protective plates and the gun sight. The binocular gun sight was its own simple subassembly, and it was known as TZF 9d, Turmzielfernröhr, a fantastically descriptive name.


The next day I noticed that my coaxial machine gun's alignment had gone a bit off, and at the moment of taking the photo it wasn't properly coaxial yet. Perhaps that could get fixed still.


The external gun barrel

Now that I started building the final, external part of the cannon, the instructions were running very low. As you could see, the bit that resided against the turret's chin was pretty sturdy.


What I found exceptional was that the main part of the cannon's barrel was a single piece instead of two (easily misaligned) halves. The photo above showed the instructions showing how to build the three-part muzzle brake.


Finally, the cannon still in two parts to show the scale of the damn thing. The barrel parts would be attached together only after the turret's assebly was completed.


A quick dry-fit and the last PE bits

Of course I was excited to check how the cannon looked like in its new habitat. At this point it looked somewhat outrageous, as some of it was bright red, some unpainted grey, with some goldish photoetch slabs here and there. But it was good to see the progress, even if it wasn't pretty yet.


I used my remaining minutes supergluing the small metal discs to the ammo racks, so that the almost completed cannon would have something to pass through. This posts progress (two evenings) was almost lightning-fast compared to me working slowly on the turret for a couple of weeks.

1.12.21

In the upper turret

The inner turret

While the last gluings of the turret basket were curing I started on the turret's inner details. There were going to be an insane amount of bits here, most of them traditionally pretty mysterious to me.


I had to admit it: bending the PE plates into correct angles was surprisingly painless this time. My largest issues with them came from the building order, some of the plastic pieces were to be installed before and some after. The instructions weren't of much help there.


Being cautious I left the superglue to set for a while with a healthy safety margin, and set the basket into the tank's hull just to see how it felt. It looked even more cramped than I had thought it would.


At this point there were so many fragile pieces hanging below the baseplate that I got a bit concerned if they suffered when laying the piece down overnight. The commander's seat, for one, was looking pretty precarious (and strangely angled).


Basketing the turret

If I had much hair left, this stage alone would've made it stand up. Basically attaching the turret's base to the basket should've been a simple and straightforward process, as the tall front- and rear bits were aligned with the basket's own edge.

Oh my, no. If you aligned one of those with the turret's inner ring, the other one was two millimeters off - to the inside! Doing this with the step-by-step gluing and slight bending was made more difficult by the fact that you couldn't leave the turret floor to rest on the other bit while the first one was curing, there was no natural support.

I decided to start the installation from the rear plate and use the pipe you could see in the bottom right as an extra support. The front bit I forced into place later, when the rear one had cured properly.


At this stage the turret was looking nasty. Just about the only positive thing I could say that it at least remained in once piece, which was a noticeable improvement from how it behaved half an hour earlier.

Shells!

Again I changed my approach with these puppies. I just detached the ammo rack w/ shells for the left side of the turret, cleaned them a bit and without further ado glued them together and into their own support wall. The grenade rack was an impressive sight and took almost all the available space from its side of the rear turret, as you would have expected.


Funny thing, but adding something as simple as the ammo shelf to its place improved my mood noticeably. Maybe it was because it was a no-problem subassembly and made a great difference when in place in this nasty-looking turret. Yes, I had bought a fresh superglue and an excessive amounts escaped as you could see in the photos.

Of the general furniture inside the turret, only the right side's ammo rack was missing at this point. I built it as quickly as I did the first one. Both were missing the PE discs, which I was going to attach well before I painted anything.