Mastodon

23.2.22

Weathering with pigments

Dusting

My weathering got started by picking through my pigment containers and choosing the ones that felt the most fitting ones. From the Tamiya Weathering Master set's triplet I chose sand, as my tank's inner floors would have some sand (not light sand nor mud) on them. This small box with three pigment tablets also contained a two-headed applicator, one end had a brush and the other a small dabbing sponge. During a good bunch of years the sponge had gotten dry and on the first careful poke half of it was lying in crumbles on the cutting mat. So yeah, that one wasn't going to be useful.

From the Vallejo Pigments series I chose some rust (VP 73118 Fresh Rust), burn umber (VP 73110 Burnt Umber) and black (VP 73116 Carbon Black). To get all of this to stay on I'd use some of their binder (26233 Pigment Binder).

Ages ago I had bought a set from AK Interactive, specifically for this kit, and I chose a couple of products from that packet. I had to skip the engine oil and track wash, as they were enamel-based and I had no handy products to clean my tools after those). Instead, I picked Dark Steel and Track Rust pigments to try them out.

Blackness

Easy targets first: I begun by applying carbon black to the muzzle brake, the exhaust pipe ends and as I thought of it, also on the rear deck's I/O vent grilles. Perphaps black wasn't the perfect option, but I felt it'd work nicely if applied lightly enough.


Sand

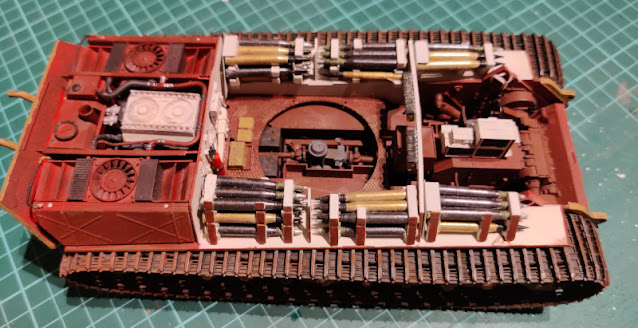
My sand cakes got spread mostly to the turret basket's floor and wherever my crew stomped around with their boots, such as the combat compartment's floors. My story was that the Jerries just made a mess of their otherwise cleanish tank.


At this stage the binder liquid was still wet, as you could tell by the photos. The results would look much better in a short while.

Track rust

Ignoring the most obvious use case suggested by the product's name I also applied it inside my tank, not just gently on the tracks. There were so many red-brown areas and I wanted to give them a bit of an effect that was something else than very visible dirt. I also applied this stuff a bit more heavy-handedly onto the heat exchangers, as they were a bit more subjected to the elements.


The track part of the track rust I could've concentrated more into the grooves, had I had a better tool available when I did this.

Steel powder

There weren't too many surfaces I could think of for the dark steel powder. To try it out somewhat safely I applied it onto the teeth of the turret ring.

That didn't look halfway bad so I proceeded to a bit more noticeable area: to the turret. My first clear place was the commander's machine gun rail. In addition to that I also poked some of this powder to the lifting loops and the corners of a couple of the hatches.

Finally I used some of the steel powder onto the edges of the tracks. I thought that'd compensate a bit for the rust pigment that had covered some of my earlier drybrushed gunmetal highlights.

The very next day

First thing I did the next afternoon was to take a few photos to record the state of the set pigments, as they didn't look too convincing in the in progress photos. Especially the gently sandied surfaces looked much better now. Also the effect on the red-brown areas was nice.


The King Tiger's tracks were the absolute main weapon in the set of my weathering attempts. I felt they were very successful.


As said, I was working on these while waiting for the other effects that were being delivered from some corner of brexitland. The transports didn't seem to be in any sort of a rush, that was certain.

16.2.22

Deficiencies

Jacked MG

I had managed to leave the tank's jack to gather dust for who knows how long. The same way the radio operator's machine gun had been waiting for its installation for months already. Now, with the tracks finished, and while I was waiting for some fresh weathering materials, it was the time to get them finished.

My own reference photos

As a little background story: in an earlier world (Spring 2019) we visited the Asturias railway museum. Among all the other stuff, heavy machinery maker insignia and whatnot I spied a couple of jacks. Of course I took some photos with the proper camera, for obvious reference purposes, and for quickness I shot a couple with my phone. I really couldn't imagine it was going to take this damn long to get to use them.


These little things were pretty much the same as the tank jacks (I had never seen one of those live, so I thought these were possibly same, or at worst similar enough), so I thought that using these as source material I couldn't go way too wrong. Perhaps a fresh unit didn't need to be that rusty, though.

Copykittying

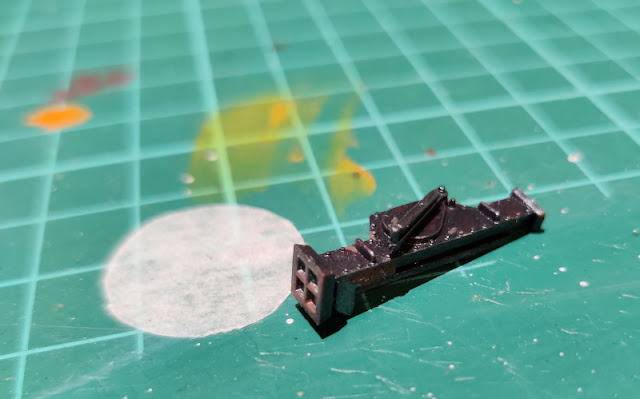
The jack I had assembled and primed a long time ago, and then forgotten it. First I painted both ends with gunmetal, then the rest with metallic black. As soon as the paints had dried, I drybrushed a bit of rust colour in various parts, the idea behind it being that some of the dents it had received were deep enough to expose the bare metal to the elements. I also drybrushed the edges and boltheads with gunmetal, to give the eye something to catch onto.


Again, as soon as the paints had dried I set the attachment brackets over the jack. This bit of dry-fitting revealed the correct places and I glued the brackets into the bottom end of the tank's rear armour. That's where it would be getting the hits and dents, while reversing over rocks and whatnot.

Ratatatatata

Due to a couple of fitting issues I had not glued the radio operator's MG34 in place. Now I glued it in for good. A little detail I had ignored to paint and that was the tip of the machine gun. I hadn't been eager to ruin the neat mini model with my amateurlike drilling. The machine gun's aiming was pretty much "straight ahead", I didn't want it being on the way any more than absolutely necessary.


9.2.22

Royal cat-trackwork, part 2

Continuing

After a relaxing break from these things (and an actual vacation) I returned to the track business. In my mind this was going to be pretty simple: a few painting runs per track, smashing them in and... this bit would be done.

The painting process

I primed my tracks with the dried bone. After that I took a few rounds for coating them with flat black, inside and outside, first having them lie on one side, then the other. This gave me a pretty good coverage.

The photo below showed the first session's result with the tracks lying on one side only. One of the tracks split into a few subchunks due to underapplication of glue much earlier. This wasn't an issue, as it made painting a bit easier and reconnecting them was simple.


First weathering

After the final blackening I painted the inner and outer surfaces lightly with brown (VMA 71037 Mud Brown). The goal was, traditionally, to get a nice, lighty dirtyish look.

On top of the brown I drybrushed my goto-metal (VMA 71072 Gunmetal), highlighting the track link edges and the teeth on the inner run. My goal was to get a pretty simple and gentle effect on the bits that were under the most mechanical wear.

Some people have recommended using a pencil on the track links, I couldn't remember if I had tried it, maybe that was looming somewhere in my future. The photo showed how the earlier one piece track had also split in two. Again, not a problem of any sort.


The installation process

The right track

Installing the tracks was a tiny bit worrisome. I started by fixing the tracks into single pieces again with superglue. After waiting for a bit I took the right side track with its drive sprocket, and dry-fitted for safety. As soon as I was certain of my success, I applied glue to the sprocket's axle hole and set the pieces into their places. When the alignments were good, I sealed the track loop with superglue.

The left track

Installing the second track was as simple as the first one, except that this time I had a bit less convenient holding spots for spinning the model around. The freshly installed right track had stolen away the support spots from the opposing side.


The track I had built wasn't optimal, but such was life and the price for not working on tanks in (too) many years. All in all the tank's look changed quite a bit with this step.

Oh, and go ahead and guess if I noticed way too late that I had set this track the wrong way? Yeah. The inner side of the track links were facing outside. Sigh.

Luckily I've never made the mistake of calling myself a good nor even mediocre modeler :D

A topless large cat

Of course I took more test photos. The top hull was something I was not courageous enough to dry-fit on again. I wasn't even sure if I was ever going to do that, due to the fitting issues.


Weathering was just about all that was missing here. What a shame, that my oil stains had dried into their jar.

2.2.22

A sidestep

Missing links

While working on the tracks I wanted to do something else TM for a moment. As a simple thing to try out was a small effect I had not used on serious models. In addition to that I'd also fix the only primer-wearing bits in the road wheels.

Edge highlighting

As you may remember I had washed the whole camouflaged area with brown. The idea here was to use the original camo colours and drybrush those over any raised edges and corners. Simple, nothing that'd jump out weirdly, and if anything stupid happened, undoing would be easy with a bit of wash.

On paper it sounded neat, but with the shades of paint I had used, the difference wasn't really noticeable anywhere else than in the cone in the front of the turret (this wasn't a Saukopf but as I mention the name, you all know which bit I was talking about). Of course I could've used slightly lighter tones, as I had those readily available, but I didn't go there due to the nature of the camo pattern. There was a risk of ruining the pattern and that kept me very cautious.


Next time I'd try a stronger one. Maybe I learned something from this, anyway.

Roadwheel touchups

As anyone with functional eyes could tell, the roadwheel rims and the locking cylinders were incomplete. They mostly had the red primer on them. I decided that those were not camouflaged, as the camo painter had more important and useful things to do, so a plausible basecoat was going to be good. I used the ruling basecoat of red brown with the idea being that it was a corrosion-protective paint.


While I was poking around the road wheels, I dabbed a bunch of flake effects with a piece of a sponge, applying some dark grey (Panzer Dark Grey). The last time I did this was inside the turret, so it was a continuation of the same effect. As gentle damages to the paintjob, they looked neat.