Mastodon

29.1.20

Flanker main assembly 1/2

Searching for the shape

Now that the cockpit was in a condition that I could live with I could get back to the business of building. As is known, the general sleek, smooth and kind of perfect shape of airplanes has been bothering me since the dawn of time itself, I haven't enjoyed the pressure these requirements put on me. That in mind I prepared for this stage with tape and pegs.

Half + half

Thanks to the cockpit tub being glued in place ages ago one of the key problems was out of my way - or made worse if it was misaligned, making fixing it even more annoying than normally. The die had been cast, onwards to glory!

Surprisingly the airframe halves settled together pretty nicely and without many hiccups. A couple of uglily grinning lengths I pressed together tightly and taped them shut for a while so I could do something a bit more motivating meanwhile.

Intake scoops

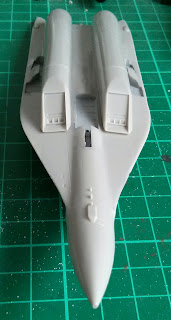
The intake vents, those funky lengthwise-running squarish tubes, didn't act up when I was assembling them. There was some sort of a miniramp that was added inside and while looking at them they looked like they didn't cover as much as I think they should, but what did I know about jet engines, anyway? After all, they were cleanly glued in, looked fine and that was just good enough for me.


I was somehow amused by the fact that the intake things weren't glued flush against the underbelly of the Flanker but they lied on top of some small riser bits (re: photo above, left edge, arrowhead-like protrusion). My very vague memory from the MiG-29 project said that its engine air intakes were different, but it really wouldn't be the first time my memories had gotten corrupted over mere seconds, not to mention years.


Saturn AL-31F

Next up I was going for the output ends of the engines. These were built out of three parts: on the bottom there was this afterburner disc and the nozzle setup that came in two cylindrical bits.


Good thing I had the patience to dry-fit the discs always before bringing out the glue, because the airframe wasn't as clean as I thought it was. The first disc fit like a glove, the second one tried to get jammed pointing a handful of degrees off. A few slashes with the x-acto knife solved that issue handily.


I really didn't count how many times I double checked that the nozzle parts were both in the correct order and set facing the right way, hopefully. At least both sets would be wrong the same way, as I really didn't know any better than to go with my "looks ok to me".


Wings

Again I got taken by surprise, in a positive way, by the kit. The main wings got installed without a hitch and they were, generally speaking, on their best behaviour. That tailplane was funny, with the extra edge piece was installed to fill the rear edge next to the exhaust bits. I dared to assume it had some important functions to take care of in the real world.


Well, that was already looking like a flier, even with half of the wings missing. After installing the other half, I got to ponder what to do in which order for the painting to go as smoothly as possible. While typing this post up I was thinking along the lines of leaving the landing gear and the landing gear bay doors uninstalled so that I could paint the bays and the landing gear setup easily, avoiding my typical "how the **** am I supposed to paint this part decently anymore when it's **** full of **** already?" rants.


22.1.20

Soviet cockpit II

Brushing on some paint

My first idea was to paint the subassembly I finished the last time and the inner parts of the upper airframe half with Jade Green and then work on that base depending on how it ended up looking. This was a very fine idea but it got foiled by the paint that had dried inside the bottle after all these years. I then tried a slightly greener paint (Goblin Green) but that was more like a wash than anything else due to some ancient mistreatment of mine. Graaaaah. I shouldn't have applied it anywhere, but I tried and it failed.

The pilot's dashboard's cover I painted light grey (VMA 71276 USAF Light Grey) at this point. I had a suspicion I might attack it somehow later on.

Base mixture

Before any further attempts I glued the workstation onto the lower airframe piece. I thought that this way I could maybe paint it a bit more easily and cleanly.

For the new improved cockpit interior I mixed some blue (VMA 71111 UK Mediterranean Blue) with a bit of green (VMA 71017 Russian Green 4BO) and repainted all the fugly bits. The ejection seat I left pretty much untouched for now.


Shading

After a chat with a colleague who has painted Warhammer pieces just for the fun of it I knew that the nearest GW shop was practically next door from my workplace. I remembered that at some point Citadel had had a colour called something like Hawk Turquoise and it sounded like something I should consider for this case.

Of course they had changed their paint lines, names and everything again since the last time I had perused their wares. I bought two paints that I thought sounded and looked like something useful. Then I painted over the mix of mine with a different blue (Citadel "Layer" Ahriman Blue).


To give the IP some life I took a couple of surfaces under my aim and painted those with a lighter blue (Citadel "Layer" Temple Guard Blue) to represent a case of "here's a new module and it was only painted with a different mix, so stop whining, comrade". This was all a bit more blue than I had intended and I thought if I should wash them with green but I realized that it wouldn't most likely work at all as I wanted to. I let them be to avoid ruining anything.


The IP and controls

This Su-27 was clearly modeled after a source older than myself, a thing which I assumed true based on the amount of round dials and nothing else on the instrument panel. All the modern humbug like MFDs and large panels were not there. Not that any of the planes on this scale had ever jumped at me in a good or bad way with their panels (for some reason I had this feeling that the IP bits were always the same, no matter which plane you were building).

All I wanted for it was that it was good enough, meaning something I'd believe at a glance. If one could see anything through the canopy later on.

References

I spent a while in the image search world for relevant sources. Of the things I found I copied a few locally as backups and added an URL to the one I had taken, as the caption. Maybe they'd be enough for this project.

[SOURCE]

[SOURCE]

[SOURCE]

[SOURCE]

[SOURCE]

Imitating life

Detailing began with the most obvious thing: I painted a vertical white (VMA 71279 Insignia White) line through the center of the panel and a pair of horizontal smaller lines to divide the dialspace somehow. Those extra lines wouldn't be noticeable at all later on. As far as I had understood the point of the center-axis line was to help the pilot whenever the plane ended up in a difficult spin, stall or whatnot. I could not even imagine the methods the instructors used to use to get the "align the stick with that white band" to become a no thought -operation in certain circumstances.


After that I painted all the lumps and protrusions on the IP and the armrests with black (VGC 72051 Black). In addition I also did the base and the grip part of the joystick black and added a couple of small dots onto the joystick's tip as hat switches and such. The ejection seat I also painted black in the end even though I had entertained the thought of doing that with Russian Green instead. As usual, the seat was ascetic, so I didn't go and paint any harnesses, straps or anything that one could see in the reference images above.


Finally I decorated a couple of the dials and some buttons with red (VMA 71085 Ferrari Red) and added a dot to the joystick's end to function as some sort of a trigger. Again, I doubted anyone'd ever notice them, but they were there anyway. The funny thing I've also noticed on these 1:72 planes is that the ejection seat triggering handles or loops have never been modeled in the kit, which is funny because I've always thought that'd be a good, visible detail.


15.1.20

Soviet cockpit I

Assembling

I built the cockpit interior in one sitting. Maybe I could've made my painting process a bit simpler by not gluing the ejection seat on yet, but I didn't really see the hassle of that sort of optimization being actually beneficial or necessary.

These small-scale planes haven't typically inspired me to customize them, mostly because I just don't know enough to go for that. Still I felt like adding a throttle lever to the left arm panel. But according to some image searching, the folks working in an engineering office had decreed that the throttle lever was installed into the side wall instead. Maybe it was a good idea not to start doing silly things just because I felt they could work.


8.1.20

Project I/20

Sukhoi Su-28

Despite all my yapping about wanting to roll in the mud I chose to stay with the weird world of the winged things. The Soviet/Russian green-blue theme sounded like a fun, different theme to experiment with, so changing the element didn't feel that important anymore. Besides, I have always liked the look of this plane that NATO folks dubbed Flanker (just like MiG-29 that has also been the archetype for a jet fighter for me)


Pieces

I think I've said this countless times before, but these small-scale planes have always struck me dumb with the low part count, every single time a box gets opened. This one was no exception, in addition to the wings and the airframe it was pretty much all missile with pylons / rails and landing gear bits. What remained looked like an assortment of antennas, engine nozzles and more mystical thingamagicks that might maybe get some sort of a reason for existing as the build progressed.


Instructions

Lucky me with most of the important things being in the pics, for the text didn't help me much. Then again, requoting myself, "how hard could it be?"

The biggest problem with the pictures was that they were abysmally small for my bad eyes and especially the less self-evident and weirder subassemblies were going to be pretty much done with some trial and lots of errors and swearing. It'd be so much easier if I just built it in flight mode, but with an empty cockpit I felt it would've been slightly silly.


Decals

I found two sheets of decals from the bottom of the box. If there was something I could see myself really using were the numbers, some who-knew-what markings and the red stars. All this of course required the decals to actually behave.


1.1.20

Hm, so what next?

Queue status, Q1/'20

Right. It was, according to the calendar, the first day of 2020, the workbench was empty, the 'mumblings TODO pile was a mess and the maker on vacation somewhere else. Last year's project saldo was an appalling two finished models from start to finish and some other badly documented themes.

I was thinking very hard what I wanted to do next, when I got back to the table. My two last models had been fliers, so a ground-based model would be good for my mind. Also the stencils I bought a bit over three years ago were still screaming for their first utilization. The stash had at least three Panzers, especially the Königstiger w/ interior was really, really interesting.


Of course there was the Atomic Annie with her movers, the sheer amusement factor of it was really cool. My main issue was that the Revell's matchbox-sized Tiger with infantry -kit was the only one that didn't look like a long project. Right now I felt like something quick and with a potentially funny, even playful paintjob.