Mastodon
Showing posts with label MPC/ERTL. Show all posts

11.12.19

Finished: Project II/19

Some projects of mine have just flown from the beginning to the very end at a rapid pace, powered some cosmic inspiration. Some of those have ground through with a murderously steady but slower progress throughout their lifecycle. Then some, such as this one, have been burdened with a more pulsating heartbeat, as these posts that have spread over a number of months have maybe hinted at. What caused this to happen with this exact project, I really could not guess or point a finger at. It was especially confusing, as I had been pretty excited about getting to fix this model.

Maybe a part of the blame lies on this being an already built and painted set, just maintaining and "only" repainting it. Or it could be caused by this year being so packed with so much other stuff that things have gotten prioritized a bit unfavourably for 'Mumblings.

The renovation process ate about half a year from my calendar and I spent - this one included- an eye-watering count of 27 postfuls of text. I took 139 work in progress photos and 15 of the finished model. The actual time used I didn't dare count, because the oversimplified 26 * 0,75h = 19,5h was not what I used, for this thing that sounded so very quick, easy and simple when starting.
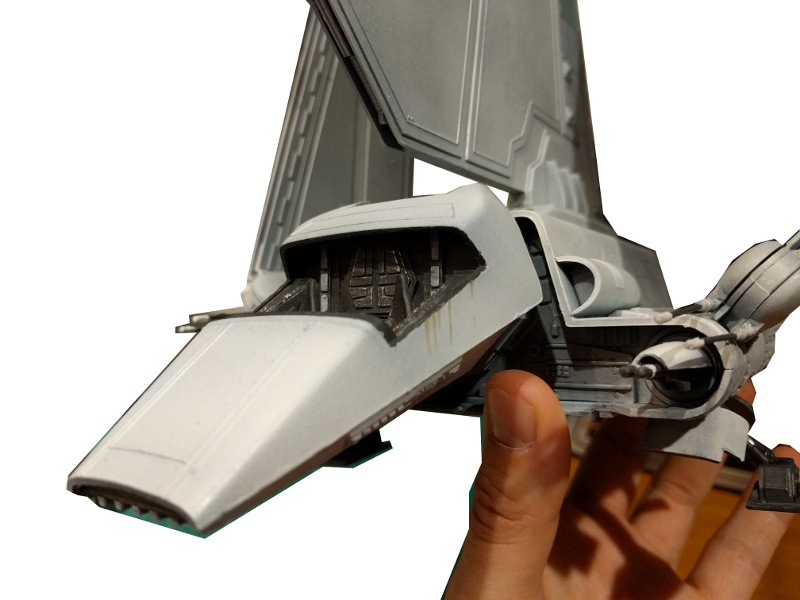
The final photoset

While taking photos of the smaller models I've often lamented that I didn't have a good setup for taking photos. So far simply setting up some A4s as a flat background and flooring have been a good enough of a hack, but this beautiful spacecraft build by Sienar Fleet Systems was way too large for anything like that anymore. I really should've bought one of those light tents, as I was itching to get one earlier this year.

Well, no sense crying over spilt milk. I went for the just about only neutral background I could find in the house and set up the shuttle for posing. The light environment was woeful to compensate the flatness of the background, of course. All I could do was to hope that the reader forgives me my weirdly, unevenly and frantically set up backup lightning, as I didn't want to ruin my photos by using the flash at such extreme short distances, either. Afterwards I just gimped out some smudges and unnecessary seams from the background, before cropping the remains.


git diff shu_ondiv

I felt that it would be a good idea to show a side-by-side comparison of the versions 1.0 and 1.1. Of course both of them had a different background style, the photos had been taken with cameras of vastly different quality, from who knew what angles and as the icing on the cake the pics had been edited in different ways. Ondiv's original first version also wasn't properly documented and there were few photos of her, even fewer of those were even tolerable. So the comparison was going to be pretty much feeling-based.

#001
v 1.0 v 1.1


#002
v 1.0 v 1.1


#003
v 1.0 v 1.1

#004
v 1.0 v 1.1

Honestly, I felt that the new version looked better than the previous one. I also thought that had I started from scratch instead of working iteratively I'd gotten a much, much better final product and I was not only referring to the jaunty angle caused by the misaligned landing gear.

So I've apparently learned and developed my skills somehow over the years. Judging that was left for the viewer, I was content to lock myself inside my own bubble.

What about the Lambda-class T4a shuttle in Lego?

A few years ago I bought myself a couple of larger Lego sets (75093 "Death Star final duel" and 75094 "Imperial shuttle Tydirium" that was full of evil space terrorists). Even though I've taken photos and written some posts of my Lego kits, some of the more essential sets such as these two have somehow fallen through the proverbial cracks. In case you hadn't guessed, a part of the paintjob's inspiration came from the Lego sister, I was happy to admit.


4.12.19

The final detailing sessions

On last week's Monday I finally decided that "it's pretty much done now" and started getting on to the final touches. The bottom of the shuttle I had drybrushed with the off-white but I left it intentionally darker than the top side, for a dirtier and more worn look.

A coat of satin

For convenience I spread out my varnishing operation (Vallejo Satin Varnish) in three parts to make the handling of the model that much easier. I started with the cockpit module, the main wing and the bulkier part of the upper airframe. On the second round I worked on the rotating wings and the front and back parts of the hull. The last round saw me working on the hatches and the remaining of the frame itself.


My intention with this semiglossy layer was to give a bit of a metallic shine to my shuttle. A glossy one would have, as is known, made it look all wet and that would've been fitting if I had wanted to make a heavily rain-weathered and also a based model. This effect wasn't too well noticeable in the photos, the shimmer was so subtle.

Thrusters: [offline]

Last week I had been thinking of the engines and how they should behave. I decided to make them look like they were shut down, cold - diverging from just about all the Lambda-class shuttles I have ever seen anywhere, physical or renders.

For the base of the engine thruster ports I applied the same dark grey so familiar from everywhere else on this shuttle. Over that I drybrushed somewhat harshly and with a randomish pattern some rubbery black (VMA 71315 Tyre Black)


For the top layer I went with a very obscure pattern of flat black. I expected the effect to work, with the black having a couple of other dark strangely patterned layers. At least I hoped a viewer wouldn't see the thrusters either too flat or too bumpy.


Wrapping up

While working with the black I applied tiny dots for each of the laser cannons. From the darker front/rear hull pieces and the bottom I chose some cables, pipes or panels that I wanted to highlight with red (VGC 72011 Gory Red) and black (Tyre Black), for variety.


Lastly I glued the windshield to cover the viewport. The model started finally looking like it was actually ready.


27.11.19

Shuttleweather

Oil leaks on my shuttle

It was the time when I could start thinking of using something from my less-than-often-enough used arsenal of weathering products. Perhaps my shuttle was being serviced or in dire need of a knowing touch of a mechanic. No matter what the case was, the landing gears had developed some not insignificant oil leaks (VWE / Engine / 73813 Oil Stains). One had a long streak of oil running down the length of it, the other one had a good pool of oil forming on the footpad. The pics didn't show, nor would it be noticeable from the normal angle of viewing, but I also applied some oil stains to the bottom of the cockpit module, where I had added some random cables.

For a fleeting moment I had thought of using some VWE / Environment series grassy muck or something but I chose not to. Maybe if I had the space to house an outdoorsy base for this I could've done that, but for a model of this size I just couldn't go for it.


Air filter or radiator or something

On the original version of the shuttle had a very strongly painted grille on the top of it. This time I decided that the thing didn't really need a heavy darkening anymore, a quick dark wash was going to be just fine. That also worked with my idea of having the armoured plates of the shuttle to be white, some things were just going to have seen more life than some others.


The photo above was taken while the wash (VMW 76516 Grey wash) was still wet.

Rainmarks

The local late autumn weather had taken its toll on me, so the shuttle was made to suffer from some the approaching polar night (nah, we don't get that properly here on these latitudes, I just love to complain). I applied some rain streaks here and there, starting from the edge of the cockpit's viewport and continued to the wings. Didn't go too heavily with them, because I didn't want to make me shuttle look derelict, either. Maybe it was under a badly built, leaky temp shelter, while waiting for maintenance?


20.11.19

Back to the details

As if my face was missing my nose

Now was the time to finally return the cockpit unit onto the airframe. This also let me to check that if the model was properly balanced now - yes it was. I didn't glue the viewport glass on yet, as I didn't want to risk ruining it at this point in the long process.


The landing gear

I simply brushed the landing gears first, then proceeded to the landing gear bays with the same colour. As the main colour I used the same dark grey I had prepped the shuttle to begin with (VMA 71123 USAF Dark Grey). After that had dried I heavily drybrushed the landing gears themselves with the lighter grey (VMA 71120 USAF Medum Grey).


The inner surfaces and the edges of the landing gear bay doors I painted and left dark grey. The outsides I'd later on revisit with the off-white to make sure they looked the way I had designed. The landing gear bays or the doors I didn't highlight at all with the lighter grey, my intention being giving contrast.


Lasergunnery

I spent a good while thinking of the frontside weaponry. Ultimately I decided that the laser guns would be mostly dark grey. First I painted the barrels of the rotating wing-mounted laser cannons, leaving the stems / bases as they were. The fixed, shoulder-mounted twin laser cannons I painted grey from under the shield plate.


They'd need some fixing later on, especially those remaining bits that were going to be off-white. I assumed that the twin cannons would need some fresh white applied, as I didn't leave anything untouched this time, just to make them a bit easier on the eyes (I felt that just leaving them sticking out, dark as night, might make them stand out too weirdly). The general plan was also to leave the dark grey bits that way, not adding any metallics on them at all, nor any lighter grey drybrushing.

6.11.19

From the bottom there's only one way forward

Delaying

I had to admit that repainting the bottom of the shuttle had not been looming in my horizon as the most exciting and wonderfulest of tasks. On Friday I finally pulled myself together and masked off what was to be masked and painted the final major area in three quick runs.

Again I had forgotten how thick my darker grey had gone (VMA 71123 USAF Dark Grey) and that made this process take at least twice as long as it had any business taking. The basic grey and off-white worked just like they promised to and that reduced my overall swearing significantly.


Finally getting up to speed I forgot to take the wip photo of the basic grey (VMA 71120 USAF Medium Grey) before applying the off-white, but I guess that wasn't a big issue as I had already documented the more noticeable parts at this stage properly. Over the grey I blasted a more carefully laid out layer of insignia white (VMA 71279) so that the landing gear bays and the landing gear themselves were left as clear of it as possible.


With the same idea I left the insides of the landing gear bay doors dark grey, but blasted the outsides white. My guiding idea was that the armoured outer shell of the shuttle was painted in a certain way and the less protected bits that were inside were clearly different looking. I wasn't quite sure what I'd do to them on the next painting round but I was thinking along the lines of dark grey base with drybrushed medium grey. That'd also fit the front/back bits of the shuttle that I had already established.


Now I only had to come up with a plan for the engine ports. In the Return of the Jedi and some games they have been, if my memory served me correctly, bright, cold blue-white. Why not? I could prep the ports with a metallic paint mixed with some white and apply a blue wash on them - but what if the engines were not warm and ready to run? Dark ports (almost anthrazite + metallic effect perhaps) to depict turned-off engines?

Whatever plan would eventually lock itself inside my brain it would not be flat black (#000000), that's for sure. I just wanted to do something else than the oh-so-typical white, because some more contrast in this model would not be wrong.


Yet again I noticed that I had put off this task for ages just to notice that it took, in fact, half an hour of work in total. Maybe admitting to my failings this way semi-publicly could help me behave in the future.

30.10.19

Back to prepwork

Laying the groundwork - again

I had gotten pretty frustrated with the look of the bottom rear end of the shuttle. One evening I finally grabbed the putty and filled the remaining chasms between the hull and the neat, rounded bit that mostly frames the engine exhaust ports. For safety and security I allowed it until the next day before I returned to it.


After the paranoidly long curing time I cleaned the area with sanding paper (150, if my memory didn't fail me again). It was better now. I also cleaned up some odd and weird paint blobs with the old x-acto knife. All of this was going to be repainted anyway, as I had left it untouhced when priming and painting the rest of the model.


Extra bonus

At long last I had made up my mind and painted the edges of the windshield / viewport glass to look rubbery (VMA 71315 Tyre black). Somehow the extra dark edge felt concerning to me, on a generally very light model, but I thought that as I had done this same exact thing on real world planes, it ought to work just fine. And the inside of the cockpit was dark anyway.