The bottom
Let's get this confession out of the way first. I started building the frame of the car upside down: I didn't check the E/N markings (that told which was the engraved and which the non-engraved side) from the instructions carefully, unlike in the previous MEM projects. I just looked at the pieces and saw that the attachment points looked correct based on the picture and went with that. I had built the main shape, some cylinders in it and a shallow box below where I expected the gearbox to live in.
The center console got something like an ashtray (or a c-cassette tray) and the hand brake lever. Or the lever was a gear selector, I wasn't too up to date on DeLorean's insides, especially when it didn't have a Time Circuit nor a Flux Capacitor.
At this point I decided to take the risk on the structural integrity and flipped the base plates around to follow the markings on the instructions - also swapping the pieces I had misinstalled earlier. What weighed most in my mind's scales was that I really couldn't be certain that the outer frame could be correctly installed onto the base if it actually was not perfectly symmetrical.
So, I installed pieces happily and built the subcomponents like any other time. Then the instructions and its accuracy with the pieces collapesd: in the picture below the pedal component was correctly on the right side of the vehicle - in the model its attachment points were on the passenger's side as if it was the British version instead. That was worrying me.
At this point I really couldn't re-reflip everything, as the bends would've certainly broken with another flip-flop action. I checked, many times, that I had the sides of the pieces showing exactly as the instructions told: engraged/painted sides where it wanted them. Curses.
Remember the previous post where I was concerned about the C-sheet's piece that looked flimsy and easily breakable? Installing that one required such an amount of poking, pushing and pulling that I think I got two more grey hairs. The car's bottom's 90° instructed angles weren't quite as pleasantly straight after the bottom bit got in place. Nothing had broken or snapped yet, but the signs weren't too comforting.
Wheels
Assembling the front and rear wheels was much less flimsy work, and this dragged my stress levels down a bit. First order of business was to set up the car body -facing inner parts into the inner hubs. Those looked like they escaped from a Super Mario game with their almost neutral faces :D
Attaching these bits into the car was then more bothersome than I had anticipated, and also fingertip-hurting. This wasn't made any easier by the little detail of attaching small hubs into the flimsy and bendy parts in the car's body. Still, I got them all on without breaking the connector points.
While installing the front wheel parts the small wall in the foot area snapped off, with pedals and all.
At this point I was feeling a bit down with all this weirdness. I kept building the wheels nonetheless. Bending the hubcaps into well-sized and angled funnels was surprisingly challenging and sweatifying, but they ended up just fine. One of them lost a spoke or two, while one other looked generally mistreated.
Despite the little pains the wheels were pretty neat. Getting them all combined was a subprocess that, again, worried me slightly.
Surprisingly they all behaved well. The biggest problem weren't the wheels themselves but the flimsy (and stressed) pieces they were attached to.
Insides
After finishing the wheels I got to build the seats. I bent the curved parts pretty much by guess, attempting to follow the shapes given by the seat frame. The most difficult thing with these was getting anything adjusted later on without ruining the paintwork.
Easy, quick and even fun. The attachments were tight and there was a decent amount of space for them, unlike in some more seriously confined builds. This hat shelf grille was a bit weird to bend into a nice curve, but it too turned out fine
Outer frame
Interestingly the next step was the brushed aluminium exterior of the car itself. First the somewhat complex-looking bit received the hood (or was it the trunk lid, as we were talking about a rear-engine vehicle). The hood was a later 1981 model without the refueling flap.
The steering wheel with the whisker-containing block was installed into the dashboard. Its position kept looking and feeling wrong to me, so I checked and rechecked a number of times that I was indeed installing it correclty before I twisted the attachment bits tightly.
Over the steering piece I installed the dashboard box, which was also a bit of a wrestle thanks to funny angles. Still, the installation was tight after I had sworn it into place.
Door frames
This may be a bit of a funny-sounding subtitle, but these bits were so curious that I felt they warranted their own section here. First the very strangely shaped flat bit was to be bent in a few different ways to get it to sit inside the car's body.
At least these had pretty clear markings for where to bend and twist, so the only mysteries were the actual angles that couldn't be clearly done by following the other edges such as the bottom frame seen above. To protect the pieces from extra suffering of angle readjustments, I left these mystery angles a bit shallower than what I expected them to live in for real. Metal Earth Models have demonstrated clearly how much better it was to tighten an angle later on than to open it up.
After a surprisingly painless installation the upper frame had suffered a bit of a distortion but I expectedit to get straightened pretty easily still. Installing this first doorframe revealed my guessing skills to suck: I had estimated the car body's angles much steeper than what they were. Despite that the pieces cooperated well.
The map reader's copy went through the process much more quickly and simply, as it wasn't the first one of its kind. The flimsiness of all these was still pretty baffling to me.
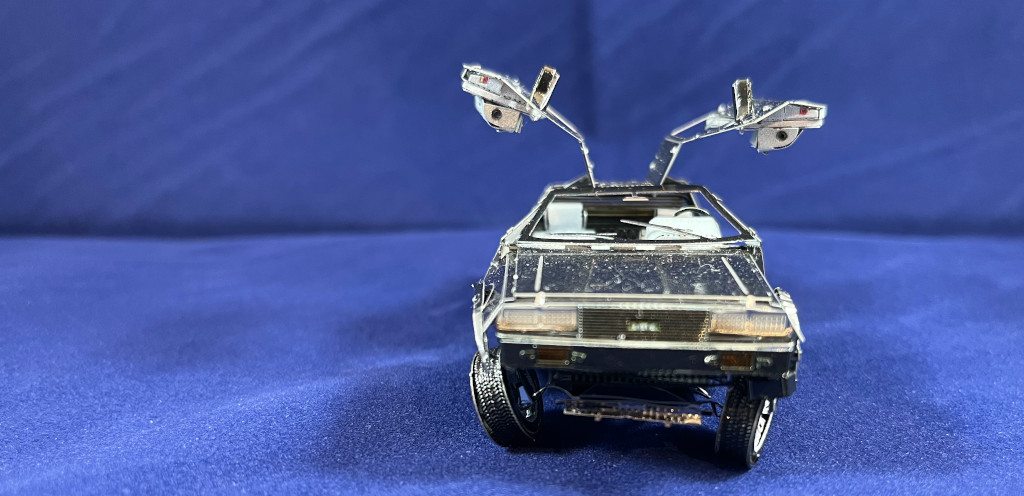
Roof with the windshield and rear window
Apparently I had forgotten to take a bunch of wip photos of DeLorean's back part. What I didn't document were the engine grille, rear light assembly and whatnot. Nothing dramatic, but I had to mention so no one expected this photo below was just a single piece to be installed.
As one was expecting, bending that kind of a multi-angle piece into the correct shape and curves, and then into the different attachment points in the outer shell of the car wasn't instantly done. This required a good amount of rotations, sweaty fingers and lots of caution, as I didn't want to crumple the car's shell while closing the attachments.
It ended up looking pretty cool. In hindsight I should've bent the rear window's gills (or whatever they were called) before. Doing that later on was a bit more difficult due to the physical blocks.
Nose-tail
Next up: the lower front of the car. This was simple and very cool-looking very quickly. Again the challenge was installing it into a half-loose piece in the car's nose. Aided by some classic swears it all worked out anyway.
Getting the rear of the car properly connected was, as the theme has been, sweaty and bothersome. Luckily all the pieces involved were sturdy enough at this point so that I didn't need to worry awfully much about breaking them.
Fenders
I was mentally heading towards the door assembly when the instructions pushed me to add the fenders. This was fun again: in their sprue the pieces were almost full circles, from where they were to be bent into a semi-roll and to flow over the angles of the car's sides.
Exactly.
To begin with I took the first part and shaped it over the x-acto knife's handle, then dry-fitted the four attachment points. After a few wasted "all or at least three positioned in one go" attempts I gave up and just connected the frontmost one tightly. Then the next, the third and finally I pulled the rearmost one into place.
I repeated the second approach for the remaining three fenders and my guess was I spent less time with those three than I did on my wasted tries for the first fender. Business as usual.
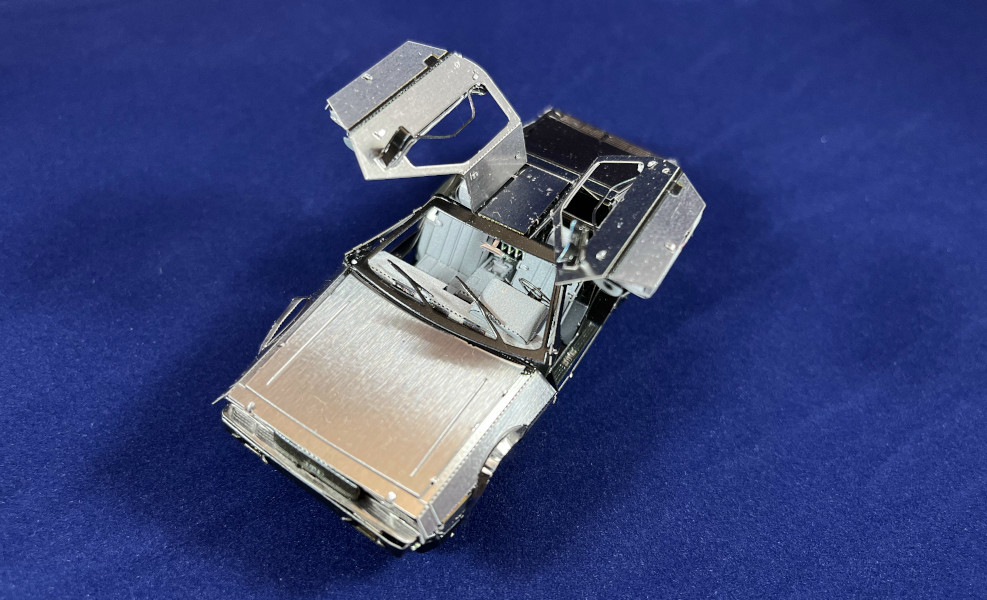
According to the instructions this was the last moment one could take a "this is how the insides look like" photo. Next step was to permanently connect the halves.
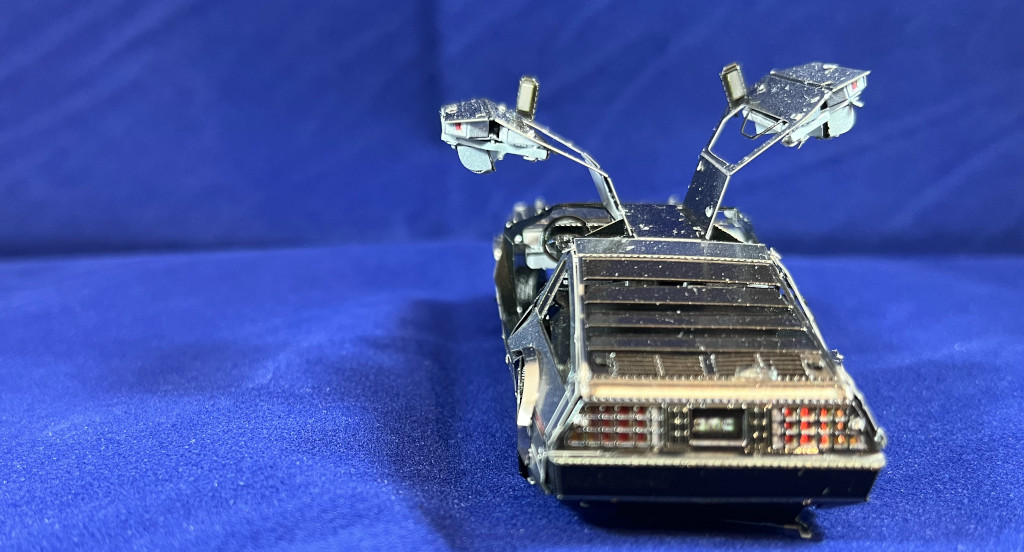
Failure
So here was the situation before my attempt at assembling the car halves. I didn't count how many attempts I did at squeezing or twisting the parts inside each other. For some reason the rear end didn't fit in at all but was blocked somewhere. I also couldn't align the rear attachment points (two tabs in the rear of the frame - two slits in the rear end of the body, located fantastically in an edge). After all the fighting the wheel attachment parts suffered even more and the tormented bends got more tormented.
Gull wing doors
To minimize my frustration I skipped to the next section of the instructions: the doors. While building the first one I was amazed by how ridiculously bulky they seemed to be on the inside.
Here was the driver's completed door with wing mirrors and all. From a bit further away the connectors didn't stand out as much, as opposed to these closeups where everything ended up looking like a bolted-up Soviet tank from the late thirties.
Same door from the inside. It nicely had the handle for pulling the door shut from the inside, I noticed (or recognized) it only this late.
Due to the gross failure mere moments ago I was afraid that attaching the door to the tiny roof part was going to be painful and damaging, but it ended up being one of the simplest things in the whole build.
And here was the right door installed. Among many other details I hadn't noticed the reflectors on the doors while I was building them.
This was as well the car halves didn't join. Especially the front looked like the driver had sped into a tree stump and the car continued a bit while the front axle remained.
It was all extraordinarily annoying, as I found the model fantastic and building it was fun despite my complaints. Excluding the lowest part of the car's frame that was like a piece of spiderweb that lost its shape and integrity too easily. That also was completely unavoidable, as connecting pieces together required some pressure.
Oh well, this was just one smallish failure in the world of the Project Mumlings.
Silliness
My shelf still had the Playmobil time machine built into a DeLorean (70317) from two yules ago. Of course I had to take photos of them together! Now I just needed the Lego version to become available...