Mastodon
Showing posts with label Mig-29. Show all posts

24.10.13

Completed: project I/13

Ta-da!

The first modeling project of the year is now completed. This took exactly five months, as I took the final photos yesterday. Reporting overflowed to today, but that's not important. Following the glorious traditions of Projectmumblings my pace has been random and everything (beginning from the weather) has affected it.


There's nothing really spectacular or special to say right now. Mostly I'm just content that this thing is finished and I even look at the results benevolently. Of course there's always room for improvement, so I don't get caught in that anymore. I'm so pleased, actually, that I have considered working on other flying deathtraps in the same scale. If I get even madder than I already am I could go for something modern, can you imagine?


A bunch o' photos

Without further ado, here's a load of photos with a hastily prepared A4 background. Each of the pictures needed to be straightened up afterwards, thanks to my ultraexcited photo assistant. While I was telling how the tripod is used and not to be poked around all the time, I noticed that one of the leg extension blocks had fallen out of its place...


This is one of my absolute favourite photos in 'Mumblings


22.10.13

The final wash

Decision making

As is very well known, I'd been pondering on washing the plane for a good while. Until yesterday my dominant thought had been "nah, I'd ruin it", but after staring at the model and the paintjob for weeks I just couldn't unsee the detail-loss on the panel lines. There was no alternative, my mind was set.

Surface wash

I dug out my Devlan Mud and applied it all around the damn thing, with long swipes along the lenght of the plane. The result I was looking for, as with the base, was a rain-beaten look. You'll see how it ended up:


What else?

The end is nigh. Though, I was still pondering if I should apply Badab Black on the mouth of the cannon before I declare this project finally done. At long last.

21.10.13

Enough is enough

The twinkling of the nested stars

Instead of playing even more with masking tape (or, as Lasse mentioned in an earlier comment (on the Finnish side), buing a thin, fine red marker) I picked up a narrow piece of plastic. Everybody knows those plastic things you find in the clothes tags, I assume. So, I dipped one of those in red paint and drew the borders. For a bothersome and yet again undocumented reason I made the border lines thicker than what they actually needed to be or what they could've been. Life is hard and art requires sacrifices.


Here we are today, I think I'll try to get the panel lines washed one of these evenings. Then we've reached the final photos stage both before and after attaching the plane on its base.

18.10.13

Edgy roundels

"Accepting the facts is the beginning of wisdom"

In case my memory serves me even half-decently, someone somewhere once said something like that at some point in the history. The fact that requires acceptance on this round of the Project Mumblings is this: had I decided to leave those white lines off my model, even though I knew they belonged there, I'd suffered plenty. So what else could I do but attack my stencils and masking tape...


Taking a deep breath and getting to work

This phase made me doubt myself quite a lot. I guess the main reason is that the previous attempt with slightly undersized roundels failed so miserably - luckily there's no evidence of it anywhere outside my brain. No guts, no glory, so I painted the edges of my stencils white. Six stars were easily ruined, but the waiting. Waiting was painful.


Intermediate result


After the paint had cured I was even more nervous than before I begun this step. Ultracarefully I peeled off my first target, the left horizontal stabilizier's masking tape star. Himmel! It actually looked like something!
Of course the red fill and the outer edges would need touching up but I wasn't nearly that concerned anymore.


A weight of tons fell off my poor heart. How in the name of the Empire can this hobby be so nervewracking sometimes? And right now I'm not talking about hunting sub-millimeter pieces from carpets, floors or wherever or fighting to get them where they belong. Those things are in a totally different league of issues :p


We're not done yet, oh no. There's still plenty to fix and touch up, but at long last we've reached that part of the project where one can actually believe to see the end somewhere. That is wonderful.

3.10.13

Basework

Painting and messifying the display stand

In case you forgot already, the last time I had finished with the plastic plates and that I had applied the ballast here and there. After that the whole setup was primed gray. Simple and quick.
The part of the stand that's not a part of the display was painted with Tamiya's XF-10 Flat Brown. Somehow I recall that there were some spots I painted badly, but then again, the already uneven coating might end up looking just fine and interetsing instead of a boring flatness. Maybe I'll drybrush some lighter brown here and there anyway.

A weather-ruined frontyard of a hangar


As with the stand itsel, a plain grey surface would've been really boring. So I applied a slightly hasty layer of darker grey on the slates and then drybrushed the edges gently with a lighter gray, using my trusty Vallejo greys. After that setup had dried I dug out the washes I received in the early summer. The concrete slabs were washed with Vallejo's grey and the gravely parts with brown wash (Model Wash 76.516 Grey; Model Wash 76.513 Brown).

I think the stand looked now nicely autumnish and to enforce that feeling I applied some puddles here and there with my old, trusty Vallejo's acrylic water (Still Water 26230). According to the internet, I could've done something to make the puddles stand out even better but let them be as they are, you may see them from a proper angle, if they're visible at all.


The everspreading weeds


When all this had cured properly overnight, I superglued a couple of Woodland Scenics' grass tufts in the edge of the bigger gravel patch and the broken concrete slab. Then I dropped a bunch of droplets of superglue in random places along the slab's edges and dabbed tiny amounts of WS foliage on said drops.

This had got me started with the weird details so I dug out the summer's Vallejo pigment bottles and the old Tamiya pigment box. From the first set I used the grey powder mostly on the edges of the concrete pieces and the light brown stuff on the gravel, wherever it happened to be. Then from the older kit I used "mud" on the top parts (in the picture) especially and some bigger empty areas, the "wet sand" around the bottom right, where the gravel lies.

Test photos


My idea was that the display stand would be a depiction of a front yard of a hangar on a slightly ill-kept air base, where the weeds are returning slowly but steadily. To my horrible eyes the effect is just what I was going for, but who can tell how you, dear readers and photo-oglers take it...


27.9.13

Bouncing and leaping

Plenty and quickly

Fueled by the project's advancement I got carried away and worked on it a bit more than usual, ignoring my other hobbies. I still try to explain in short what I got done.

The noble skill of waging war

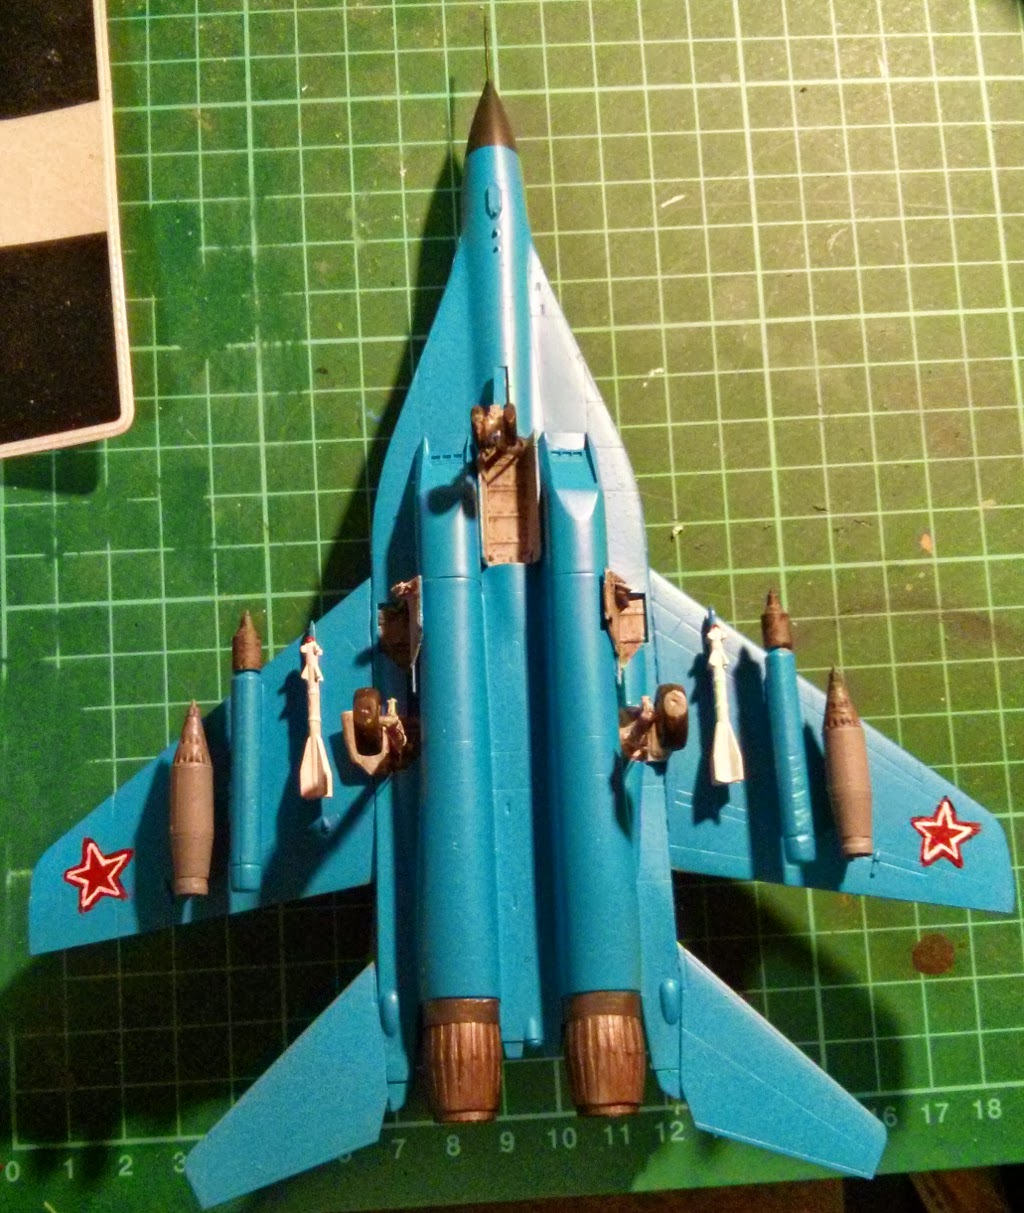
Because the plane's paintjob was pretty much done, in my opinion, I moved on to the parts that go bang. To give myself a better idea of how they should look like,  I googled a bit for real-life examples.

  • R-60 missiles got a bridal white paintjob with a red tip for the seeker head.
  • S-25 OFM single packed rockets against hardened targets I decided to leave blue (the pack itself) and the tip ended up dark gray with a Badab Black touchup.
  • UB-32M-57 rocket pods I painted dark gray all around and then I washed the tips with Badab Black as well.

After these six pieces were done I glued them on/under their rails and pylons. At some earlier point I had decided that my Ground Attack Plane's self-defence missiles would be in the centermost hardpoints, the heavy rockets to the middle ones (hoping they'd be more accurate that way) and the sow death -rocket pods to the most distant ones to provide ample coverage for the rockets.


This is how I saw fit to set my plane up, at least it sounded practical to me. If and when someone knows better, please feel free to point fingers and laugh a bit, as long as you educate me a bit as well ;)

The baseplate

What now as the plane is just about done and all? When I was building my Imperial T-65 fighter prototype project, I got a couple of mdf plates and thought that as I'm already out of my comfort zone I could take another step and build a stand for my jet.
This idea of mine is not a recent one, I just didn't dare to voice it yet. The plan is simple: a Soviet plane is standing on a more or less mistreated concrete-plate airfield somewhere in the Soviet Union. My mental image comes from Operation Flashpoint but I managed to find a real-world example (from current day Estonia):

There you go. Just choose a nicely sized plate and arrange 1mm polystyrene plates on top of that in a nice way. Of course it'd been way too boring (and easy and effortless) to just align them straight. Oh my, no! They'd be rotated at a random angle and the plane would stand on them, aligned to the base, for practical reasons.

First I set the place for the the main plate, the largest one, that'd set the baseline for the other pieces' alignment and shapes. Then I sliced off the overhanging junk.


Then the rest of the plates were set up to fill the rest of the surface area. That one piece on the top right did not end up being a single piece, I was just testing the layout at the point I took the photo. After the pieces were precut I still made some adjustments to the gaps and whatnot.


I really couldn't leave the plane off my setup yet, I just had to see it on its place. Maybe someone'll complain that the plane leaks outside the base but not me. This is the way it was going to be. The base is not important, the plane is.


The last photo shows the mistreated plates glued on their places. In the bigger gaps and slots I applied some white glue and sprinkled some Woodland Scenics' gray ballast. Whenever I'm done with the painting I'll add some random tufts of grass / hay and stuff like that. This airfield hasn't been too well kept in the last years, but who cares as long as the plane flies and the bombs explode...

24.9.13

Stars redone

SNAFU

While I was excitedly working on the stencils last time I didn't realize (remember) that the paper stencils were pretty much useless and I should've used masking tape instead. As a result the stars I had painted had been smeared and smudged around - incidentally they were all a bit too small as well. Redoing was looming in the horizon, in any case.
So I sliced open a couple of bigger stars from the printouts I worked with the last time and used those openings as templates for making new stencils out of masking tape. After about ten minutes of working I had six pieces of masking tape with star-shaped holes in the middle of each. These would fit snugly on the surfaces and wouldn't allow such smears as the paper pieces did.


A time for pondering

The current state of my project is this. I guess I should paint the thin white inner lines as well, but I'm just concerned of ruining the whole thing (again). I mean, to me they look fine as they are right now. Those slightly smaller Soviet stars on the tail wings didn't end up as pretty as the big ones on and under the wings and I fear they need a bit of touching up. That's why I took the photo so that they couldn't be seen. Aren't I sneaky?


19.9.13

Follow the red star

Rush'n' attack

My busy week led me to a situation where I just noticed yesterday evening that I hadn't got anything done since my last post. Those red stars... Perhaps the full manual approach I considered wouldn't be the most optimal one after all. Not that I was going to attempt to prepare stencils out of masking tape alone, either. My next option? Printing out a couple of sheets of properly sized red stars, cutting the starshapes out and attaching the new mask in place, maybe even facing correctly. Repeat in two different sizes: big ones to the wings and smaller ones to the tail.
Behold, it was all done already and pretty quickly as well. I did my best to get the stars in mirroring places but as long as we're discussing my hand-eye coordination, they may not be perfectly aligned after all.


Not quite

I almost got to start painting as well, but as my modeling time was already ending I had only managed to dig out my two red paints and was pondering on which one to use. Maybe I'll get them painted red this evening? The white detail lines I'll leave for a tiny bit later.

We'll need to cross our fingers. Otherwise nothing'll ever get done. Again.