This year's second Lego car
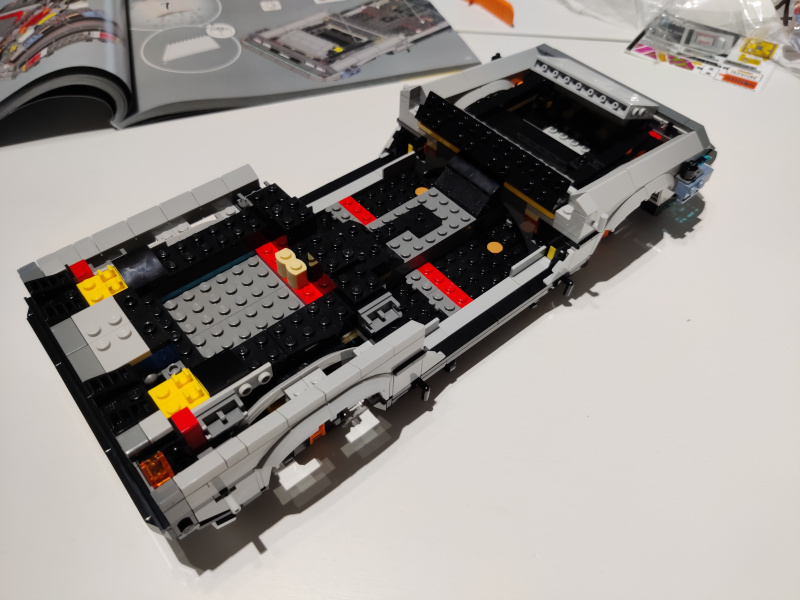
The construction process started, again, from a halfway colourful Technic frame. Pretty quickly it became clear where the main important bits were going to live in, such as the wheel rotator setup.


Some of these following photos showed, if you stared at them carefully, that I had started building the wheel rotators wrong. I noticed it only when I was testing the rotation and the L-shapes didn't align as I expected them to, and they wanted to turn to the wrong direction from the flight mode. When I noticed it I fixed it but made no specific mark when I took my photos.


After the wheel setup was built, the car's exterior started going forward in leaps and bounds. The lower front was surprisingly complex in its shape.


In addition to the chromed strips the wheel wells and the nose's edges brought the familiar look up. The Time Machine was such a child of the eighties, that this was the only conceivable look for it.


The car's rear deck was pretty modular-looking at this point. Would've been cool if you could just swap in/out the different movie versions, but alas, it was not going to be (I had spoiled myself already by checking the I/II/III variants earlier).

The rear lights were just damn cool. In an eighties way, that is.


Slowly but steadily the car's outer edges got built. All the primary colours disappeared under layers of black, grey and silver/chrome.

Finally it was time to add some interior details. Here we just had the handbrake, the dashboard base and the switch for the time circuit.

The light brick went there, and it got a TNT-plunger -like press-switch, but at this point I couldn't imagine what and how it was going to behave in the final model.


Flux Capacitor, the
It wasn't that long since I last saw the first two BttF flicks, but I could hear the sound effects as if they were on tv as I was building! Of course there wasn't a perfect lit transparent three-pronged Lego piece but the grappling hook was a great part for this model.


*giggling*

The segment LED displays - those that showed the destination time (red), current time (green), and the last time departed (yellow) - were pretty neat. I kinda expected them to be printed, instead of having to misalign stickers badly. But that's how it was, I just didn't like stickers myself, so I grumbled a bit. The important thing was that it looked fantastic.

Not much leg space between the seat edge and the steering wheel...

I was pretty sure I had read that the windshield was a unique piece just for this set. The shape was peculiar, so I didn't think there were awfully many other normal uses for that kind of a piece.

For some reason the roof and the top parts of the gull-wing doors were built now and then the build process continued to other areas of the car.

The rear of the car started getting fleshed out. Random knick-knack, attachment points for the frame and then these massive cooling funnels. Or that's what I always thought they were.


Gull-wing doors
The doors were lots of fun to build, massive and bulky as the real ones seemed to be. For the longest time it looked like they were going to be without the front edge, like in the next photos:


But the front edge got built after all, I had just expected the A-beam to be solidly by the windshield, not in the door. I imagine anything else would've been way too bulky.

Last edges and cables
These rear edges of the car were pretty tight setups, and they got clipped on to the frame quite sturdily in the end. Lots of time was spent on the translucent blues and the chrome strips. Just imagine if this was also lit up somehow!


The cables were pulled from front to back, guided by the little blocks with side hook so that they didn't get pulled by the doors.


94 Pu
The bright yellow Plutonium case that Doc Brown cheated from the Libyan terrorists was cool. It only had space for two containers, as opposed to the vastness of the Playmobil Plutonium box. Still, much better than no box at all.


It even fit nicely into the trunk with the hoverboard! At least at this point, with the trunk lid waiting for assembly in the semi-distant future.

Last bits
The back of the Time Machine got filled up with details and greeblies. At long last the cooling vents got built, again greatly kicking up the wow-factor.


Being my own self, I glued the register plate stickers so that I could flip it for an original or the 2015 version. The transparent window plate wasn't something you could actually just turn around, it had to be popped off the frame for that. Would've been too flimsy otherwise.


At this point I locked my sights to the 1985 Time Machine. It was the most nostalgic ones for me, surprise of all surprises.

These cables here weren't actually important, aside from being details, I just got so excited seeing them for the first time in decades. I had a good set of these, in various colours, back in the heyday of Classic Space.

Alternate version accessories
During the three movies some changes were made to the Time Machine. During the first one an electricity-conducting rod was added, in the end the Plutonium-powered setup was replaced by a Mr Fusion from the distant year 2015. And the 1885 version in the third flick was more steampunky.
Back to the Future Part II
I just built the Mr Fusion with its bananas and soda can contents at this point. I didn't undo the rear deck of the car to try it out yet, because I was barely done with the car itself. The other major change was the bar code - register plate in the back.


Back to the Future Part III
For the Part III car I should have reversed a few steps and undone the hood, so the box could be bolted on. Didn't feel like it right after finishing the build. Just like I didn't swap the wheel rims just for that at this point.
Almost all the pieces were there, when I built the box to see how it looked like. Just a couple of silly bits were not duplicated, so if I wanted to get it completely done, I would've needed to take them off the original or Part II setups.

