Mastodon

26.5.21

Lower inner hull details

Spending a lot of time in the bottom

While working on the tank I often took a look at how the insides started looking when you looked at it from the front. As far as I could somehow the full interior, I'd be enjoying watching its progress.


After the inner walls I installed a couple of lenghtwise support bits, which I assumed to have something to do with supporting the combat compartment's floor and what got set on top of that, than anything to stiffen the hull itself.

Already the vagueness of some of the pics in the instructions had confused in some places. Just like I complained the last time, the attaching surfaces of some of the pieces were pretty tiny and low on tactile feedback while installing: you couldn't easily feel when it was where it was supposed to be.


In the left front corner, right next to the drive sprocket's clutch(?) and the cylinder installed at a 45° angle seemed to house a set of three periscope heads for the driver. If that was the case, it was an interesting detail.


This sad-looking box looked like it was also protecing one of the combat compartment's fuel tanks (170l). Originally spacious panzertub was getting fuller by the step.


19.5.21

Die Panzerwanne

Project thoughts

I hadn't actually decided, how to write my progress reports before I started writing this post here. The funny thing was that I had already started building a bit before I realized I should've started writing, too. Perhaps those experiences were useful for this decision.

Lately all my building sessions have been, shall we say, full of interruptions, so writing a post per every "not nearly 45 minutes" session provided any value for a reader. Then again, if I waited for some logical entity to be finished before I wrote about it, we may end up with various empty weeks, repeatedly.

An example from the very beginning: in one sitting I had the time to install a magnificent amount of three of these cross-supports (pieces G36, 35 and 30). Of course before that I had unpacked all the packing plastics and whatnot.

The support himmel of the tub

Right, here we go: to begin with I had to install a set of support slabs to the bottom of the tanks' tub. They felt pretty flimsy and therefore finding the correct installation positions felt a bit difficult, because the target slots and piece's overhands were also very shallow, providing little haptic feedback.

Inner sides

Some armoured slabs were waiting to be installed to the inner sides of the tub, these slabs had passthrough holes for the torsion bars, and installation slots for all the wall-mounted stuff there was going to be. In the first picture below you could see, as far as my blueprint reading skills (or lack thereof) were concerned, one of the 145-litre fuel tanks.


Installing the megaslab was almost easy, just a couple of those slightly misaligned ribs tried to protest. Here, if anywhere, it'd been supremely helpful to own a couple of [screw] clamps or something like them.


The following pictures told the same story, but from the viewpoint of the left inner wall. First those at-an-angle installed things that looked like shock-absorbers, but of which I wasn't quite certain.


It started looking pretty interesting already, looking from the nose. A huge amount of the stuff that was going to be installed here, and at this point they were a mystery that I hoped to slowly get solved while working.

12.5.21

Project IV/21

Königstiger with internals

Now, folks. Before I started writing this intro, I checked my #Begin-tagged posts and got shocked. I've always considered myself primarily as a tank modeler, and especially one most concentrated on the PzKfw subcategory. So when did this happen: my last tank of any kind was started 3,5 years ago and my latest Panzer got started almost seven years ago?


I'd have to admit that this box has been waiting for its turn for over four years already. It felt like that as the previous PzKfw V (still running on that same battery, btw) and the mere idea of this PzKfw VII having its insides modeled too was so intimidating that the downward spiral has been speeding up for a good while.

Just paging through the instructions (with the photocopied corrections) and staring at the amount of pieces to be played with was... well, strange. The complexity of the insides, revealed by the painting instructions, didn't really help. Then again, this was exactly what I had been waiting for.

The pieces

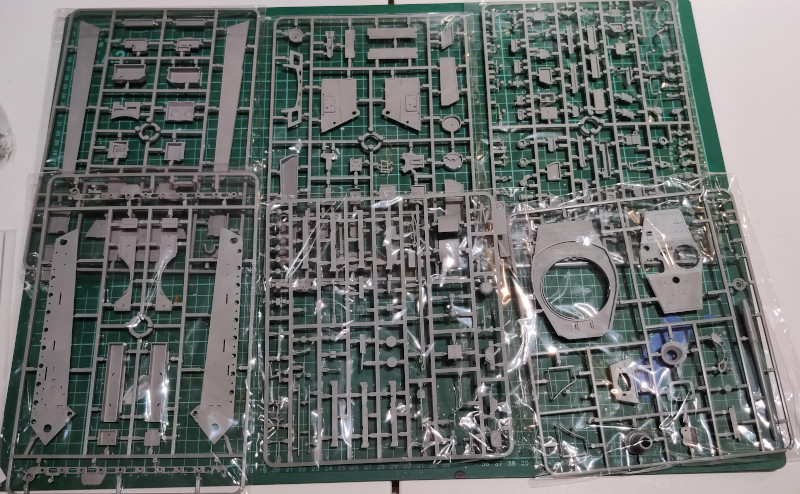
There was a hefty amount of sprues. The convenient-looking thing that Takom had done with the sprues was the military-like open character in the tab in a corner. I expected that to be much more readable from the stack / pile than the usual embossed chars.


Decals, my enemies. A bunch of those apparently belonged to the sides of the shells and other things that would most likely never be seen again. The photoetch sheets had a few more unusual things, like the bottoms of the shells - or so I guessed at this point.

Guidelines for painting

This two-page paintjob example looked slightly scary, considering the upcoming tasks. As a bonus I thought this'd help with the unclear bits of the instructions, at leat in a couple of places.


Error correction

The first time this happened to me, there were indeed some corrections to the instructions. These photocopies were targeted to the assembly phases by the step numbers, except for that 0,0's "drill here" part. That'd be easyish to locate anyway.

Checking the instructions

Last but not least, the imperfect instructions. This was not a leaflet but not an epic, either. If my poor memory served me well, Dragon's instructions were a bit like these here: nice pics but sometimes those were a bit difficult to figure out. Perhaps my expectations were going to prove unfounded in short time.


The motor itself got a couple of pages dedicated to it. Concerning.


The insides of the combat space was to be filled with stuff. It looked pretty stuffed.


Looking at the turret instructions I started worrying, how in the Empire would I ever get any of that aligned perfectly for the outer shell?

5.5.21

Pre-project work

Stocking up

Early in the year I ordered a couple of sets of VMA paint and a couple of extra bottles to top all this up (cream white and two different shininesses of brass). Ten points and a parrot sticker to who first guesses, what we'd be talking about next week.


"A Panzer" won't cut it, I'll have you know. We expect and even demand more accurate definitions around here.