Mastodon
Showing posts with label Su-27. Show all posts

27.5.20

Finished: Project I/20

Su-27

This Flanker from a friendly eastern nation was actually a pretty nice build, though I suspect that some of this convenience was brought to the Project Mumblings by my decision not to build the landing gear. Thinking of how vague and guesswork-inducing the instructions were, especially the main landing gear might have ended looked like it was just tossed together instead of built.


At the writing of this post the plane's been enjoying flight on its stand on top of a bookshelf for a good while and I've been pretty content with the way the model ended up on my silly stand. It didn't look that bad from afar, either.


20.5.20

Impale it!

Wrapping the pylon up

Between these posts my pylon had gotten some filler on it and that had been mostly removed with a numb mind while the Project Assistants were watching cartoons. The usual.

I painted both the pylon and its baseplate flat black. After a reasonable curing time I masked off a margin of a couple of millimeters around the base. My graphical designs have never been critically acclaimed but even I knew that a margin was going to be a good idea for the base.


To be honest I couldn't remember how many years ago I bought some Citadel paints from the OhMyGame store in Myyrmanni before my dentist's appointment. The main items were the washes but I rounded my haul up with a little pot of a 'technical' paint (Citadel / Technical / Agrellan Earth) that I had never encountered before. Over the course of uncounted years I had occasionally remembered that and then immediately forgotten it again when I was doing some sort of weathering. Now it was to be tried for the first time, not on the tracks of a Panzer but the ground at the foot of a fake steel tower.


After the paint had dried a bit it started showing some disgustingly plausible half-dry mud that's been cracking in the summer sun. The shade of it was a bit sad but that's what I had bought and on purpose, even. To make it a bit less depressing I superglued a couple of autumn-era grass tufts.


When the paint had cured I tore the masking tapes off. My eyeballed margins had not been as uniform as my css rules had specified, but it was good enough for my bookshelf. I could've used the technical mud a bit more, but this was fine as well.


A swooshing moment

The moment of the model being finished has always been one of the most fun moments in each project. Of course I've spoiled most of this with my never-ending dry-fit pics over the duration of the project, even in this same post. Maybe these next pics would've been more impressive had they been unprecedented?

Back to the topic at hand, more or less: I've been thinking for a good while that I should buy a light tent. Cleaning up these pics of mine with Gimp, especially with the backgrounds of this apartment has been somewhat tedious, so my itch for buying more toys has just gotten worse. When this post was being written we had been a couple of weeks in the corona isolation, so running for random shoppings hasn't been too high on my priority queue. I also haven't wanted to order one blindly from the net, either. Not yet, at least.


Next to its "peers"

Like in the first post or so I felt like comparing two very different planes that had about fifty years between them. The only reason for putting these into the same photo was that they were both in the same scale and were counted as military planes. Looking at these two flying machines next to each other showed how tiny the Stuka was in comparison.

Ah hey, they both accidentally had white highlights! Funny.


13.5.20

Impale it?

Presentation control

My hasty decision to pull the landing gear of my Flanker in led to a problem with the presentation, especially as lying on its belly the model would put an unfair amount of stress on the flimsy missiles. Some sort of a custom polystyrene construct was the first idea that came to me, with my so-called skills we'd end up with a fittingly brutal-looking solution. The problem with that approach was, in my mind, the missiles, which I didn't want to knock off when setting the plane on.

The second idea I got was to do some sort of a metal rod as a stand, such as I made for the N/AW A-10 or the Imperial Incom T-65 prototype. This was much simpler to implement but it would require a sturdy place on the plane for the attachment. And a way to keep the orientation set so that the model wouldn't just fall off as easily as the poor warthog.

The second option, to recycling

On my plane's underbelly there was maybe one small area where the stand attachment could have gone, but the front-middle missile was inconveniently blocking it. The stability of a plane freely floating on a much-bent thick wire left quite a bit to be desired. I also didn't want to make a massive "holding fork" that I did for the space fighter proto. This made me decide that this was as far as I was going to spend on thinking about this option.

Option one again

I had been spinning a workable form in my head for a bunch of evenings and finally came up with something that I felt was decent. After a few thorough pass-throughs I even found my polystyrene sheets, so I was pretty much ready to start.

Absolutely no amount of Adam Savage's Tested channel's One Day Builds were not going to turn me into an expert. That in mind I set my expectations exceptionally low for myself. This wasn't going to be ornamental. The first word I had used about this was brutal and I thought that it was a plausible prediction.

I - From scratch

Maybe ten years ago I had toyed with the idea of making a Haunebu Gerät and I had even bought some sheets in a couple of thicknesses for it. My original attempt was just as successful as the idea sounded like, all that was left was the remains of a couple of uglily mangled sheets of plastic, while the others were left untouched. I started prototyping with the end of one of the mistreated ones, my idea being that I wouldn't at least start by ruining fresh sheets of material.

To begin with I measured a length of plastic that'd be the part where the plane was going to lie on. After a few slashes of an x-acto knife I had a piece that looked like a weird, italics and serifed symbol 1 from a funny angle. For my stand I'd need two copies of this exact shape.


The copy was done by using the first piece as a stencil and just slicing the lines into another mostly ruined part. Of course they didn't stay perfectly put while I was working on them, nor was my knife usage near exemplary, so instead of a twin I got a sibling of sorts.


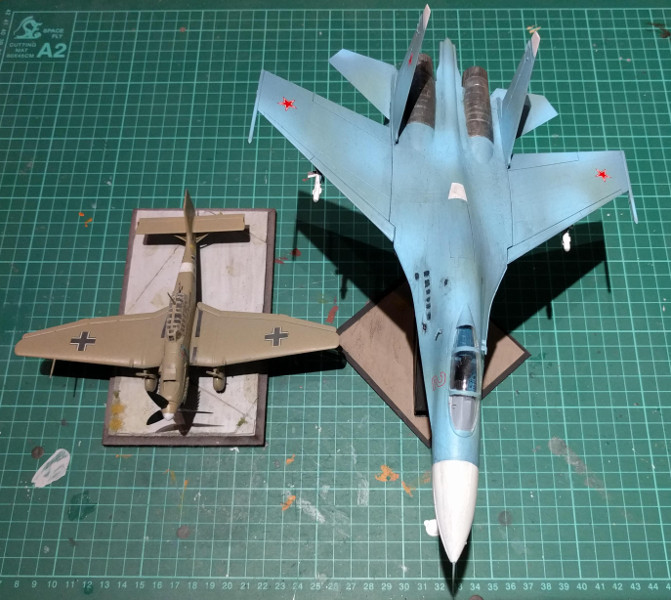
These support parts were to be attached together at such a distance where the plane could just be dropped on, engines ending hugging the structure between them. The maximum width was to be almost as wide as the space between the engines, to avoid any shaking around, but not so tight that the paints would get scraped off.

I measured the approximate width first and cut four support pieces to flesh out the pylon. My idea wasn't to make this a solid-walled piece because that would've looked too bulky. These four may not have been enough, but this (the next two photos) was as far as I got in my first session.


The long flat part would've benefited from, thematically, a couple of round-ended rectangles. Acknowledging my status as a total beginner I did not even dream of trying to do anything fancy and decorated. A very bare-bones construct was going to be just good enough for the 'Mumblings.


II - A baseplate and fine-tuning

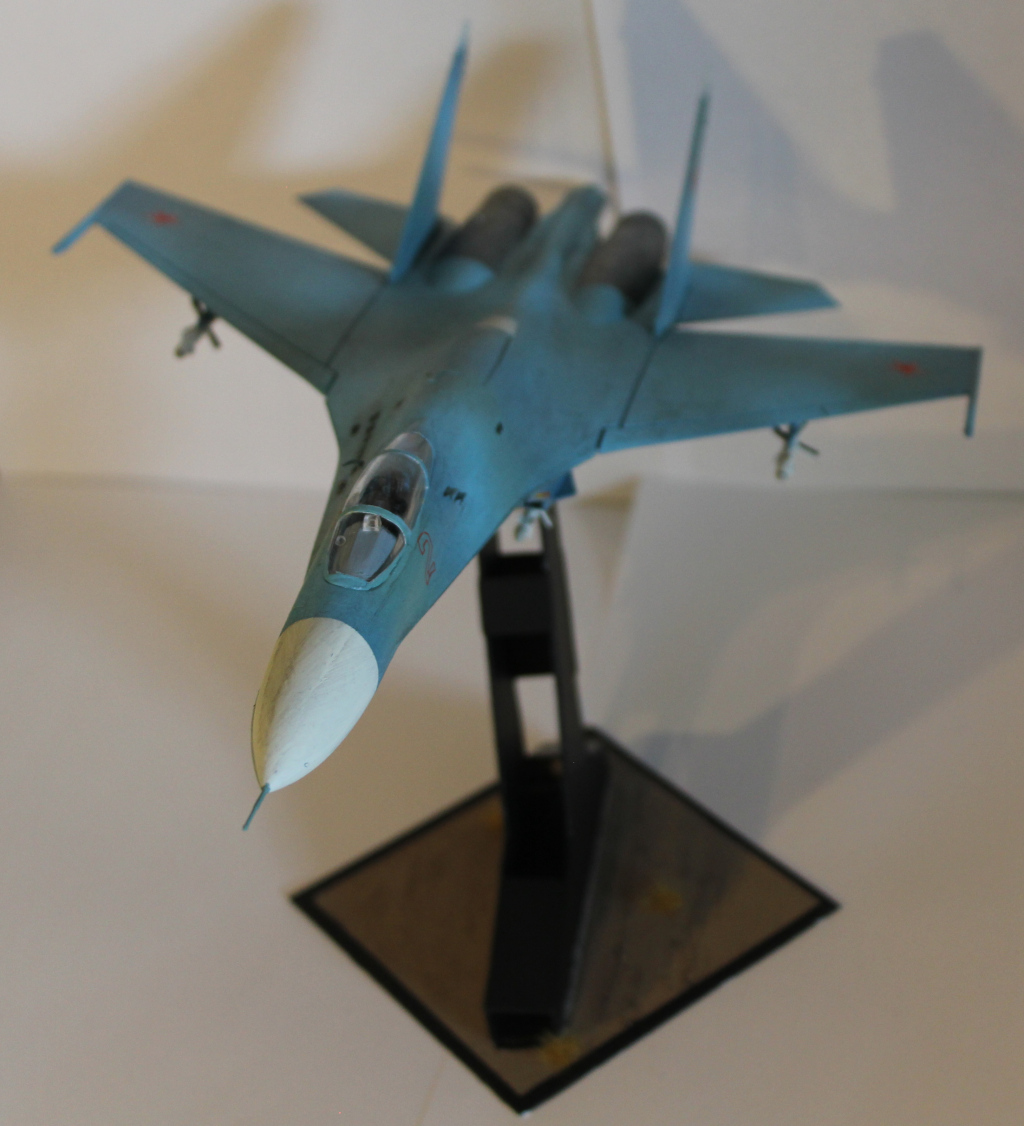
When my construct's gluings had cured I had to try it out. As a whole it was leaning a bit too much right (from the pilot's viewpoint), which was ok considering the attitude of the plane, but not for the structural stability. I cut a square baseplate for my pylon and glued a small spacer between it and the pylon's bottom to straighten the setup a bit. The craftsmanship was still... ugly.


The plane's position was otherwise ok but I felt it was a bit too level with the horizon, I wanted it to be doing a banking turn. A quick fix was also an ugly one: I sliced off a chunk of the left rear corner of the pylon's top (well described, eh?). In the photo below the adjustment was still in progress.

To add some little details I drilled a pair of holes to the upper and lower ends of the pylon, and carved them a bit wider with the old x-acto knife. This way I could push a narrow polystyrene rod through each to add another kind of "support beam" to my construction.


I didn't take photos of puttying, sanding and filing all these horrors away. Next I had to start thinking if this should be flat black or maybe the sky blue had more merits.

Attitude test

In its new and improved stance the plane looked much, much better. I've always liked the shape of the Flanker and this model really benefited from this dynamic-ish display pose.


6.5.20

Armed for Anti-Aircraft Activities

6x R-27R/T

I had already shared my few thoughts about these mid-range anti-aircraft missiles, so I wasn't going to repeat all or any of that now, nor did I have anything new to add. The radar seekers I glued into the pylons along the central axis of the plane and the heat seekers went to the mid-wing pylons. The wingtip pylons were left, as previously assumed, empty.


A little difference

When the glue on the missiles had cured I applied some semiglossy varnish on them (Vallejo 70522 Satin Varnish). Based on a bunch of pics I had seen I thought this was a decent way to represent the fact that the missiles were new and therefore in more pristine condition. The gentle shine that this varnish provided wasn't jumping out strongly, one could mostly see it from a certain angle.


29.4.20

Varnishes and decals

Spot-varnishing, glossily

Following the tried and true method I went through all the areas where I intended to put decals on and covered it with safe margins with the clearcoat (Vallejo Gloss Varnish). I had chosen spots for three red stars, a unit number, and a warning stripe for the air intakes. Of course this applied both on the left and right sides of the plane.


Now the unit number that went next to the pilot's side, it could be made up to four digits, if judged merely by the horizontal space - and the decals were of a noticeable size. The decal sheet only had one small number set for a plane that also had its number in the vertical stabilizers, the hull-numbers were just about as tall as a pilot's torso. My options were limited, no matter if I chose red or blue numbers, that there only were digits 0-9 per side, meaning that the practical combinations were definitely few.


My original plan did not include the caution stripes by the air intakes, not to mention any of those dozens of tiny squares and whatnots. Still, following the traditions of the 'Mumblings, I indeed changed my mind regarding the caution stripes and actually felt that they'd bring some essential something into the model but without making me swear my lungs out while working on them. Though considering these documented decal failures, it wasn't the first time I had high hopes for these little beasts and failed just about as often.


Those foul, foul transfers

I started this fight with the red stars, because without the roundels something essential would've been missing from the plane. If those first and most important decals got ruined, I could just stop pretending with the transfers as early as possible.

To my great surprise the each of the stars fell in place beautifully and without a single complaint by me. They looked just fine and I was content. After the stars I applied the warning stripes, because they also didn't require any planning, choosing or triple-checking on positioning, just dropping in. Both of these also obeyed me, oddly enough.


After getting the more or less stock decals done I got to the individualizing part. I thought that I could go as mad as setting up a space-eating 1024, or 2028, but I realized that in addition to it taking a load of space, a three-digit number would serve just as fine. With these I meant to go for a power of two, but just when I started on 512 the five went all wet spaghetti on me - as these bastards often do, it also ruined 256 automatically. This didn't give me confidence to try 128 that would've, on failure, reduced my options pretty much down to something random. Instead I aimed for a true classic: 64.

That was otherwise a wonderful plan but the first six got spaghettified, or just plain ruined. Now it was perfectly clear that I was already passing the workable levels of annoyance and frustration with these little shits and just wanted to get it out of the way. My useful stock of numbers was rapidly dwindling, so I just took a pair of twos to represent, if nothing else, the silly fact that this was my second Russian jet.

Of course the second of the twos got a bit twisted while applying and both their positions left room for improvement, but I just could not bring myself to care anymore. Despite all my raving and ranting about how much I hate decals I still had not learned to just throw them away at first sight.


Matt varnish on top of the prints

I had built up my frustration with the decals and started undoing it by doing something pretty much foolproof: I applied Tamiya's matt varnish on all the glossy areas. Checking the next afternoon the result was decent, even if you looked at things from a certain angle the earlier glossy parts looked slightly different.

22.4.20

Weathering session number two

On the sunny side

I started the topside work by washing the remaining (now nicely worn-looking) metallic surfaces with brown (VMW 76513 Brown) just the same way I had treated the flipside parts. The result was again something that looked like it had seen a nice share of real life already.

The airframe I weathered just like on the bottom side, with paintbrush-applied grey (VMW 76516 Grey) all around, then wiping off the excesses off, perhaps driving some paint more into the grooves. I still approved of the result. I had been careful enough with the canopy frames and did not see any new mess ruining them.


A lot of vents

Many of my reference photos had gotten the set of vents, especially on the righthand side of the plane to jump out with their very dark look. I applied a black wash on them (VMW 76518 Black) and again wiped the excess paint away, but this time the result wasn't quite as neat, mostly thanks to the attributes of black paint.


Below the massive air intake scoops a pair of enormous vents got also washed black. Now my flying device looked pretty much aligned with many of my reference images had shown, at least on the generic level.


At this point I did a yet another check for not missing anything. Lucky for me, as I noticed the seagull impaler both on the instructions and the sprue. I glued the missing piece onto the nose cone and painted both that and a couple of fixable bits with the slightly gloomier shade of blue-grey (VMA 71319 A28M Greyish Blue).