Mastodon

28.5.14

Completed: I/14

On Monday evening I fixed the landing light on the left wing as I had pondered on earlier. I sliced off some extra material to make the piece fit better and then I glued it on with white glue. While I was at it I also spread the glue around a bit to cover up the small mismatch on the bottom side.

Without further ado: it's ready. I only spent about four months on this, if we blindly stare at the calendar. The actual time spent is noticeably smaller, but who bothers to count hours for real, anyway?

The final photos

As declared, this is supposed to be (according to the instructions) Hans-Ulrich Rudel's plane. A Junkers 87 G-1, a plane with two 37mm AA guns under its wings. If it reminds you of the A-10, there's a damn good reason for it, as google will tell you.

Around


Higher up


Other angles


The Gimp is (not) strong with this one


26.5.14

The hopefully last missing piece

As I told before, the landing light's glass fell into the wing assembly while dry-fitting. I had two ideas regarding the impending scratchbuilding of a new piece: either some thin transparent plastic of a fragment from a transparent sprue. Both approaches had their issues.

Either/or

While working with thin plastic the main problem would be getting the tiny piece into a decent shape. The amount of burnt nerves could not be foreseen but it wouldn't be a small number. The end result, on the other hand, could be really pretty, if I got lucky.

A turd of transparent-ish sprue would be a very simple approach. All I'd need to do was to file off material to get the piece inside the bracket. It would also occupy all the given space and could not fall inside the wing like its predecessor - nor could it end up twisted stupidly while the glue cures.

An easy choice

Pretty predicably I chose the latter option. Below you can admire two photos of my first try. Either I'll try to adjust this a bit so the open edge in the bottom ends up sealed or I'll just mengelify a new piece and see if it works better.


19.5.14

The canopy is just about done at last

Yet more fixes

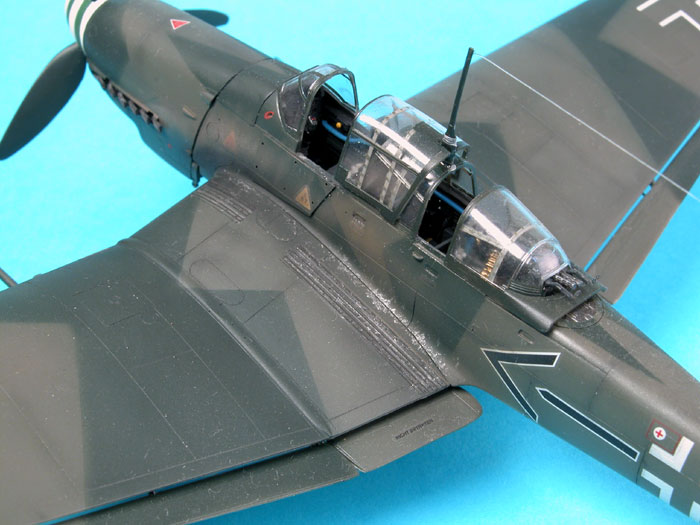
The last time I was wondering how I'd detach that antenna from the one-piece canopy. I shouldn't have worried, for in my paranoia of fogging up the clear pieces I had used white glue to attach the antenna! I realized it the moment I rolled the canopy piece in my fingers and peeked inside. Then I just gently pressed the end of the antenna's stub with the tip of my xacto knife and it fell on my palm accompanied by a faint "crack". For a change something goes really well!

While I remembered it, I took it upon myself to fix the Balkenkreuz. The slightly mouldy-looking markings were quickly and easily fixed with a stroke of white. Most likely I'd declared this model done and complete without this fix, if I hadn't done it right now...

Needless masks

I was staring at the canopy masks I had done much earlier and decided that they've no purpose in this project anymore. So I tore them off and painted the frames by hand, just like I did with the one-piece canopy. The lone unattached part only got its dark grey paint, while the green section was left for later.

As I was working on these, I also glued the antenna on its proper place. Such a tiny detail made quite a difference.

The final piece

I was thinking, in which position I should set the last piece of the canopy, while playing around with it. Somehow it looked a bit wrong in its "closed" state. Being completely open it didn't quite fit and I was slightly confused. This pic, provided by almost five seconds of googling, opened my eyes:(http://hsfeatures.com/features04/images/ju87g2bg_004.jpg.

Being as uneducated as I am, I had painted the part of the canopy that should've been open so that the canopy could slide open without slamming into the antenna. After a closed inspection the part had a properly shaped area. First I drilled open the bottom of the enlongated U and sawed off the rest along the shape.

After a quick dry-fit I declared that "this is what I should've done originally!" So I glued that part in its opened state. Of course I could've also been a bit cleaner with the glue but I trusted that the final result wouldn't look too shabby.


Now I'm just working hard to remember that I didn't paint the right side's green camo pattern section yet. And if I somehow managed to scratchbuild a new cover for the landing light (if I didn't mention it before, the original fell embarrassingly inside the wing while dry-fitting), everything would be dandy and just about ready.


14.5.14

A necessary step backwards in the name of progress

Now that I had found that misplaced piece of the canopy (or more like because Lasse's comment in the Finnish counterpart reminded me of the possibility), I had to do something according to my original plan. For some reason it took me one and a half weeks to get something done, but I did it nonetheless.

Crack

Simply put, I cracked the monocanopy off and prepared the other pieces to replace it. My biggest problem will most likely (and hopefully) be the antenna, because I just don't believe it'll leave its current resting place without a bit of fighting and if my memory serves, there wasn't a replacement / alternative in the kit. This won't cause any sort of an emergency in any case, so we'll see what I end up doing.


Splat

Next I decided that I'll glue in 75% of the pieces: the frontmost and the two rearmost of them. Why so? Just in case that something goes wrong at some point. Then the pilot's hatch would be the one I could do something with. If it doesn't fit between the other two for some reason or something like that. Just like I didn't want to take the risk of trying to glue four pieces with slow-curing white glue, because they might very well slide around before the glue sets properly and therefore cause issues.


Once again, according to the finest Project Mumblings traditions, the last photo sucks like a black hole but I reserve the right to use awful wip pics while the current project is, indeed, a work in progress. I trust that this iteration of the cockpit and its canopy will be much better than what I had. Otherwise I'll have to swear quite a lot - and loudly.

5.5.14

We're just missing some final details

I washed the camouflaged surfaces of my Stuka with Vallejo's "for green vehicles" liquid. I even got a couple of silly photos taken, but for some reason everything else in the world pushed in front and I didn't get to scribble down a couple of words before now.


// TODO

One of Balkenkreuz looks moldy, so I'll fix it.
The exhaust pipes still need some crap on them. To be added.

Oh and now I found that cursed final piece of the four-part canopy. It was in the middle of the floor and I had absolutely no clue of what had happened to it and how it ended up there. Bugger.