Mastodon
Showing posts with label F-22. Show all posts

25.11.15

Finished: Project VI/15

Decals

For a change there weren't any noticeable issues with the decals. Only two of them got uncancellably ruined: a coat of arms from one horizontal stabilizer and one "F-22* Raptor" ad from the nose.

Getting a couple of those small decals into their places mostly blocked by the bomb bay doors also provided a challenge, but they ended up where they were meant to be in the end. This time I didn't notice anything being the wrong way, either. I guess I was paying enough attention.

After a short drying period I applied the matt varnish all around - excluding the canopy - and decided that this was it [285]. Now I have, just for my own amusement, followed the way I have used the time on a project and can ponder a bit. This one took one week on the calendar (I began on Monday and finished the same week's Sunday) and in actively used time just a bit below five hours.

Time usage mumblings

Building was done quickly, as the pieces fit together wonderfully, and nothing really required much fighting. As long as we ignore the bomb bay doors in this context. Masking things and preparing for the painting were again the time-eaters - and the decals, as I tried to be really careful with them. Painting itself, on the other hand, was pretty quick, as I mostly painted flat colors on surfaces, except for the dark shape. Nothing required accuracy or special care.

Of course I could've cut some time off from just about every step, but I wasn't in a rush and I was taking my sweet time. I was occasionally listening to Top Gear, QI or WILtY that was on the background instead of working single-mindedly, aiming for a 100% efficienct on my time.
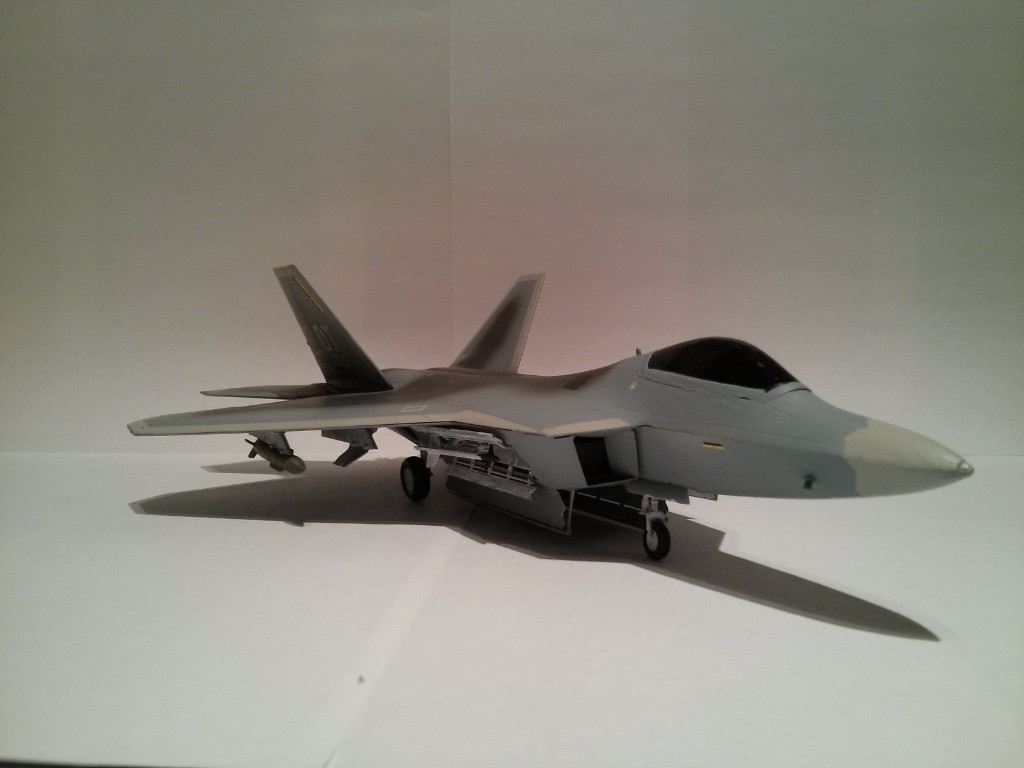
The final photos

This time I took my final photos exceptionally with my phone, as the real camera was on its way through Europe. Please do forgive me and try to survive, you can see something from these pics, too.


An advert-sticker for a war material expo perhaps?

There was even a serial number


I had fixed the glass pane edges a bit


18.11.15

Set the bomb and run away

Air combat missiles and a pair of bombs

As the major paintjob was finished, I continued the work on the remaining construction, more or less according to the instructions. Next up in the schedule were the bombs! As I'm famously not too well-informed about these, I googled a bit and maybe got a bit wiser. For a short while.


The main bomb bay was to receive six AIM-120 AMRAAM missiles, the side bays would get an AIM-9 Sidewinder each. Under the wing pylons two GBU-32 (or 31, who knows) would be installed. Those were stupid iron bombs with JDAM bomb-smartener modules bolted on.


Because I didn't trust my guesses even with wikipedia, I painted the democracy-savers just the way the instructions told me to. I thought that it'd be safer than guesswork and going wrong at full speed. The AMRAAMs I left basic grey but I painted the tips light grey. The Sidewinders I painted white over a bunch of different sessions and their tips I painted black. And the smart bombs I painted olive green (VMA 71096 Panzer Olive Green). Into the rear ends of each missile I painted a black dot to represent the rocket engine's nozzle. [180]

The canopy debacle

I decided that I'd save time and my nerves with that accursed canopy. An extra motivator was also that whatever I tried to do to the sepia crap, the result might not be clean or acceptable. So I took a shortcut and painted it black (VMA 71057 Black).


My idea was that when I'd varnish the model, I'd apply the glossy one over the canopy as well. And when applying the matt varnish, I'd just leave the black part untouched, achieving a night-like cockpit. Or something. We'd see when all was done.

Bombs go where bombs belong

Gluing three AMRAAMs nicely and neatly into the tight bomb bay was easier drawn than done. With a bit of fighting they all went in their places. The Sidewinders went beautifully on their extended LAU-141/A catapult-like launchers because they had plenty of clearance. Later on I thought that I could've been silly and used the closed pylons in the side bays and the extended ones in various slots of the main bays.


As a thought those devices are very amusing: the bay doors open for less than a second and that thing catapults the weapon out instead of it falling out with the help of gravity alone (and slowly). I find it extremely funny.

Bothersome doors

From this subtask I first built and glued on the landing gear bay doors, as they were noticeably easier and simpler. The bomb bay doors consisted of multiple flimsy part and they were of annoying shapes and sizes. They didn't have much surface to glue on to anything: the few tiny hooks were to be attached to the very narrow edges. [230]


Final details

I painted the wheels in the traditional way: black-grey (VMA 71056 Black Grey) and a couple of cylinders in the landing gears with steel (VMA 71065 Steel). Because I had reached the fine-tuning part of the project, I finally painted the often-forgotten engine nozzles metallic (VMC 70863 Gunmetal Grey) and then washed them with brown (Citadel Washes Devlan Mud). This time I remembered to paint the notification lights on the wings, one red dot (VGC 72010 Bloody Red) and a green dot (VGC 72030 Goblin Green).


Finally I applied a glossy varnish over the whole model (70510 Vallejo Gloss Varnish) in preparation for the decals. As an eagle-eyed reader may have noticed, this time I didn't wash the plane itself at all. [245]


11.11.15

Painting II

Sitrep

Let's see where we left this project the last time. I believe we could ignore the ruined canopy, the rest seemed to work out just nicely. The light grey I had used was, in combination of its colour and shininess such that I really didn't like it. It somehow always ends up looking like unpainted plastic, which isn't what model builders usually strive for.

The nose cone ended up great. The edges were just as crisp as they should and they followed the shapes of the model obediently. All the leading edges also looked pretty good to me and I didn't get the feeling that I should've extended those areas at all.

The masking tapes used on the wings left some shades, which meant that in some places the dark grey was cut too abruptly and the result looked a bit odd. Also because of the masks the horizontal stabilizers completely missed the dark grey areas and that made the complete picture a bit wrong. They were too different from the rest of the model.


Back to work

I quickly applied new masks to protect the light grey strips and despite all, over the rear of the canopy as well. This way I wouldn't have painted on anything I didn't want to refix anymore. Then I masked the edges of the bomb and landing gear bays.

To protect the purity of my paints I quickly but carefully airbrushed some white (VMA 71001 White) into the aforementioned bays. This way there was going to be some coverage all around, in case I couldn't reach every nook and cranny with a paintbrush later on.

Then I started working on the camo pattern by first airbrushing some basic grey over the grey/dark grey parts to soften their differences a bit. Immediately after that I loaded my airbrush with dark grey and recreated the form-breaking shape but this time better, I felt. [175]


For some really twisted reason that dark patch, that looks a bit like a skull, reminded me very strongly of Boba Fett's armor: Boba Fett bust. Of course this wasn't done on purpose but was a pure and simple accident.

4.11.15

Painting I

Hiding the glass

I started working on the glass pane by first painting the frames with black-grey on the inside and while on it, painted the cockpit's insides with the same paint. As soon as the canopy piece had dried, I covereed it with three strips of masking tape and cut the excesses off (at this point it was very useful to see the grey-black through the tape, as it made cutting so much easier).

After a moment of letting the paint dry I grabbed a sepia-coloured Citadel paint (Citadel Shade: Seraphim Sepia) and applied it on the inner surface. My plan was to get a nice shade on it, not golden like some planes seem to have, but something similar-ish. The liquid just didn't seem to catch on, so I didn't spend too much time with it and just white glued the canopy on the plane (knowing that if I had to adjust something, it'd be quick and easy to crack the canopy off again). Before I did it I even remembered to glue the targeting glass pane on the dashboard.


Grey as a base

I thought that the best approach would be to paint the whole plane with one tone and then finetune everything else. So I airbrushed both sides with grey (VMA 71120 USAF Medium Grey). After that had dried, I took out the masking tape and began working on a maybe slightly tolerable paint pattern that I had seen. There the wing's edges were lighter and had sharp edges. As did the nose cone, with a sharp salmiac pattern. Then on the top of the plane there'd be a fuzzy darker shape.

The source is forgotten
Of course I took some artistic liberties and left the rear wings out of this and I didn't mask all of the rear edges of the wings, either. I took an approach with noticeable "leading edges" instead, because to my eyes it kinda looked like a better-looking way of doing this. To me the wide band going around the plane looked a bit too cartoony.


Thanks to the angle of the horizontal stabilizers, masking them was surprisingly challenging. The nose cone also took a bit of time because of the zig-zagging salmiac shapes, but it was at least very easy to do. In short: I only protected the edges of the plane so that I could very quickly and easily airbrush the light grey (VMA 71121 USAF Light Grey) from well-chosen angles. While I was painting the horizontal stabilizers I used post-it notes as additional dynamic protectors so that there was no overspray. To protect the underside of the plane from the potential overspray I applied a few long strips of masking tape, just in case. [150]


The form-breaker

As soon as I had the light greys painted I loaded my airbrush with dark grey (VMA 71123 USAF Dark Grey) and shot a random shape on top of my model.

With maskings on place...

...and without
Oh yes. The canopy looked like the pilot had vomited prodigiously inside the plane. What in the Empire could I do to fix that now? I really couldn't see a good way out. [160]

28.10.15

Building away

C is for cockpit

Again, following the neverending traditions of airplane modeling I started with the cockpit. The ejection seat was amazingly detailed, it even had some container-like cylinder shapes beneath it and it was made out of five individual pieces. Nice touch, I say, but no one can see them if and when the plane's built the "normal" way.


Where the explosives live

As I got carried away with the build I forgot to take pics of the first stages. Do try to survive.
I was to build three bomb bays, of which the centermost was the largest one and issueless to assemble. The side bays, on the other hand... Well, they took a bit more work and they didn't sit in as nicely as I would've thought. I trust that if they suck, I can somehow camouflage them - if by nothing else, I'll glue their doors shut to keep my hideous secrets safe.


The engine intakes got some very funnily shaped vanes (inside the airframe). I had to turn and turn them in my hands and on the model quite a few times because I just wasn't sure how they were supposed to go on. Despite being installed just the way the instructions (vaguely) say, there were insane gaps but I guess they'll be somehow masked or hidden later on.

Both main landing gear bays were just big boxes. They fell in just nicely. I'd like many more pieces to work like that.


A drum magazine engine

Well, the engine nozzles looked like a combat shotgun's drum magazine to me... I also didn't really know if the vanes were absolutely correctly set. The instructions weren't too clear on that again so I decided that they could be dynamic or something. That's what my excuse is going to be if someone wonders.


At this part I, obediently following the instructions, glued the airframe halves together and tightened the most critical-looking points with masking tape. I finished up that evening but gluing on a couple of sensors and then left the setup to cure. [70]


The next evening I attacked the rear wings eagerly. They were nicely problem-free to assemble and attach in place. Into the bomb bays (in the photo the main bay was done and the side bays untouched) I glued the pylons but left the bombs and missiles for much later. I decided that I'd paint the plane in this state and glue all the hatches, doors, wheels and the nose landing gear after everything else was done.

Working this way I'd ensure that the painting of large surfaces would be as problem-free, quick and as simple as possible. At least the last time the landing gear bay doors were a bit on the way while airbrushing. Trial and error is the way I find these things out.


This looks quite sci-fi -esque
Now that I had decided my working order I primed the plane. Next I'd paint the cockpit with its canopy and then start painting for real. Because boringness the scheme's going to consist of greys... sigh. [110]