Mastodon
Showing posts with label Incom T-65. Show all posts

15.11.23

Project III/23

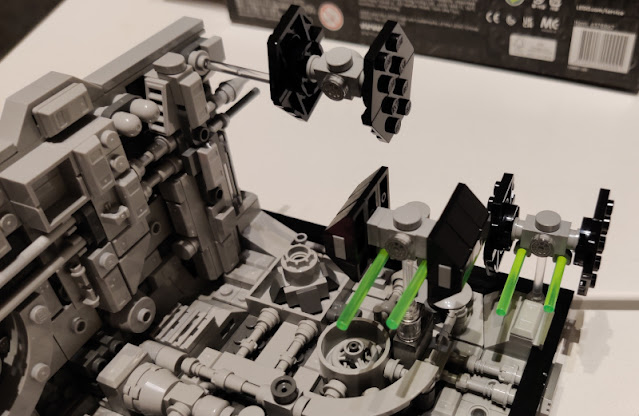
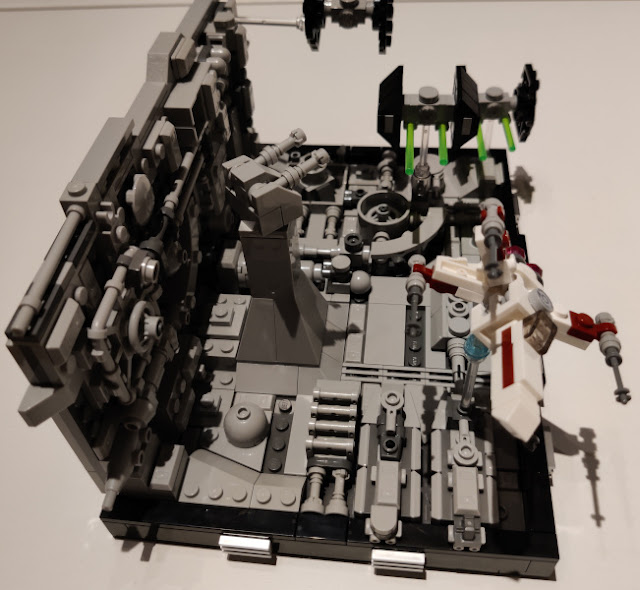
Running in the Death Star trench

The Autumn side Father's Day brought, in addition to the mumblings-unrelated things, some Lego! This has been a good theme for years and I was more than happy to build things.

It was an action diorama. I remembered seeing someone building (or upgrading) this one as an automata, but it could also have been a yet another fake memory of mine.


The trench

Building this set was quick and hassle-free, just perfect for a quick afternoon build. It only had almost 666 pieces so the expectation was "almost done".

With the first bag's baseplate done, the next couple were full of greebling at random places. My set was missing one light grey ingot (99563) from the center-middle, that I could complain about to the Danes and get a replacement. I just wasn't familiar with the process and wasn't sure if I wanted to bother.


With the floor of the trench done I moved on to the sidewall, that received a good amount of greeblies. In the middle you could see a couple of the claws that I had set 90° wrong, but I fixed that as soon as I noticed.


The completed sidewall sat sturdily on the baseplate and it got then impaled into it with two (for some reason of different length) studs. Undoing this might be interesting, but I didn't see that appearing into my calendar anytime soon.

Black squadron

In this scene Darth Vader was escorted by two wingpeople, both in TIE/ln starfighters. Unlike what the instructions said, I set the green laser blasts a bit offset for both of the firing units, because I just found it more visually appealing than the dual-firing ones.


To get the best-looking and most active scene I might have to fine-tune the angles of these a bit still.


Red 5

Then the baddie of the scene, flown by the Red five from the Red Squadron of the space terrorists, his Incom T-65C was a pretty decent representation in this scale. While building it I was wondering a bit why the spaceframe's front and back halves were only connected with two studs instead of all the four available, but maybe it looked better this way, greeblie-wise. The S-Foils were not adjustable: the split-wings were going to stay open so you couldn't use the fighter on a more calm scene just as it was.


Diorama

With the fighters built and installed only the Taim & Bak XX-9 heavy turbolaser turret was missing. It was a pleasantly poseable piece, even though it didn't have any green turbolaser blasts for the barrels. As befit the scene.


We were running seriously low on space on the shelves with these various Lego sets we had accumulated over the years :D

23.3.11

More basing

I decided that I'll finish the base as soon, or quickly as possible. There were two main reasons for that.
  1. I was in the mood
  2. My next models are already begging to be started with

So I took my pin-vise and started drilling a hole to the mdf-plate. Its place was handily scouted when I spraycoated the asteroid base: for this the asteroid plate was on top of the mdf-plate where it was going to sit in the finished version, so I just sprayed directly from above. Some paint went through the small hole I had made with the iron wire so there was a neat, precise spot on the plate as a "drill here" sign. As I was patting myself on the back I noticed my tiny mistake with the toolset. My pin-vise has 0.1mm bits and the iron wire has a diameter of 1mm. So I had to misuse a couple of my other tools but in the end I got the hole as big as it needed to be.

Just in case my white glue wouldn't be enough I decided to pin them together. I marked six places and drilled shallow holes in those spots. After that I poked the end of the thin wire in each hole at a time and cut a short piece. To prevent them from falling off at critical moments (that always happens) or just being in an awkward angle, I spread some thinned down white glue around them. Thinned down so that there wouldn't be any funny lumps on the mfd-plate when I try to attach all things together.

Had I been a bit less enthusiastic, I had realized before attaching the ministicks that the bigger wire needs a place to go to, too... While the tiny pins were occasionally digging into my palm I dug a trench on the bottom of the mdf-plate. When the extra iron wire can be bent to be out of the way and maybe giving a tiny bit of extra rigidity for the whole thing.

That's the actiony pose I had intended. Now I just need to clean up a bit here and there, like taking the sawdust remains off and all that.

As an ultra extra bonus a shot directly from above:

22.3.11

Forking the base

Yesterday I went for a manly shopping run.

First I ended up in the shop that used to be called Risteysasema but nowadays it's something like mallikauppa.fi. Never been there but Tapsa recommended checking it, so... I asked for a good "ground material" for my asteroid and I ended up choosing some gray Woodland Scenics "ballast". Thanks for the recommendation! The bag says it's good for railroads and gravel roads so I bet it's good enough for an asteroid as well with those merits. He didn't have all I was looking for (but my todo list got longer again) so I had to set my course to Kamppi.

From Hobby Point I got - as I had half-expected - some Tamiya pigments and a container of Vallejo's burnt carbon (iirc). Oh and one button of white water paint, just in case I feel like going for a hasty winter camo again. It worked pretty nicely on Hobbes' surface.

Now that I got home, I mixed some water and white glue to make some nicely spreadable but not-that-quickly-setting goo. I spread that stuff over the foam base I had prepared last week. In the middle of the first sector I realized that I hadn't made a hole for the iron wire, so I punched a hole and didn't even make a mess! I'm getting better at this :P Just in case something was going to go wrong I spread the thin glue goo a sector at a time. When the first one was covered I just applied some of that ballast stuff quite liberally. Then shook all the excess crap off, GOTO 10.

That wasn't good for my shoulders, working in weird positions and all that. Or maybe I'm just broken. The end result was pretty neat so I decided that I'll let it dry well so that I don't blow all that ballast off when I start spraying it gray. As I had gotten in the "let's do this"-mood, I approximated a good lenght of wire I needed for the holder. My original idea was something shaped like a square bracket and a support leg going from the back of the plane.

I did some measuring, cut the wire and started bending it around. For a moment I thought I could take a shortcut (not bending the wire 180º but just going down) but it didn't feel too good in the terms of supporting the model. So I decided to go with my original idea because it sounded like it worked better. After each bend I checked if all was going as planned. Just to make sure. And just to be on the safe side I made a couple of extra bends under where the belly of the Imperial X-Wing would be, even though I didn't think it was absolutely necessary. Just in case.

That's how the fork ended up. I'll paint it matt black later so everybody gets that it's not a part of the picture:

Of course I had to check how the "final pose" would look and if it ends up like I had hoped:

At this point I can still finetune the whole thing and there's plenty of time and space for it. Maybe those caves need a bit of filling or maybe not. Who says that all asteroids are as smooth as potatoes, anyway?
I guess that's most of what's left: fixing the MDF-baseplate, painting the asteroid and attaching it to the baseplate with the model supporting metal wire. Oh yes, I've got a good feeling about this!

11.3.11

New material to accompany the Imperial X-Wing

A bunch of days ago I asked from a guy I know, what he as a more experienced modeler thinks of my plan for the X-Wing's base. I had thought that a salsa jar lid would be a nicely sized and shaped thing to put stuff on. The asteroid could've been modeled with some styrofoam that's been softened over a tea candle or something. Then the model itself would be lying on a plastic pipe (cotton swap pipes, to be more exact) and there would be a piece of metal wire that hooks to a hole in the bottom of the model. Or a bunch of them. But drilling holes in my model? Didn't like the sound of that.

This is more or less the reply I got to my email: "I may have some extra finnfoam at work, it's nicer to work with than polystyrene and maybe some MDF plates and some heavier metal wire. Would it be fine if I popped by on Friday?". Of course it was fine. And as usual the five-minute visit ended up being more than an hour and a half, for we both seem to have the habit of talking quite a bit whenever there's someone to chat with. This is what Tapsa brought with him:


A plate of lightish blue finnfoam, an assortment of those mdf plates with nice edges (I have absolutely no clue how that thing is to be called in english) and a small roll of strong-looking metal wire. The idea is to twist a piece of that wire to make a two-pronged fork to have the model sit on (between the wings). Then the wire would turn back from other end to go down, through the finnfoam and the mdf plate where it would be finally connected. At the moment I think that the biggest problem will be the making of the asteroid shape so taht it doesn't look too fake. Soon we'll see how badly I guessed. Again.

I really was going to keep a short-ish break from modeling and all that but then again, there are my pieces and it's less than two months to Model Expo so I have to actually build that base before it. Meanwhile the next special vehicle (SdKfz) is already whispering from under the table "Build meeeee.... buuuiiiiiiillllldddd meeee". Auf deutsch, natürlich.

Maybe I'll go and play a bit more of Fallout so that kind of whisperage ends for a moment at least.

22.2.11

Lock S-Foils into attack position, deflector shields double front


It ended up looking pretty neat after all. Now I just need to come up with a good idea for the base & support, but that's just a bonus. I've been suggested an asteroid and I thought of something like a Star Destroyer's surface or something where I could build a tiny Taim&Bak XX-9 Turbolaser tower. That could be cool. Let's see what happens in the end.

Aside from the slightly modified Pilot figure, this is a straight OOB build. Nothing else has been changed and as far as I've understood, painting is something that you do always, so it obviously doesn't make this any less OOB, even if the kit was prepainted. Especially the engines show that a perfectionist would've had a ton of puttying and sanding to be done. As everybody can see, I'm not either a perfectionist or suffer from ASM. This looks good enough to me, I'm satisfied with it and that's what matters :)

I will return to this when I've got something to report, that being a completed base, but otherwise this project (1/2011) is now completed. Took a couple of weeks, the second idea and attempt of a paint job was good and I didn't really ruin anything at any point. This is actually working pretty well! Of course these are one of the famous last words of a modeler, part "too many to count"... Next I'll either mumble about Fallout or a SdKfz 251/1 and its crew, depending on how I feel.


Here are a couple of final shots of the Pilot in his tub with his trusty R2-M2 astromech droid. Those pieces are just a bit too small for my hardware - either of the cameras - to get good, clear pictures even in the macro mode. Or maybe I'm just too dumb for these things.

20.2.11

Our history affected the even older history in the legendary GFFA

The aluminium coating with olive green anti-blinding paint and darkgray whateversripes that I started the last time is more or less completed. Of course I did things funnily here and there because I didn't really know how certain things would work out. So I'll explain a bit what I did and how as awhole, even if a part of it is some sort of repetition from the previous post.

First I painted most of the model with Tamiya's flat aluminium and a selected few panels with Vallejo's gunmetal gray. The contrast difference between those panels was too strong in my opinion so I fixed the problem by repainting those panels with aluminium to get a uniform-ish surface. I also found the green anti-reflectory part in front of the cockpit looked a bit too short to me compared to the lenght of the model's nose and a full-lenght thing would've looked silly too. A bit more was painted but so that there was a nice-looking strip of flat aluminium between the sensor cone and the olive green part.

The surfaces of the laser cannons (Taim & Bak KX9) I painted with gunmetal, except the counter-flash pieces that I painted with the aluminium paint. Of course I wanted to get some of those hull panels look a bit darker than the rest so I mixed a bit of the flat aluminium with Vallejo's Oily Steel and painted a random few panels with my mix, whatever looked good. In the end it was a couple of panels in each side of each wing and a couple in the bottom-rear part of the hull.

After all of that had dried nicely I coated everything with this new Citadel (or are the paints under GW's flag nowadays?) black liquied called Badab Black. That stuff also dries matt unlike its glossy predecessor. The whole model was painted with this thing and I saw that it was going to be good. Earlier today I was in the finishing up stage of the build and I fixed some of the minor foulups that I noticed while dry-fitting the pieces together.

The shallow semi-openings in the undersides of the S-foils I repainted black to cover the earlier metallic leaks. While doing that I paid more attention to the surface texture of the engine parts that are visible and decided to add some details to them by painting some of the wires with red and yellow. Just in case someone looks at the model from a good angle and good light. While I was at it I painted the first front panel lines of the wings with the same Vallejo Grey-Black that I had used on the sensor cone. The business ends of the ion engines (Incom 4L4 Fusial Thrust) I painted white and later with my 15+ years old Citadel Blue Glaze, which still works unlike so many newer Citadel paints... That was to get some sort of a running engine effect to the model. And yes, I know that in ANH those parts are red-ish but this is a prototype and blue is always so much more Imperial.

As a pretty finish I painted all the new surfaces with that aforementioned Badab Black and stared at the results:


I wasn't quite sure of how the modified and slightly larger Pilot was going to fit in his tub (and the cockpit window over him), so I took it easy and didn't put the pieces together for real, so I'd avoid any last moment fuckups. I mean, that would've pissed me off at this point because it actually looks nice, even if I say so myself. In addition to the final construction and photos the only missing element is some sort of a stand. Have to make it myself, I guess this model is just to be whooshed around until it breaks. Or something.


17.2.11

New but old paint scheme idea for the X-Wing

My Imperial Pilot is awesome, I don't need to poke around with it anymore. Well, maybe a bit of blackwashing it, because I got some complaints about the chestbox. "Does he have a space mushroom from Tintin and the shooting star or what's the thing growing on his belly?" Well, it doesn't look like that anymore and it's a lot better that way.

So I was painting the hull gray, as I had planned to make a couple of layers of gradually lightening gray to mimic the look of Imperial Star Destroyers. After the first one had dried I noticed my mistake: the panel lines were light gray and that looked repulsive. That's something I did and accepted when I made my first tank (Revell's 1:72 StuG Early w/Schürtzen), but that's not acceptable anymore. I had been stupid again.

So I dug out my half-dried Citadel's black ink, thinned it down a bit and covered all areas with it. There, now the panel lines are as they're supposed to be. Hrmph. Of course the whole thing was splotchy black all around and I stopped to ponder a bit about the next course of action.
Accidentally as I met an online friend yesterday we at some point ended up talking about this build, too. Two heads think better than one and we thought of the american WWII fighter planes and bombers. I mean, that's where the space fight scenes and all came from to Star Wars, as everyone knows. If WWII was good enough for the Flanelled One, it's definitely good enough for me as well!

Ages ago I finished a one quarter-done bomber kit that I got from a flea market (I think it was a B-24), mostly aluminium coated, a green area to prevent the sunshine reflecting from the surface of the plane and making the crew blind and black stripes on the leading edges of the wings. We were thinking of other planes, like the P-51D as an easily googleable example. The thought was interesting and my mental image of my model in that scheme felt good enough so I decided to go that way with this build.

This evening / afternoon I've been doing the new first layers. Now that I set the kit and paintbrushes to rest, I noticed that I have to fix it later. As usual. But all in all it looks fun (for a change the photo isn't the smallest one around):


Now that I decided to upload a bit bigger pic, I gimped a couple of things to comment on. The blue markings show where the anti-reflecting part is, both on the front of the canopy and really small patch behind it (there's a small rear window). Maybe I'll extend that front patch to the nose cone, it might look a bit better.

Green points to the nose cone. It's gray-black to represent a non-metallic material that the sensor suite, radar and all the other electronic devices can see through.

Red things point to the centermost parts of the wings, they'll be completely hidden by the hull so the bad painting and extractor marks are meaningless. Just in case someone ends up commenting on something somehow somewhere, those parts don't need any fixing ;)

The original idea was to make some sort of an imperfect surface, that's why most of the hull is painted aluminium and some panels are painted gunmetal. But as it is, the tone difference is a bit too strong to my liking so I'll repaint all those aluminium and tone them darker later, to make a bit softer transitions. Those "engine wells" or whatever they're supposed to be that are located in the wings, they're going to be darker than the rest of the wing. That is completely intentional.

Oh, and at this point only the visible half of the wings is painted, the rest I'll paint later. Tomorrow or over the weekend, we'll see. And if you look really carefully, the leading edges of both wingsets are painted black like in the B-24 link a while earlier. Or that's what it's supposed to mimic.

Maybe this ends up going somewhere after all. But as usual, it'll take a while. Again.

10.2.11

Fixed bucket

Of course the wrongly made bucket ended up haunting me... So I took my greenstuff out again and rolled a nice piece to make the needed shape. I left it to set and later I covered it with black. Maybe I should've  got some sort of a glossy thing to make the helmet shine a bit? Oh well, maybe some other time.

While I was fooling around I also painted the engine intake vents, the warhead launcher wells and all the blue markings of R2-D2. Now I have to come up with a better designation for it. R2-F6? Dunno, I've still got time.


I doubt I'll ever post this much in such a short time again :p

8.2.11

My attempt at modifying the Pilot

To begin with I dug up my old greenstuff and a roll of legendary trick-wire. Can't translate that one, sorry :P I guess everyone's familiar with greenstuff: it's a two-component thing that you can mould and carve when it's set. In the container it's made of two separate strips of blue and yellowish stuff that you need to mix to get that green stuff done. Surprisingly.

To follow my idea that I presented in the previous post, I randomly made an extra lump around the pilot's head. After that I cut two very small pieces of trick-wire and bent them to fit nicely:


Later in the evening I got my paints out and quickly covered the guy in black to begin with. While he was drying I went and checked a couple of reference pics. Only the bucket, boots, gloves, chestbox and the pipes are to be black, rest are to be a bit lighter. So after the paint was dry I covered the overalls with Vallejo grey black and left the guy drying again.
When that was fine I did a couple of small white rings to the shoulders and to the left and right frontsides of the helmet. And then a small black asterisk-like thingie in the middle to make it resemble the Imperial emblem a bit better. Silver or metal would be more correct in this case but as white shows better I decided to stick with that. Finally I did a couple of white and red dots on the chest box.


As is a recurrent habit of mine, only when I was done and was looking at my reference pics again I noticed that I made a small mistake. That helmet is supposed to have a low mohawk-like shape on it. Sigh. Maybe I'll fix it tomorrow or maybe I'll just don't give a damn and decide it looks good enough through the smallish window. We'll see.

7.2.11

Startup 1/2011

This project is (was) supposed to be a light snack before returning back to the WWII thingamagicks. Maybe I manage to stretch this one over many weeks again, even though the thing itself would be done in less than five minutes...

We're talking about a Revell EasyKit series X-Wing, also known as Incom T-65 space superiority fighter. For most of my life I've been some sort of a Star Wars fan. Nowadays I'm a lot calmer than what I used to be, but I guess that happens to all of us at some point. Despite that everyone who knows or pretends not to know me, knows what I think of the rebellion and all such humbug.

Originally the model depicts Luke Skywalker's Red 5 during the battle of Yavin. These Easykits are some sort of "welcome to the world of scale modeling"-things, that don't require any fooling around with paints or glues. Supposedly. It does look like something as it is, but after removing the pieces from the sprues there are some paintless spots. And it's a bit funny in general. At least in my opinion a blue barberhsop-like twirly thing in the laser cannon is a silly.

Everyone knows the behind-the-scenes story of the X-Wings but I'll summarize it quickly anyway: Incom was developing a new starfighter to the Empire, their model T-65. But those bastards defected to the rebellion with the prototypes, causing some ruckus. I don't support such stuff so I decided that I'll modify the whole thing so it's a prototype for the Imperial Navy.

The first thing I did after my last finished project was to clean and rearrange the working area (the side table of the kitchen) so that I can evacuate my junk whenever the table is needed for kitcheny things. From my awesome lego xmas calendar I got a handy plastic tray where my Vallejo paints fit like a dream. The remaining old Citadel/GW paints - some of them I got to use once before they dried up - don't fit that well but I'm phasing them out anyway so that's not a real issue.

This is a lot handier than my old "these paints are in that box and those are ... there"-themed dynamic random archive. Of course it needs to be adjusted and fine tuned, but I've got the time. And anything's an improvement.

But now to the business. I opened the box and checked what it contains (instructions included) to avoid the problems I had with my previous build. A couple of sprues and an almost pointless instruction sheet:


Naturally the next step was to cut the pieces off the sprues, clean them up and dry-fit them to see fi they work nicely. And to see what I need to fix. In the end I glued the engine pieces to the S-foils because they were grinning a bit too much on their own. I left the wings as they are because you can't change it between the normal flight mode and combat mode. Normally I'd call that cheating but I guess you can't demand all the awesoments from this kind of a kit. In the foreground you can see the pilot that's going to need most of the modifications. But I'll get back to that in a moment.

During the next couple of afternoons I rebasecoated the pieces with my trusty Vallejo gray. No interesting stories or legends about that:

When I get to the third phase I guess I'll paint a couple of lighter layers on select surfaces, aiming for a sort of "Star Destroyer White", as the Imperial Navy has it. As a bonus detail I could try to paint the Imperial insignia somewhere and maybe something that smells like a "prototype". Obviously that's a bit difficult 'case there's no real definite way to mark something as a proto.

Meanwhile I'll attack the dude in those awful orange overalls. In case my greenstuff isn't completely ruined by time, I could go for a new helmet for him and use some metal wire to fix the TIE Pilot tubes. The helmet itself doesn't need to be a normal Pilot bucket for the X-Wing has a life support system, unlike TIE series of fighters.
That idea wasn't my own, I even got a photo hint, though I don't have a clue where that pic is originally so I can't give due credit to the owner.


Maybe I get something like that done, that'd be cool. But we'll see how it goes when I start fooling around with Yet Another Thing I've Never Done Before...