Mastodon

29.4.20

Varnishes and decals

Spot-varnishing, glossily

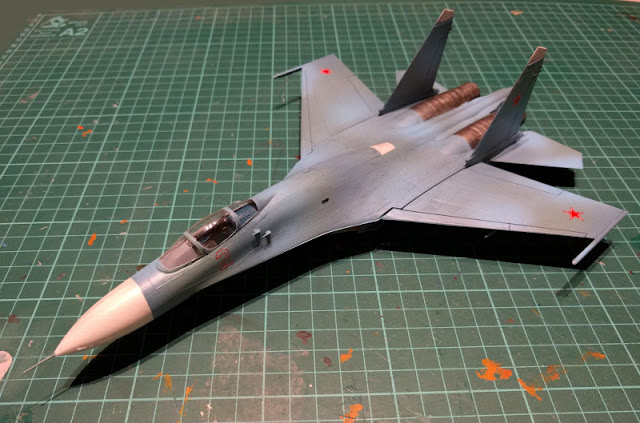
Following the tried and true method I went through all the areas where I intended to put decals on and covered it with safe margins with the clearcoat (Vallejo Gloss Varnish). I had chosen spots for three red stars, a unit number, and a warning stripe for the air intakes. Of course this applied both on the left and right sides of the plane.


Now the unit number that went next to the pilot's side, it could be made up to four digits, if judged merely by the horizontal space - and the decals were of a noticeable size. The decal sheet only had one small number set for a plane that also had its number in the vertical stabilizers, the hull-numbers were just about as tall as a pilot's torso. My options were limited, no matter if I chose red or blue numbers, that there only were digits 0-9 per side, meaning that the practical combinations were definitely few.


My original plan did not include the caution stripes by the air intakes, not to mention any of those dozens of tiny squares and whatnots. Still, following the traditions of the 'Mumblings, I indeed changed my mind regarding the caution stripes and actually felt that they'd bring some essential something into the model but without making me swear my lungs out while working on them. Though considering these documented decal failures, it wasn't the first time I had high hopes for these little beasts and failed just about as often.


Those foul, foul transfers

I started this fight with the red stars, because without the roundels something essential would've been missing from the plane. If those first and most important decals got ruined, I could just stop pretending with the transfers as early as possible.

To my great surprise the each of the stars fell in place beautifully and without a single complaint by me. They looked just fine and I was content. After the stars I applied the warning stripes, because they also didn't require any planning, choosing or triple-checking on positioning, just dropping in. Both of these also obeyed me, oddly enough.


After getting the more or less stock decals done I got to the individualizing part. I thought that I could go as mad as setting up a space-eating 1024, or 2028, but I realized that in addition to it taking a load of space, a three-digit number would serve just as fine. With these I meant to go for a power of two, but just when I started on 512 the five went all wet spaghetti on me - as these bastards often do, it also ruined 256 automatically. This didn't give me confidence to try 128 that would've, on failure, reduced my options pretty much down to something random. Instead I aimed for a true classic: 64.

That was otherwise a wonderful plan but the first six got spaghettified, or just plain ruined. Now it was perfectly clear that I was already passing the workable levels of annoyance and frustration with these little shits and just wanted to get it out of the way. My useful stock of numbers was rapidly dwindling, so I just took a pair of twos to represent, if nothing else, the silly fact that this was my second Russian jet.

Of course the second of the twos got a bit twisted while applying and both their positions left room for improvement, but I just could not bring myself to care anymore. Despite all my raving and ranting about how much I hate decals I still had not learned to just throw them away at first sight.


Matt varnish on top of the prints

I had built up my frustration with the decals and started undoing it by doing something pretty much foolproof: I applied Tamiya's matt varnish on all the glossy areas. Checking the next afternoon the result was decent, even if you looked at things from a certain angle the earlier glossy parts looked slightly different.

22.4.20

Weathering session number two

On the sunny side

I started the topside work by washing the remaining (now nicely worn-looking) metallic surfaces with brown (VMW 76513 Brown) just the same way I had treated the flipside parts. The result was again something that looked like it had seen a nice share of real life already.

The airframe I weathered just like on the bottom side, with paintbrush-applied grey (VMW 76516 Grey) all around, then wiping off the excesses off, perhaps driving some paint more into the grooves. I still approved of the result. I had been careful enough with the canopy frames and did not see any new mess ruining them.


A lot of vents

Many of my reference photos had gotten the set of vents, especially on the righthand side of the plane to jump out with their very dark look. I applied a black wash on them (VMW 76518 Black) and again wiped the excess paint away, but this time the result wasn't quite as neat, mostly thanks to the attributes of black paint.


Below the massive air intake scoops a pair of enormous vents got also washed black. Now my flying device looked pretty much aligned with many of my reference images had shown, at least on the generic level.


At this point I did a yet another check for not missing anything. Lucky for me, as I noticed the seagull impaler both on the instructions and the sprue. I glued the missing piece onto the nose cone and painted both that and a couple of fixable bits with the slightly gloomier shade of blue-grey (VMA 71319 A28M Greyish Blue).

15.4.20

Weathering session one

Somewhat calmer metallics

Bright as polished steel, clean engine pieces would've been at home in a model of a plane on the final stages of the assembly line. That's not what my plane was, so I drybrushed said pieces heavily with Gunmetal grey.


They looked a bit more plausible and alive, in a way, now. Of course I could've just painted them completely flat with the gunmetal, but my vision was to get a bit more lively look on the engines instead of what a plain gunmetal delivered. This was again something that just depended on your taste.

Washing

Next I washed the metallic parts with brown (VMW 76513 brown) to tone them down a bit more. I thought that the brown was a better fit to this model than the black wash I've used more often on metals.


I had somehow thought or most likely just remembered awfully wrong that my storage contained some of the Vallejo Model Wash that was meant for light vehicles, but after rummaging through my sets three times I had to admit that I really didn't have it stored anywhere.

As the next best thing I applied the grey wash (VMW 76516 for grey & dark vehicles) that I've used on a bunch of builds already. After I had applied it on I wiped the excesses off, where applicable.


Now the bottom half of the plane was practically fully painted, except for the little vents below the air intakes that I thought to wash with black, based on the reference images. A stronger effect could've been fitting but I felt that I'd at least start with a black wash.


Already my mind was working its way to get obsessed by the next stages. Of the decals I'd use the red stars and I guessed the unit number(s) too, but the insane little markings and whatnots I might not even bother to glance at. Decals have almost always just left me annoyed and offended.

Regarding the decals I remembered that in my rss feeds someone's fun scifi vehicle and how the maker had weathered the decals by gently airbrushing over them the base colour. The model in question was, if memory served, sand-coloured spinner or a fighter, so that approach wouldn't quite work in this case, thanks to the camouflage pattern. Of course I could in the final stages, before applying the matt varnish, filter the whole damn plane with a dusty colour (VMA "Dirt"). Though that approach would require another go at canopy masking...

8.4.20

Additional engine bit painting

A fresh layer of paint

Only when I was absolutely certain that my maskings were protecting everything as perfectly as I required, I proceeded. I airbrushed the unprotected bits with steel, just like I painted the nozzles a few posts earlier. Painting the topside pieces was easier, so it worried me considerably less than what was waiting for me on the other half of the airplane. Though, was something going to go awfully wrong on the bottom parts. repainting anything with a single colour was going to be a breeze as opposed to fixing a camouflage pattern.


Rrrrrrrrrrrrip!

As soon as I dared I ripped off the masking tape setup. The result was acceptable, I did not notice any overflow and only a couple of underpainted parts in badly visible corners. Those I could fix manually later on pretty easily.


This puzzle piece effect was curious. Maybe there was a very simple, practical reason, but the model did not betray that to me. All this bright steel was quite striking, but we weren't going to be staring at it for long, anyhow.


1.4.20

Back to the masking line

Step retracing

I had started drybrushing the engine nozzles with Gunmetal when something made me take another look at the reference pics I had used before. My camo pattern ran up to the attachment point of the nozzles (photo 1) when on a plane in its natural habitat the metallic area went almost as far as the leading edge of the vstabs (photo 2). Verdammt. I feared this was a deviation large enough to warrant a redo.


[SOURCE]
On the belly side the look was funnily different, with a puzzle piece look. I believed I could do that.
(c) Pavel Vanka [SOURCE]

Masking paranoia

I trusted that I'd get this done rather quickly. Now I had to make sure that all the surrounding surfaces were properly and perfectly protected before I restarted painting.

On the top I started by choosing the front edge of the paintable surface, this I did by masking horizontally along one of the panel lines. After that I fought the strips of masking tape running along the length of the plane, in a couple of pieces thanks to the gentle curvature of the engine covers. Getting these masking tape pieces tightly in place was a bit bothersome, thanks to the shape of the target edge and the confined space. For pressing the tight line I used the dull edge of the xacto knife. Doing the same between the two engines was obviously much easier with all the space I had available.


On the flipside the masking was just about the same, but as seen in the photo below, I added strips of tape directly below, along the panel lines, to implement the puzzle piece effect I mentioned earlier. Unlike in the reference image, I was not going to do the middle grey part. I just did not deem that one necessary.