Mastodon
Showing posts with label Jagdpanzer IV. Show all posts

24.4.24

A day trip for some reference photos

Parola Armour museum

During the summer half of 2023 the Parola tank museum had a special showpiece, a King Tiger that was on loan from the Bovington's museum. I tried to ask a couple of friends in separate cases if any of them were interested in a silly trip but no one had a matching schedule with mine. So I took this day trip all by myself, especially the Project Assistants I nor II, not to mention my partner, were interested in admiring blocks of steel in engine oil -smelling halls.

On an evilly early Saturday morning in August I drove north to Parola and the parking lot was jam-packed already thirty minutes after the opening of the museum. Following that the first hall that was the King Tiger's temporary home was also pretty damn busy. I had dragged our DSLR camera with me, so I took only a few photos with either of my cell phones, because the big one was much better for references?

What happened with my numerous photos was that I moved them on my desktop, but delayed with my actual backups a bit too long and an OS update wiped my data drive along with the OS-dedicated drive. My recovery attempts were futile and I was a bit annoyed with myself and the OS provider. These tank photos were the only ones I hadn't paranoidly copied to many different disks in many places.

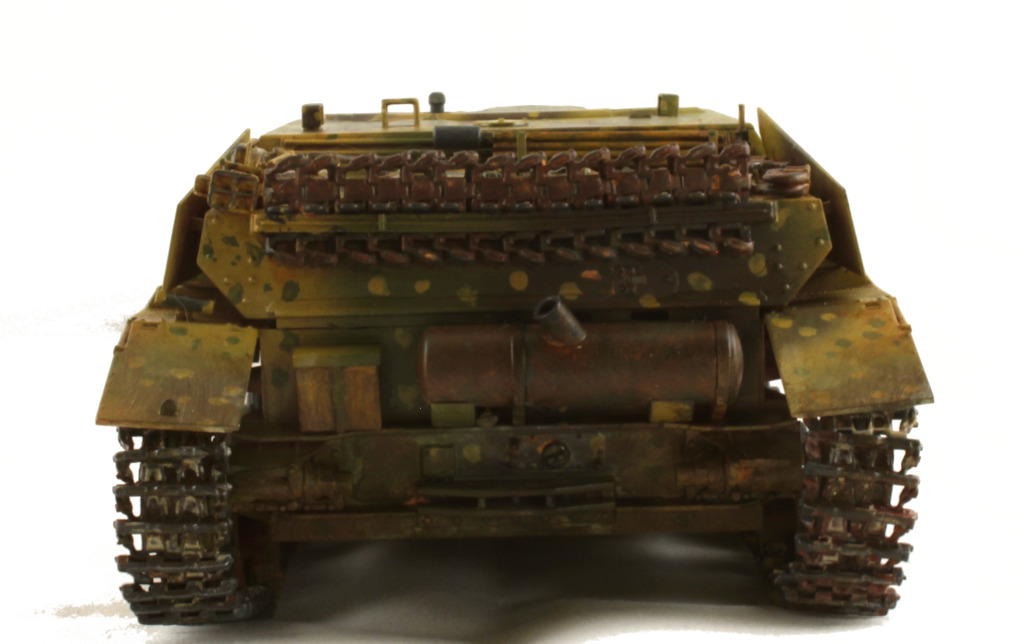
Panzerkampfwagen Tiger Ausf. B

The rare display piece was the Henschel's second prototype hull, Versuchs-Fahrgestell No. V2, with the older turret. The tank itself had few extra pieces on it, such as side skirts, mud flaps, tools, or most of the exhaust pipe pieces either. Seeing a Königstiger with my own foul eyes was awe-inspiring and it was extra amusing as the tank was positioned just about next to a tiny Vickers-Armstrong -made tankette that was pretty much the size of a wheel barrow.

The only photo of mine that remained of the biggest of kitties:

ô_õ

More important than photos was that I did get to ogle at the tank myself, at weird angles and just be generally baffled by the immense size of the tank. Just the drive sprockets were about the size of my torso and most likely somewhat heavier as well. It was impressive, if I had to choose one word. Now I just needed to find myself next to a live Tiger, and a Panther would be a cool bonus.

T-34/76 "Sotka", Ps 231-1

I was taking these T-34 photos for reference at a pretty fortunate time, as I hadn't started with the mine roller tank yet, but I knew I was going to take it up soon after. I was most excited to check the wear and tear on the tracks and what looked worn-out in which place.


StuG III Ausf. G, Ps 531-45

More than the many Soviet tanks in the museum I knew I was going to need (and want) more random, weird details on the German tanks. Looking at the effects of the road wheels and such was always useful, to begin with. Had I gotten very deep in this stuff, I might have tried to recognize the type of the tracks on this one, but I didn't know enough to say a thing.

In case I ever was going to make another tank with a modeled interior, and especially a StuG, it was a good idea to link to Andreas Lärka's collection here: http://www.andreaslarka.net/ps531045/ps531045.html


One of the most useful details here was the jack's wooden block and go me for taking a photo of it with the phone as well. I recognized being completely wrong with these pieces on models and had painted them so very wrong for years. These days I knew better.


57 ITPSV SU 57-2, Ps 461-nn

This turreted Sergei (the Finnish name for ZU-23-2, the twin-barreled 23mm AA cannon) on a tank chassis mostly offered me some more fun details of the life-lived tracks, the tow cable loops for upcoming chipping sessions, and the general forest-provided debris on different parts of the tank.


Panzer IV Ausf. J, Ps 221-nn

Of the J-model Panzer IV I didn't take many quick photos of, as it was such a rusty individual that I didn't see myself copying all that myself. For the upcoming projects I was most interested in its muzzle brake.


Some Soviet tracks

These photos I took only because these tracks showed so nicely how the contact surfaces of the tracks reflected light and how the bare metal showed at different angles. I think I spent a good fifteen, twenty minutes with the proper camera and my phone, most likely looking a bit silly, trying to capture the effect I saw so plainly with my own two eyes.


All in all the photos from my trip could've been much worse, these quick "easier to check from the phone than from the computer" shots saved a bit at least. The drive overwrite happened months ago now and I was still heavily annoyed by it.

21.6.23

Finished: Project VIII/22

Vogtlandische Maschinenfabrik AG (Vomag) SdKfz 162 - Jagdpanzer IV L/48

The Tank Destroyer project that I started barely in the year 2022 was now finally completed, in June. Not that I had rushed around with this, nor had I dragged my feet on purpose. This project, just like every other one, lived on inspiration: sometimes I got a sick amount of stuff done in a handful of consecutive days, then I tinkered with other things for a good while as the Jagdpanzer IV was simmering in the background.

Timeline

My timekeeping was pretty unstructured, I mostly used the timestamps of the photos I had used to follow up the different modeling sessions. If the whole show lasted 28 about 45min sessions, then we got a 28 * 0,75h = 21h, spread nicely over six months. While spinning these numbers up I took a look at how the Königstiger went, and it had only eaten something like three more months from the calendar despite being a lot more complex a model and the build-paint process was quite a lot more intensive.

New method invocations

In an earlier related post I was ruminating that being practically a random gift, this was a great model for testing all sorts of weird new things. As documented, I got carried away painting the metallic parts with a non-metallic paints (excluding the final highlights on the tracks), and that seemed to be a neat approach, at least with the engineering tools.

Oil paints had been tickling my curiosity for a longer while now, but until this early year I had managed to squash my interest in the subject. Luckily, however, my colleagues were even better with their sales pitches than the random internauts, because those things were damn comfortable to use! Their drying/flashing/curing times were incredible, but especially considering my weird schedules that was most often a good thing. Curses, I couldn't fix my overapplication of mud over a weekend? No worries, the thinner reactivated my paint and I could salvage the situation. There was nothing like this with the acrylics, but I was going to keep using those as my main painting tool in the future.

Applying pigments with the thinner was also a new thing for me, that I encountered accidentally, and good that I did. I was most definitely going to play even more with the pigments in the upcoming projects.

Photography

With all this newness, I got inspired and played with my final photos much more than before. The backgrounds of my light tent photos had been bothering me because they (the backgrounds) weren't smooth and clean fresh out of the camera. For reference, any of the recent "Finished: Project n/yyyy" can be checked for examples. For these final photos I spent some more time, checked for some useful processes, and ended up taking my photos three times until I got what I more or less wanted, thanks to someone missetting the DSLR's aperture parameter to the opposite end of what it needed to be.

[0] – Photos in the light tent

Simplest thing first, I set the background roll so that its folds (packed away it was folded twice) would jump out as little as possible. I took my photos with the camera's (Canon EOS 60D; kit lense with specs I never have bothered to memorize) manual mode; ISO 200; aperture f25; exposure time 0"6 aka 600ms if I read these correclty. So far I have not shot these photos of mine raw but still jpeg, despite the seriously committed people swearing by the wonders of the raw format.

[1] – First edits

When finally done with the photography I dropped my shots into my work laptop's Photos, where I bumped the colour temperature a notch upwards, then adjusted the Levels. Being a total amateur I just looked at the spectrum and dragged the dark handle to where the graph practically started and the light handle to where it pretty much ended.

Unlike in this pic here that showed the Levels of a WIP photo taken from the tabletop, my final photos had a pretty much gaussian curve in them with a noticeable amount of emptiness. With the unnecessaries trimmed off, the colours in the photos started looking much more than what my own foul eyes told me of the model in the real world.

[2] – Artifact cleanup etc

Cropping the Levels didn't remove all of the nonsense, even if it helped quite a bit. As the second editing stage I threw my photos into Gimp, where I picked a white and simply started painting over artifacts with it. The result was a pretty uniform white background (or blue in the few photos I took with the blue background).

Being my lazy self I got most of the junk just along the edges of the model with Gimp's magic wand tool's "select by color" mode. The last fine-tuning I did by hand, sometimes poking individual pixels. Whenever needed I also rotated the photo to get it to an angle I felt I needed to get, then cropped it nicely, and finally resized each photo down to n*1024.

As you could see from these photos below, you didn't even need to squint for it, the results didn't end up being nearly perfect. They were much, much better than the ones that I didn't play with this much, that was for sure.

[3] – Photo gallery