Mastodon
Showing posts with label Ju-87. Show all posts

20.2.19

Finished: Project IV/18

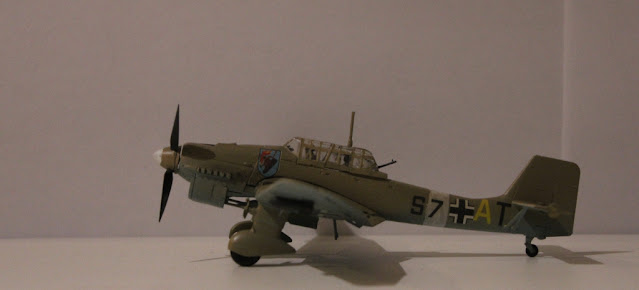
Ju-87 B-2 trop

According to Wikipedia the Stuka B was the first mass-produced model and the B-2 was also had a tropical variant. So, the idea I had completely pulled out of my hat was a technically believableish solution! This has not happened often here.

S 7 + A T

At some point a couple of those claw-like bits from the bottom of the airframe had fallen off, ended who knows where and I had no idea where. On this "no glue needed" model, no less. I guess I could've gone all my wip pics and posts backwards to find out, but what'd it fix at this point?

Below I have dropped my traditional walk-around -like photoset from a distance more or less that someone could actually have had while walking around a real world example. I didn't think of hunting down a few same-scale little folks to provide that sort of scale.


Perhaps I should finally consider seriously buing one of those ~40¤ collapsable photobox, I saw one at the office last autumn, it looked convenient enough. I mean, I've survived so far the way I've done my silly photos, sometimes bothering to gimp off the silliest nonsense to /dev/null, but if I could get away with less effort...


Recycling

Because I could, I took the baseplate I had made for an ancient MiG-29 project, even though a more serious hobbyist could assume that there weren't maybe that many ill-maintained, prefab-concrete slab airfields (or airplane parking areas for that matter) in the early '40s. With the dry grass and wind-blown sand the plate somehow felt like it fit the mood of the model. Someone who wasn't that suspicious of ending on weird watchlists could almost hear the fliers singing Stuka über Afrika! or something like it. Those krauts sure got busy making up weird-ass songs... wtf.


13.2.19

Withstanding the weather of Tunisia

The final details

I had decided that this plane wasn't going to get heavily dirtified, weathered or modulated. The sun-toasted decals (see last week's post) were enough in my opinion. The only clearly visible change I did anymore was that I painted the anti-slipping surfaces on both sides of the cockpit dark grey (Vallejo's RLM 66).

The always as happy-lookingly grinning engine's cooler grille I just dabbed with some black on top of what had already ended up there. I also drybrushed the exhaust pipe ends with a direct but gentle exhaust gas flow towards the back, both on top and bottom of the wings, and somewhat along the airframe itself. Maybe pitch black wasn't the best choice for the most critical eyes but again, it was more than good enough for me in this project. The exhaust stains weren't, as I had wanted, incredibly strong and heavy.

Why did I add the no-slip parts so clearly, then? I hadn't really thought of it much, they just brought some more details to otherwise so simple a paintjob. During the same heartbeat I also decided not to apply a wash of any sort.


Oops, I almost forgot!

Oh right, while brushing on Vallejo's matt varnish (70520) to cover my back I realized that the damn thing had some forward-facing machine guns as well! Instead of black or almost black I quickly painted the tiny nubs metallic (VMC 70863 Gunmetal Grey) and to the tiny tips I dabbed a speck of black as the open mouths of the barrels. I also drybrushed the radio operator's MG with the metallic paint while I was at it, to simulate some wear and tear.


Oh, the difference on the character of the sandy colour with a different lampset! The last photo also showed nicely (unlike on the phone's screen) that the main bomb indeed had the yellow stripes. So I had that provably documented after all.

6.2.19

Varnished decals

Fighting the silvering

Being the lazy pig I am I applied the glossy varnish (interestingly Humbrol's bottle says Matt Cote, but it has always been very glossy to me, but after a new search I found out I just didn't know how to use it properly) only where I was going to insert a decal and nowhere else. Yes, I was going to apply decals despite my neverending complaints about them.

So: I varnished mostly corresponding areas of the bottom and top surfaces of the wings. Then I varnished the rear airframe from the back of the canopy up to the tail wing. Finally, just in case I was going to use that bit that made me think it was the unit's individual funny thing. While writing this subsection the fact was that P("any extra decals") = 45%.


Decals

Spoiler: fml

Let's get that out of the way, everyone was expecting it anyway. I was applying S7+AT as this plane's markings to the airframe. The first side went ok. The second S7 turned into some purple profiteering jellyfish and I couldn't undo the first one anymore.


There I was, asking myself again: why in the Empire do I always give these pieces of crap more and more last chances? Either I was an idiot or an incurable optimist.

To business

Under the wings I applied the largest of the three Balkenkreuz, no issues there. I wasn't mad enough to use the slices on the dive brakes. The middle-sized crosses went on top of the wings and the smallest ones behind the tail band. All good there.

Then I started pondering which markings to use, if any. Despite my usual fears nagging on the background I decided to go with a set. From one suggested variant I took substring "AT" and used it at the end. To go with that I took the other substring "S7" (no, I was not going to cut those in two and apply them character by character) and the first one behaved as hoped. But as I already spoiled the surprise, the second '7' turned into boiled spaghetti and I just swore inside my own head.

Despite all this stupidity I attached the silly shields to the nose of the plane not giving a flying hoot if it was like this in the history books. As a personal comment I thought that the shield was ridiculously oversized compared to the rest of the plane.


Dullcoating

As the interwebs had re-educated me, I shook and mixed the Humbol dullcoat like a maniac with maracas, and spread it around the plane. That crap took way, way longer than Vallejo's matt varnish to dry, but I wasn't in a rush. I left it to cure over the rest of the evening and night.

The next morning this is how the Afrika's conqueror looked like. Maybe I'm just used to the sharp-contrast nationality and whatnot markings, but somehow I got the feeling that maybe I should've gone with a lighter touch with the paints. But then again, they didn't look bad, just quite different.


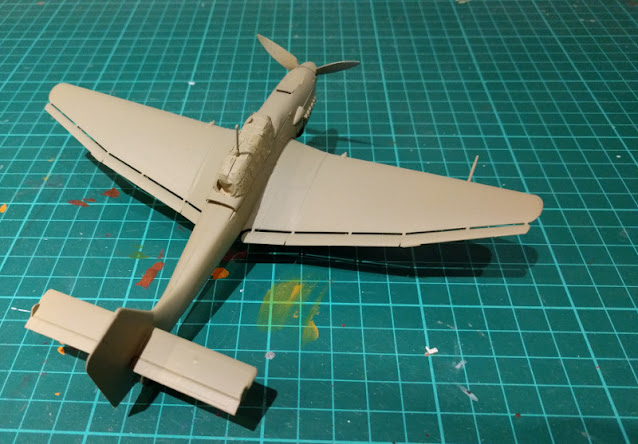
30.1.19

The first fixing round with some brush painting

Some brush painting

Canopy

After the paint had cured on the canopy I somewhat anxiously tore off the masking tapes. The result was, as I guess was somehow predictable, suboptimal. There were some white primer overflows here and there, which I scratched off to the best of my abilities with the tip of an hobby knife. For some covering up I did a bit of fine-tip painting over the nonsense, where I needed to. It was somehow tolerable from a distance, after all.

Now plese remind me, why I'm not primarily an airplane guy, hm?

Details matter

The propeller blades I painted almost black (VMA 71055 Black Grey RLM66) and the bottom half of the spinner that had turned blue I returned back to the yellow-brown world. While pondering on the bombs my searches took me via the FSM forums to some odd and unexpected sites (http://www.warbirdsresourcegroup.org/LRG/bombs.html), where the Luftwaffe's bombs and their variants were described very nicely. It was a very handy link, now if I only managed to remember it in the distant future!

In this case the bomb pairs slung under the wings were model SC 50 Bi (reason for this choice: the colour) and the underbelly bomb was an SC 500 Grade III (the only one listed, no need to choose). With this in mind I painted the little bombs dark grey and left the main one blue, I just touched it up a bit here and there. The big one then needed a yellow stripe in each sector of the butt-end, between the winglets. So that's why I did (VMA 71002 Medium Yellow), it just didn't stand out too well out of a sky-blue bomb.


Fixing this and that

At this point I realized - while duckducking colour photos of the propellers of the jericho sirens - that I should've painted them sand-coloured, or to be more exact: I shouldn't have painted them blue in the first place. Learning is good, they say. I decided to fix them by hand and I think I saved at least half an hour of masking time, not to mention the time I could potentially have spent fixing any overspray.

By my gut feeling I masked off an area for the white theatre band. These have never worked the way I have wanted, but as I haven't found a better, more reliable way, this has been my method. I did the band and the tip of the spinner with white paint. To avoid the overflow, just like with the landing gear, I left the airbrush at the dock. And to make my life that much simpler.

While I was on a roll I also painted the radio operator's MG's barrel and handleable bits along with all three wheels completely black. I thought that in this case the contrast difference would be strong enough and this way they could maybe be distinguished from the dark grey bombs. Maybe I should go again to look for the rubber-coloured paint, just so I could at least once say that I have done wheels "correctly".


23.1.19

Priming and basecoating

A sandy base to Tunisia, for example

I airbrushed the vast majority of the plane's surfaces with a sandy colour (VMA 71246 Yellow Brown) that wasn't Dunkelgelb but looked pretty decent to me, especially after it had dried. Maybe I'd modulate it a bit when I reached the late stage of the painting process.


Not quite cerulean bellyside

The RLM blue (VMA 71101 Hellblau RLM78) wasn't that sky blue to my awful eyes, more like something from the endlessly grery, raincloudy, late November, but who was I to declare to an air ministry of how to name their paints. This was definitely supposedly be in the very core of their domain, not mine. Anyway, my image of this paintjob was a bit "toned down". That didn't mean it was wrong, just different from my own personal expectations. So, nothing new in the land of the Project Mumblings!


16.1.19

The gloriousness of a multi-pane canopy and masking tape

A masking tape adventure

I've always liked the general look of Stuka's multi-window pane setup. The last time I built a Stuka I tried to mask it by assembling it out of a gazillion tiny tape flakes and that didn't work out at all. After that I've done what worked better (and usually pretty well) then: first the inner panes were painted darkly, then the whole outside is covered with masking tape. Then the window lines are traced with a sharp x-acto knife (this is where the dark inner bits come in handy) and the excess tape bits get torn off. The result should be and has almost always been a more or less perfectly fitting maskset.


Either I wasn't as patient as I should've been or the knife had gotten dull, but this time all I achieved with this otherwise wonderful and simple method was loads of cursing. So as an A/B test I decided to give the fragment approach another but most likely doomed go. It wasn't going to be perfect but I just had had it. The second photo shows the results after the first masking session of the B variety.


I was mightily lazy and just popped the MG+window bit off and protected it with tape from the inside. This led to me having to paint the plane and the canopy imperfectly attached. It didn't seem like a noticeable issue and I thought it was actually going to be the simpler solution.


Please remind me never to attempt a Do-17 in this scale, no matter how amazing their nose windows were. The mere thought of it made me shudder.