Mastodon
Showing posts with label Hobby Boss. Show all posts

5.6.24

Kamov's multi-year painting process, new scheme

If I have ever seemed a bit slow with my projects, just think about this: the Project Assistant I had started painting this Ka-50 in 2016. The plan at that point was to paint it to look like a flying pig.


Immediately in February 2024 she got inspired to paint the Helo a bit more. This time the colours chosen were blue (Citadel Ahriman Blue) and pink (VGC 72013 Squid Pink). Over the years four of the blades had fallen off from the double beaters, but I knew where two of them were kept and the other two were either completely lost or just next to the long-term storage facilities.


The beautiful February idea was to keep on painting until it was done, but as anyone looking at the timestamp of this post could guess that the plan was revisited and left for more inspired moments. Who knew, maybe it got worked on before the next 7-year season had passed?

29.3.17

Helo priming

A ghostly white 'copter

Without any weird explanations: I finally sat down with the Ka-50 and the white primer to get some painting done. This took a couple of short moments on two days. As I always tend to do these things. The white primer worked here nicely, as my Project Assistant was going to use bright and light colours in any case. There would be less issues with paint coverage this way.


Kamov assembly

The Black Shark and its pointy teeth

The building process was pretty typical. First I piled up the bits of the pilot's workstation and then forgot it for days. Then I started working on the rocket pods and the missile launchers. First things first, the 80mm S-8 rockets, which consisted of a couple of pieces per launcher and the pylons to top it up.


Next I built the 130mm AT missiles, of type 9K121 Vikhr (NATO: AT-16 Scallion) and there was a good load of them. I didn't really have a clue of how good those have been but I'd guess that twelve missiles would be good enough for a couple of tanks and/or tanklike vehicles.


The double mixer

I have always liked the counter-rotating blade setup that a bunch of Soviet and later Russian helos have used. They've just looked neat (and it was great fun flying with them in OFP). The mechanical and structural complicatedness has been something I haven't looked into much care, but by the Empire, the yule tree that was to be built...


The helicopter's airframe was a simple two-piece build, all the extra bits (such as the wings, exhaust pipes and so on) fit like noses on faces. It was a very pleasant build. The most bothersome piece was the 30mm autocannon (Shipunov 2A42) thanks to its flimsiness, I was a bit afraid that it'd just snap off in two when I was cutting it off the sprue. That's also why I didn't drill out the end like I had wanted to.


The rotor blades (6) settled in nicely, except for one. To support it I left the xacto blade's arm under it while the setup was curing overnight. When I checked it later on it looked just fine.


At this time the infamous real world started being a bit on the way of hobbies and I was pretty low on spare time. The priming was to be done "whenever I get to" and as always, the painting itself was going to be on the mercy of the artist's whims. Earlier these may have had weeks in between, so the Project Mumblings will return to the story of the Ka-50 when we can. Hopefully sooner than in half a year or so.

22.3.17

Project IV/17

The Project Assistant's assault helo

Last autumn we visited the Hobbyscapua again and my assistant grabbed a Ka-50 assault helicopter from the shelf the same instant I had said that "I've always wanted one of those or the two-seater version". Kids these days... Oh well, it was all the same, I was going to get to build it and then observe the forming of the paintjob - safely from the side.


The assembly instructions fit on a single sheet. The painting instrcutions could've been thrown away immediately as they weren't going to be followed anyway. I also assumed that the decals were going to be skipped.


All the bits fit into two sprues again plus then there were two transparent pieces and a set of not-so-military-looking decals. I didn't expect that building this was going to take many sessions.


25.11.15

Finished: Project VI/15

Decals

For a change there weren't any noticeable issues with the decals. Only two of them got uncancellably ruined: a coat of arms from one horizontal stabilizer and one "F-22* Raptor" ad from the nose.

Getting a couple of those small decals into their places mostly blocked by the bomb bay doors also provided a challenge, but they ended up where they were meant to be in the end. This time I didn't notice anything being the wrong way, either. I guess I was paying enough attention.

After a short drying period I applied the matt varnish all around - excluding the canopy - and decided that this was it [285]. Now I have, just for my own amusement, followed the way I have used the time on a project and can ponder a bit. This one took one week on the calendar (I began on Monday and finished the same week's Sunday) and in actively used time just a bit below five hours.

Time usage mumblings

Building was done quickly, as the pieces fit together wonderfully, and nothing really required much fighting. As long as we ignore the bomb bay doors in this context. Masking things and preparing for the painting were again the time-eaters - and the decals, as I tried to be really careful with them. Painting itself, on the other hand, was pretty quick, as I mostly painted flat colors on surfaces, except for the dark shape. Nothing required accuracy or special care.

Of course I could've cut some time off from just about every step, but I wasn't in a rush and I was taking my sweet time. I was occasionally listening to Top Gear, QI or WILtY that was on the background instead of working single-mindedly, aiming for a 100% efficienct on my time.

The final photos

This time I took my final photos exceptionally with my phone, as the real camera was on its way through Europe. Please do forgive me and try to survive, you can see something from these pics, too.


An advert-sticker for a war material expo perhaps?

There was even a serial number


I had fixed the glass pane edges a bit


18.11.15

Set the bomb and run away

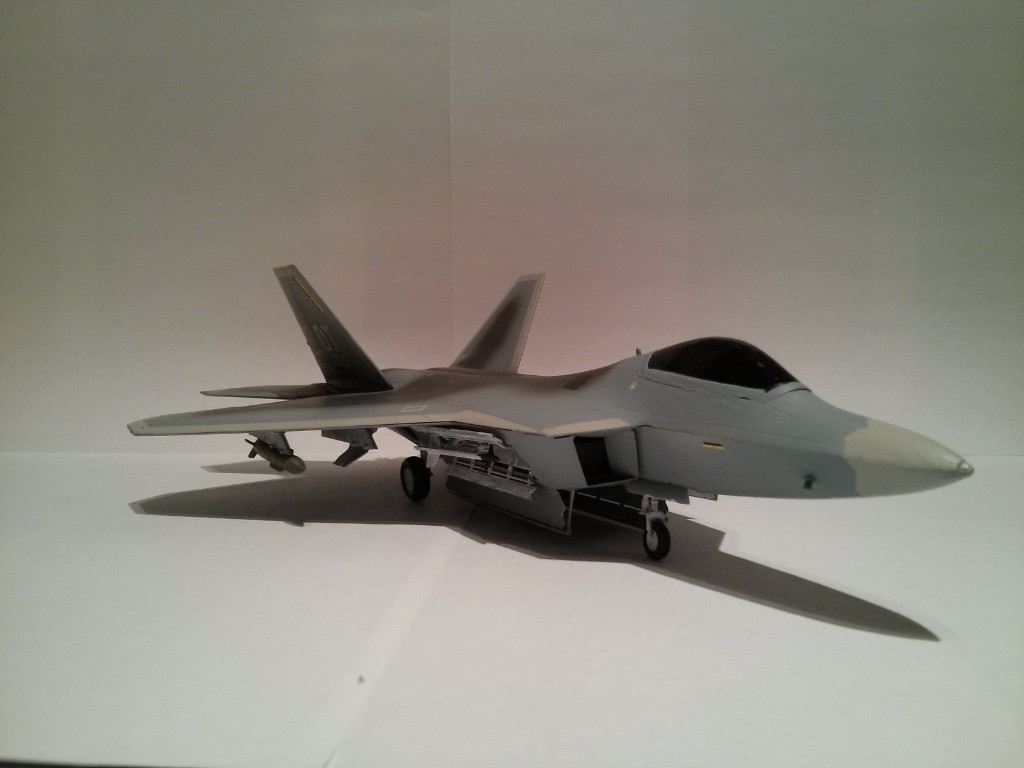
Air combat missiles and a pair of bombs

As the major paintjob was finished, I continued the work on the remaining construction, more or less according to the instructions. Next up in the schedule were the bombs! As I'm famously not too well-informed about these, I googled a bit and maybe got a bit wiser. For a short while.


The main bomb bay was to receive six AIM-120 AMRAAM missiles, the side bays would get an AIM-9 Sidewinder each. Under the wing pylons two GBU-32 (or 31, who knows) would be installed. Those were stupid iron bombs with JDAM bomb-smartener modules bolted on.


Because I didn't trust my guesses even with wikipedia, I painted the democracy-savers just the way the instructions told me to. I thought that it'd be safer than guesswork and going wrong at full speed. The AMRAAMs I left basic grey but I painted the tips light grey. The Sidewinders I painted white over a bunch of different sessions and their tips I painted black. And the smart bombs I painted olive green (VMA 71096 Panzer Olive Green). Into the rear ends of each missile I painted a black dot to represent the rocket engine's nozzle. [180]

The canopy debacle

I decided that I'd save time and my nerves with that accursed canopy. An extra motivator was also that whatever I tried to do to the sepia crap, the result might not be clean or acceptable. So I took a shortcut and painted it black (VMA 71057 Black).


My idea was that when I'd varnish the model, I'd apply the glossy one over the canopy as well. And when applying the matt varnish, I'd just leave the black part untouched, achieving a night-like cockpit. Or something. We'd see when all was done.

Bombs go where bombs belong

Gluing three AMRAAMs nicely and neatly into the tight bomb bay was easier drawn than done. With a bit of fighting they all went in their places. The Sidewinders went beautifully on their extended LAU-141/A catapult-like launchers because they had plenty of clearance. Later on I thought that I could've been silly and used the closed pylons in the side bays and the extended ones in various slots of the main bays.


As a thought those devices are very amusing: the bay doors open for less than a second and that thing catapults the weapon out instead of it falling out with the help of gravity alone (and slowly). I find it extremely funny.

Bothersome doors

From this subtask I first built and glued on the landing gear bay doors, as they were noticeably easier and simpler. The bomb bay doors consisted of multiple flimsy part and they were of annoying shapes and sizes. They didn't have much surface to glue on to anything: the few tiny hooks were to be attached to the very narrow edges. [230]


Final details

I painted the wheels in the traditional way: black-grey (VMA 71056 Black Grey) and a couple of cylinders in the landing gears with steel (VMA 71065 Steel). Because I had reached the fine-tuning part of the project, I finally painted the often-forgotten engine nozzles metallic (VMC 70863 Gunmetal Grey) and then washed them with brown (Citadel Washes Devlan Mud). This time I remembered to paint the notification lights on the wings, one red dot (VGC 72010 Bloody Red) and a green dot (VGC 72030 Goblin Green).


Finally I applied a glossy varnish over the whole model (70510 Vallejo Gloss Varnish) in preparation for the decals. As an eagle-eyed reader may have noticed, this time I didn't wash the plane itself at all. [245]