Mastodon

31.10.18

Finished: Project II/18

Boba Fett's vehicle

Mumblings

In my assembly mumblage I did rant about how incredibly long building this vessel took. The main reason for that were the numerous curved - and at that point unsupported (unlocked) - surfaces. Compared to the Falcon's less than two hours this one consumed almost five hours.

A few of the pieces felt like they'd break any moment while bending and/or installing them. The long-cursed dish was something that got its attachment bits (or the targets) apparently bent so out of shape that they couldn't be used, since I guess I had them misaligned on my first attempt. Whatever was ruined wasn't salvageable with my skills, this time.

Slave I

The legendary bounty hunter Boba Fett inherited Slave I, a Firespray-31 class patrol and attack craft from his suddendly and surprisingly deceased father figure. According to the old stories these ships were used by some planetary police forces, in the times before the mass-invalidation of the Extended Universe, and I haven't bothered to keep myself up to date on the new timeline.

In this model none of the sneakily hidden features and extra weapons were displayeed (some of the hatches/doors were there, for whoever recognized them), only the lower hull's twin blaster cannons were there to be seen. In case my memory served, the normal variant had laser guns instead, but looks-wise I didn't think it made much difference.

Imagery

Below's the traditional set of eight spin-around images. I almost got my balding head reflected in the canopy of the first photo, but luckily for all of us I ducked before taking the photo. Seems like I should take a full encirclement with A4 approach for these shiny models instead of just below and behind. Now the reflections ended up containing the assistant 2's chair, my fingers and who knew what else that really had no business in being there.


To wrap things up here's a couple of extra photos. The point of the middle one was mostly to show the otherwise less visible details of the inside of the handle-shape. Sadly the wings could not be rotated for a "landed" pose and some appropriate quotes.


24.10.18

Another visit to some Kuat space docks

The first 45 minutes

I somehow assumed that you, the reader, might find it amusing that it took me that long to get finished what you'd see in the two photos below. Something like twenty minutes went to bending the main hull into shape, especially that "chin plate". That's the bit in front of and below the viewport when the ship's landed and above the pilot's head when it's flying. The instruction sheet's "just bend it by hand" didn't really help much and somehow I had positioned myself so that the lights were continuously reflecting into my eyes. Getting anything aligned was bothersome.

That same silliness went on while I was working on the twin blaster cannons. Their rotation/aiming piece was easy, getting the cannons on that was still ok but oh my, getting that subassembly into the airframe.. that took some swearing. Again, the first one required much more work than the second copy.

All in all, this small amount of stuff took a ludicrous amount of time. And here I had thought that out of the two 'wars vessels this was the easier one!


The second round

This was ridiculous. Six (6) pieces that were to be installed flatly against the hull took a sick amount of time. The reason was that the airframe was curved and getting straight plates on it was more complicated than it sounded like, as the connectors just didn't align with the traditional "turn them 90 degrees and that's it" technique.

Luckily I got to start the first wing-rotating bit after these armour plates. Of course I then had to stop working just before I could proceed to the half-circle-shaped armour plate's twisting, turning and installation phase.


And third...

Getting that arced shape into proper form and then installing it was complicated. Again I had learned from the first one and the sequel went easier and with less head-scratching. Still it took about half an hour and I was about to break some bits while re-rebending them.


Here was the easiest piece so far: the Z-like shape that forced the main hull into its actual shape. After this I got to attack the cup-shaped bottom piece and while working on it I totally forgot to take wip pics.

The "best" part was that the parts that were supposed to lock the cuplike piece into itself just didn't fit together (either the slits were bent out of shape or the tongues were, something just didn't work like it was supposed to) and I decided to give up on them before I actually broke or bent something into unfixability. Maybe sillily I trusted that the decorative pieces hiding the seams were going to be enough to hold it all together.


Fourth session

I started by sealing the cup's front part with that extra armour piece. The grimacing was quite ugly, but there was nothing I could do with the actual attachment bits being totally useless.

Luckily the hull was installed in a way that hid the stupid gaps complately! I was actually surprised that this part went with so few curses.


These double cones weren't nozzles for the main drive but repulsor generators. They were still there to move the ship around, so for a non-fanatic this was assumedly a non-issue, if even that much.


The fifth and final element

After a couple of weeks of not working on the model I continued with the bottom disc. There were many greebly bits and they were all fascinatingly shaped, but still easy to install so the progress was pleasantly rapid.


Getting the last subassemblies together was (again) hair-greying fun, but as soon as I had the bottom disc locked into the cup-shaped skirt, I could bend the wing's top supports into the main ones and that gave the hull noticeably more stability. Those square-shaped bits were just a bit tight for twisting the attachment bits, but still I got them turned enough.


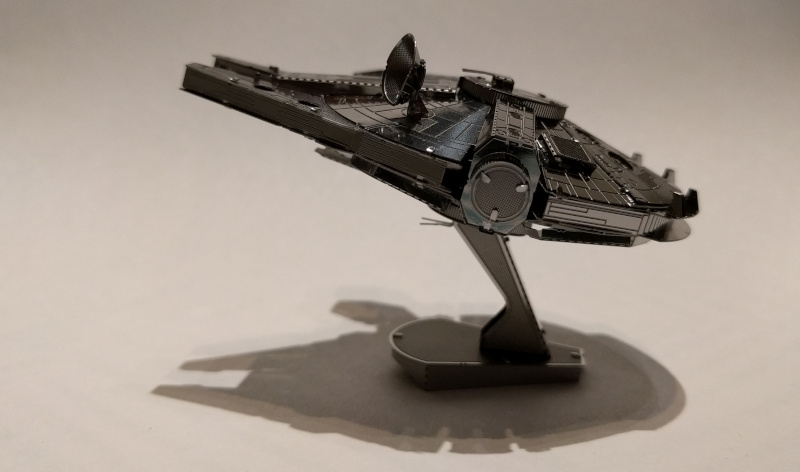
Slave I's display base was confusingly small considering the size of the rest of this model, I even had to bend the leg a bit backwards to get the setup to stay upright. Then I proceeded to work on the final bits - the wings.

Dear me, how complicated those buggers were! Getting the wing installed into the support bar was also a struggle of a kind, but it all worked out in the end. And as usual, the first one taught me how to do it all so the second one almost flew into place.


I wasn't sure if it was because of the angles of the photos or my own weirdness, but somehow, looking at the model in these pics, I got a strange asymmetrical feeling. Unbalanced.


17.10.18

Project II/18

Some company for the Falcon

Fittingly as the Falcon had taken flight the next model in the queue was a ship that belonged to a bounty hunter, who had worked for the good guys as well. A ship that was legendary and just so incredibly cool. I remember, when I was a kid and beyond excited during those few moments when Boba Fett or Slave I were on screen, preferably making sounds as well. This applies to the Empire Strikes Back, that is.


The instructions were of a much larger font and image sizes than I was used to (that was nice, doubly larger pics felt clearer) and were spread out on eight pages. In english: two two-sided pieces of paper.

Somehow the pieces engraved onto the plates were even a bit disturbingly complicated and it felt there were awfully many of them this time. Even though it was in the same ballpark as on all the other MEM kits, but if you thought of the shape of the ship, there was going to be an amount of greeblies.


10.10.18

Finished: Project I/18

The fastest hunk of junk in the galaxy


So here it was: a Corellian Engineering Corporation's model YT-1300f, a Light Freighter. This individual was heavily modified and was known as the Millennium Falcon. For a long while it worked in the shady businesses of the smugglers but then its owner joined to take an active part in the bad guy's side of the galactic civil war.


3.10.18

A couple of hours worth of tinkering

Almost done during a single sitting

The topside of the saucer looked a bit odd to begin with, as the C-shaped plate that gave it its shape was closed up into a donut. The front bit that hid, among other things, the Arakyd ST2 Concussion Missile Launchers also covered up this structural feature.


What I found very bothersome was the corridor to the cockpit and the cockpit itself, being built out of a single peculiarly shaped piece. Either I had managed to twist the pieces into a stupid shape or something just was blocking. I decided that I wasn't going to break it (yet) with violence but I'd fight it only when I absolutely had to and not a millisecond earlier.


Interestingly I really couldn't remember that the Falcon had those vertical winglets on top of the main engine's exhaust port. That of course didn't mean that they hadn't always existed.


The B-side

The underside of the saucer progressed just about as nicely as the top side. Maybe a bit faster, as now I knew by experience how this model worked.


Again the baseplate didn't give the name of the model. Of course there were the Lucas Licensing markings (this time I bent those on the inside so they wouldn't be ruining my visuals). So, below you'd see what I got done in the first session, only joining the halves together and adding the left/right side docking ports / escape pod launchers / whatnots were left for the next evening. Forgot to take any photos of the remaining three steps, sorry.