Mastodon

27.2.13

A fool in the turret

cont.

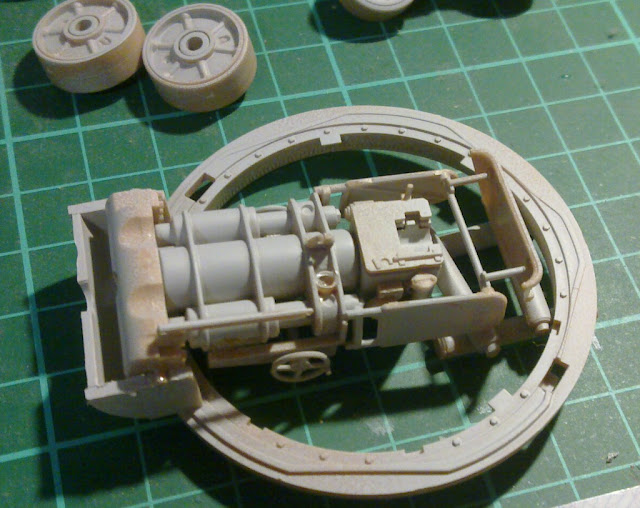
It's pretty obvious that the turret has been my #1 priority for the last couple of weeks. That's because it's just about the last incomplete subset of the model. There won't be much stuff on the inner walls of the turret, only a couple of machine pistols for close defence, a spare aiming device (I guess that's what it is), a couple of containers and an empty wheel. For a while I was thinking if I should fill the wheel somehow, but as I didn't have a good idea what I could use, I left it empty.
All the pieces got a couple of layers of green paint applied manually at this point. The externals will be airbrushed whenever I get to it.


Turret assembly

When I had finished the two triple sets of grenades in their racks, or at least I get them to look acceptable at this point, I started assembling the turret at long last. To keep my exits covered, this obviously meant that I only built the front- and rear parts and left the sides open. This was mostly because the side panels weren't even complete at this point, so it didn't make any sense to attach them (just look at those insane holes in the photos).


I had somehow imagined that those huge gaps in the insides of the armor panels left by the injectors would've been placed so smartly that the equipment would've hidden them at least half-decently. Oh my, no! There was little stuff to be attached anywhere and all of it was located somewhere else, maybe to underline the ugliness of the mould. Because my benevolent guess was (again) so wrong and I didn't want to leave my machine looking like a teenager's cheeks, I dug out my Tamiya putty and set to work. After a couple of extra layers of paint the result started looking a bit better. Yay.

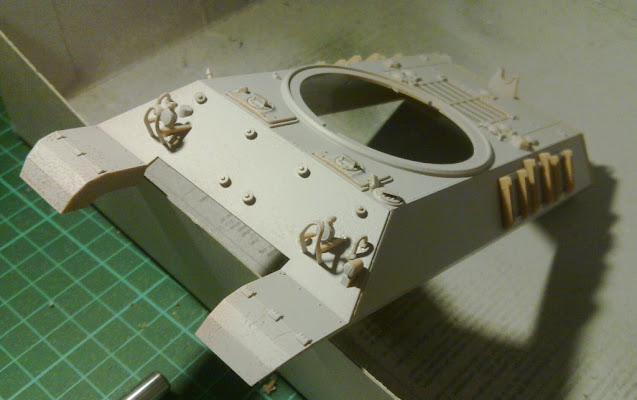
Test fitting

Of course I had to try and see if my vehicle was going to look like anything acceptable. Yes, it is going to do that. These photos show you that I (once again) changed my mind about the handles. After all I used the kit handles on the hatches of the engine compartment, the driver's and the radio operator's exits. Those customized handles I tried to use didn't really work as I wanted them to. Shockingly the plastic monsters of this kit looked better.


19.2.13

Turreting

Slowly as usual

This week's achievements have been astonishingly few, thanks to the real world pushing my time usage on an interrupt vector a bunch of times. It happens sometimes and there's nothing to it. Anyway, I got the end part of the gun built and attached on the turret ring. Nothing more, nothing less.
One weird thing was tha the instructions pointed at a part 18E twice (in the E sprue the part #18 is the lower rear part of the turret) and in this pic that part should've been a pistol-handle like piece, attached slightly above the wheel. Didn't find anything like it anywhere on any of the sprues. I'm not entirely sure how to fix this thing. Bugger.


A new change to the build order

While I was looking at the instructions I decided that I have to change my approach regarding the next steps in this build. I'll assemble the turret with its toys while manually painting things as they come along. Whenever the turret's completed I'll apply the green paintjob on the whole outer surface of the vehicle. I was going to do it a bit differently in my origianl plan but as it'd be so damn difficult to detail the insides of the turret after its assembly, I must adapt.

12.2.13

The final form can almost be seen!

I got busy

The "let's get stuff done"-bug bit me pretty nicely, so I've been working just about every day on this monster. When I got the hull halves in a good shape, just a few options remained. First: build those custom handles I mentioned a couple of weeks ago, second: assemble the hull. As usual, I didn't remember to dig out my wires, so the handles are still missing in action. I'll get them done one of these days, I promise.


The road wheel cradles

When the hull was in an "almost complete" state, where it was only missing the tools, I turned my eager fingers towards the wheel setup. First things first, I assembled the drive sprockets and glued them in their places, my plan was to leave the idler wheels off until I was ready to attach the tracks. So the next task was to build the weird cradles that house the road wheels.

I think I'll leave them off and paint them separately, so I can attach them on the already painted hull. While I'm at it I could messify these pieces and the lower hull a bit more nicely than if they were all attached. If the whole setup is built they overshadow each other bothersomely while weathering.

Close the tub and get going

Why keep wondering and pondering when everything's just about done - as far as they're supposed to be at this point? After a bit of dry-fitting I slammed the deck on the bottom and let it cure overnight. I know these last pics are foul, I took them in a bit of a rush, I apologise. Though they are work-in-progress photos, so I do reserve the right to share some suboptimal pics at this point. The final pics are going to get a bit more attention from me, rest assured :)


Like so. Of course I have to apply another coat of primer all around, but that's something I knew when I started the whole project. In any case I think I'll attack the turret next and take care of the painting in the end, when everything else's done. Someone may have noticed that all the tools - shovels, sledgehammers and whatnot - are missing, yes, I will attach them when the hull is painted, not a moment earlier. Otherwise the british green might not get applied nicely enough.

7.2.13

Working on the rear and top hull

Business as usual

These last few sessions I've been working on mostly the same things as before. My order of assemblage is pretty random and depends mostly on what I intend to paint next. The latest additions have been concentrated on the rear and top hull parts, yesterday I slapped a couple of hatches on the top hull.
Both the driver's and the radio operator's hatches are still missing their handles because I felt that the cast pieces were way too large in comparison to everything else. I'll try to hunt down my thinnest metal wire, in case I could use that to make some sweet, custom handles. And of course, if I find something else that needs handles I'll customize them as well to maintain a unified style.
Otherwise I believe this'll be a straightforward OOB build because if I start fooling around it'll take even longer. And I would really, really love to complete at least a couple of projects this year ;)


Did I ruin something?

My plan is to leave all the hatches closed so I won't get too stressed with the interior of this vehicle. For some reason the rear hull causes some confusion, anyway. So far all the pieces had gone where they ought to go and without any fighting. But when I started installing the fuel tanks nothing worked. The bottoms didn't go as deep as they were supposed nor did they align properly - the rear wings were grimacing by millimeters! What to do? I mengelefied the pieces until they fit and I got my weird box assembled, because the interior parts aren't as important as the tightness of the exterior hull itself.


Now I'm just pondering in my mind if I should paint this weird box at all or should I apply a quick layer. If I just left them like this, mostly primed but with some bare plastic visible, it'd haunt me. Oh, and you could maybe even see these things from the bottom if you had a really (un)lucky angle!
I guess I have my answer.