Mastodon

28.7.11

Marauder IIC - custom variant


I'm doing my best to keep my BT builds (these models and the miniatures) as wysiwyg so I had to fool around with the specs of the Marauder. My main problem was if all the crap I wanted to have in was going to fit for real. In several posts I've been talking about the ERPPC:s in the arms, as well as the MPLasers and the AutoCannon that sits on top of the machine (not caring too much if it's a normal AC, an UAC but at least I never thought of it as an LBX varian). Oh, and the Jump Jets were talked about the last time, if not earlier.

That was a good starting point, the result was a custom variant of Marauder II C because none of the more official configs didn't provide exactly what I wanted. So this is what I ended up with:

Mass85 tons
Tech/EraClan / 3055
ConfigBiped 'Mech (Level 2)
Movement4 / 6 / 2
Internal structureEndo Steel (130pts)
Engine340 Fusion
Heat Sinks21 Double
ArmorFerro-Fibrous (221pts)
Weapons & Equipment

TypeLocHeatAmmo
ER PPCRA15-
Medium Pulse LaserRA4-
ER PPCLA15-
Medium Pulse LaserRA4-
Ultra AC/2CT145
CASE
Standard Jump JetRL
Standard Jump JetLL
Combat Heat43 (42)

That filled my tonnage pretty easily but there were something like eight or nine open Critical Slots. The last tons I spent on an extra ton of ammo for the UAC/2, just in case... Of course I could've fit an UAC/5 but for some reason I chose the /2. Maybe it's the plain range so it can work with the ER PPC's. As a small touch I moved a set of Heat Sinks to arms, on top of each ER PPC, so it'd be like in the model. Those JJ's didn't fit in the torso sides, so they had to go on the legs, but you can't always get what you want.

Fascinating, isn't it? I would be pretty curious in playing with that someday, I'm going to have my arse handed to me in any case, no matter what my 'Mech is. Maybe my "Death to the Freebirth scum! ROAAARGH! Alpha strike!" isn't the safest one? But then again, it's more ClanLike than a safe, cautious style. In any case: as long as it's fun, it's all good.

24.7.11

Detailing the Marauder

For some reason I couldn't wait more than a couple of minutes after publishing the last post. So I continued working on the details on Thursday afternoon/evening. The Galaxy logo was on its place already and I wanted to add a vehicle number and a couple of Clan logos around the 'Mech. After turning the thing in my arms for a while I decided that both sides of the torso will get a logo each and the left leg will get one. Then I just had to come up with a good place for the number (and I had to come up with a number, too). In the end that number found itself from the rear part of the right leg.
I don't think I'll start worrying about the Point insignia (from Point 1 to Point 5) nor the pilot's rank insignia :)

Freehanding the Clan logos was a bit easier on this kind of a large model than on the tiny tabletop miniatures. It's obviously not 1:1 copy of the real logo but it looks recognizable and that's what I was going for. Besides, I just can't draw that (or any other) thing accurately on any scale anyway ;)

The right side

Rear view  with the unit number

The left side

Front view, the PPC & Medium PLas lenses are installed as well

I also tried how that Tamiya's Burnt Carbon pigment works on the AC. Guess it works somehow. At this point all that's left is to install the arms properly and that's all I can think of right now. We'll see if I manage to do that before I attack the Warhammer...

As usual, I took the photo against the light, but you should be able to see the barrel's end anyway. Somehow.

21.7.11

Going green again

Since the last time I've painted the torso and arms of my Marauder with Vallejo's German Green and the end result looked a lot nicer than my previous spearmint-approach. Maybe the extra plates will end up bothering someone but they don't bother me so they'll stay. And I'll use the same scheme on my Warhammer, when I get that far.


While airbrushing around I noticed that the canned propellant starts acting funnily during use and the less there's propellant left, the quicker it starts acting up. I guess it's because the propellant cools down a lot and when it gets too cold it just doesn't push the paint out of the airbrush anymore. With a new can you can paint for a good while but as this one's on its last ~20% I could only paint one arm before the paintflow died away.
This causes extra pauses and excess worrying: "Do I get to paint this piece or does it die in the next two seconds?". The solution is, as I pondered last autumn: a compressor.

Maybe before I go for the second half of my summer vacation...


While I was fooling around with the upper torso, I finished the paint job of the legs. Just like Camospecs (and my initial post) says, the feet and shins need some red paint splattered on them as if it was the blood of the Steel Vipers. This time I tried not to get carried away with all the gore...


When all these key components had dried, I finally got to tinker around with the details. In my opinion, Battle- and OmniMecs just have to have some caution stripes (you know that cool yellow-black warning pattern), otherwise something vital is missing and that's never good for the model or its builder. In any case I had decided to take it easy and I chose a couple of key points where the caution striping fits. As a helper I used the surface details of the hull.
Both of the gun pods get two for each side and left/right torso, where the arms go attached, get narrow stripes on the front and rear sides. This way they'll stand out but don't steal all the attention.
While I was working, I painted the pieces I decided to call the nozzles of the Jump Jets, the thing in the rear hull I call a Heat Sink and the gun ports with Vallejo's Oily Steel. The Heat Sink I'll cover with a thin layer of brown ink, the rest will stay cleaner. As the grand final I painted my own version of the Omega Galaxy's logo on the outer side of the right leg. I think it ended up pretty neat.


That thingamagick on the nose needs something but I'm not sure of what. Because it's supposed to be a cockpit window, I guess I could paint it glossy black and maybe it looks good enough that way. Other than that there's not horribly much to do anymore, just a bit of touching up and freehanding some Clan logos and Point numbers. Oh, and the jewel-like things but they'll be the absolute last ones to go on the model after all the painting is done.

14.7.11

Fixin' the mistakes - or trying to, at least

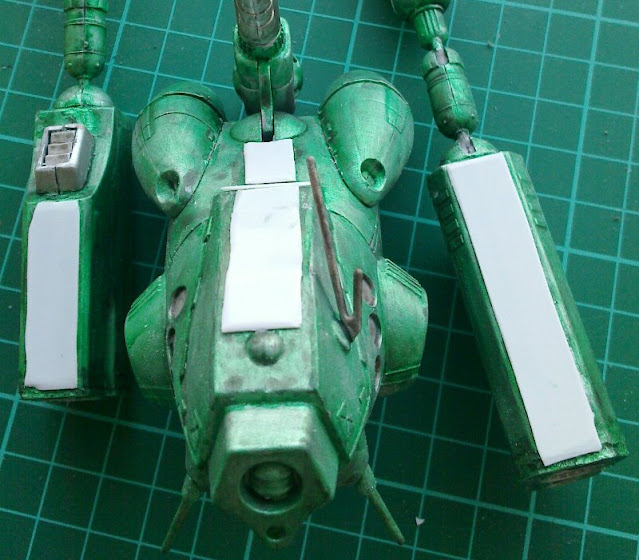
That's how scabby the upper torso and gun pods are or were a day ago. Not good enough for me, not by a long shot. Though, in a sense that kind of a mark could represent something that was gently caressed by an azure bolt from a PPC or a beam from a LLaser. In any case I slapped pieces of 0,5mm polystyrene to cover the scabs and filed the edges down a bit to make them stand out a bit less.


It doesn't look any worse, at least. Last evening I went and rebasecoated the whole thing because this had gone beyond reparation with mere painting skills... Not that those pieces bother me, this isn't supposed to look like it just walked out from the assembly line ;) One of these days I start repainting it with some german panzer green, hoping it looks better than my previous attempt. We'll see soon!

7.7.11

That moment between vacations has begun again

The first set of vacations came and went, the trip to almost-in-laws ended with a bit of bringables, as it's a sign of a good vacation. To fix the Marauder and to prevent the same ones happening with the Warhammer I got some Tamiya's Putty and 0,5mm polystyrene sheets. Of course I tried first if a quick re-application of black wash helped. It didn't. So I'll take and repaint those couple of things completely again, what else can I do? Maybe I'll lay a piece of plastic to hide some scars on the Torso and gun pods. We'll see, though as long as the weather stays as hot as it is and the calendar tells me it's not a weekend, I'll do something else because spraypainting in the balcony under the evening sun doesn't work for me right now...

Naturally I had to get something new as well, it's not fun otherwise. In one of the shops I saw a model of the Kugelblitz but as it want to support my favourite toy/hobby shop in Gijón (Capua Hobby's), I skipped it. During my hobbying years I've built the main types of the Tiger series so next in line are the Panthers, at least the Panther and Jagdpanther. The latter being the latest entry in my TODO-queue.


At the moment my plan for that beast is to do a triple colour camo and on top of that I'd apply a light "field applied" whitewash, just like with good old Hobbes. This time I'll make it even better.
As if :P