Mastodon

25.9.24

Panzer IV weathering strikes back

Oiliness, part 2

I wasn't quite done with the oil paints earlier, but I hadn't wanted to start making more of a mess on the tank before getting the tracks on. Now I got out of my self-setup holding area toward glory.

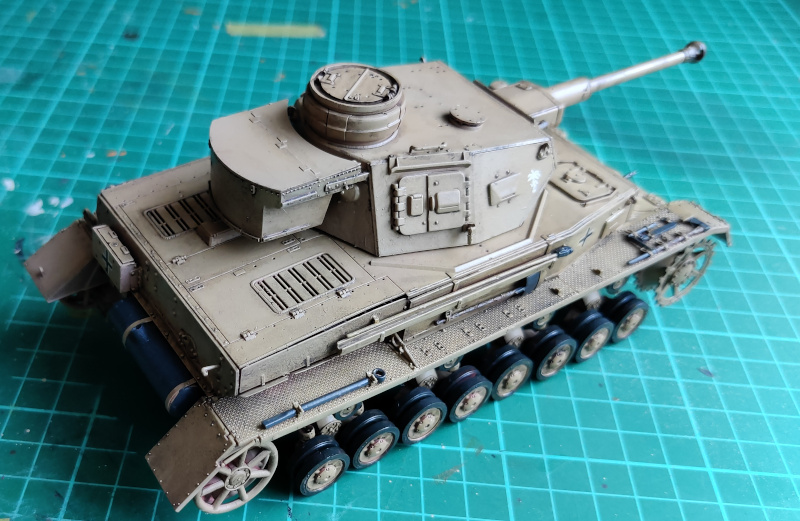
Exhaust pipe and track armour

This tank's exhaust pipe needed some life on it. Trying it the last time I wasn't too happy with the splotchy effect, so this time I decided to skip it. I made a mess of irregular splotches with my dark rust (ABT070) wash.

While I had some excess wash left, I used it here and there on the inside of the track armour. Unplanned, irregular patches of colour.

Already the next day I did the same but with fresher rust (ABT060 Light Rust) first as little obscure dots, which I then blended with a poking motion. In this photo the paint was still fresh, but it did show the variety already somehow, despite the reflections.

Now I had to let it sit still for a few days. Also, before cleaning up my wash, I used it very lightly on the track armour.

Earthy paint

I had already spread some earthlike thin oil paint on the lower parts of the Panzerwanne. Now I made some more of it and poked that into the holes and gaps in the tracks and on some select spots on the tank itself. Of the latter parts I blended the stuff pretty heavily, as I didn't intend to leave clearly noticeable brown stains on the deck of my tank but to add tonal variety to the practically one-colour paintjob.


This rear shot now showed that I finally remembered to paint the rear reflector red (VMA 72710 Bloody Red). In the end that single bit would be the only glossy part of the build.


My final shot also showed the freshly painted light rust on the track armour. My actual goal with this photo was to get a nicer look at the freshyl earthified tracks.

The jack, highlights and flakes

Soooo yeah, I had forgotten the jack repeatedly, so now I build and painted it in short order (black primer, then dark grey) but the wooden handle didn't make it to this photo. As I wasn't smart earlier - or I thought I was and was gravely mistaken - it wasn't really installable with its neat clamps without multiple repaintings all around. The jack was going to just lie there on its own, on a fender.

For the wooden handle I used just one paint, AK1108 Hull Red, that I had used for wood before. I didn't intend to try the woodgrain on a lonely piece anymore and I recognized making this same choice before.

Gentle chipping and bolthead highlighing

I thought I'd do a few chips  only, and one of the best places for it was the track armour's steel bit. To get the first layer of these chips I mixed something like 40% of sand (VMA 71075 Sand(Ivory)) into some sandy yellow.

In addition to the steel bit in the front I made some scratches into the rear plate's Balkenkreuz box but not too many places called my attention for scratches. Somehow I remembered one of Uncle Nightshift's details and I used the same paint to highlight a bunch (read: all) of the topside bolts and whatnot, like those handles above the turret's side hatches and so on.


While the lighter bits were drying I mixed my well-liked dark grey + red for the deeper gouges and went for it. There weren't that many of these, I really didn't want to make a worn tank this time around.


In the front end I changed my mind a bit and made a few more markings after all, thinking that they were driving into things with the limited visibility they had. Still, not many of those, mostly to the easily stone-bumped things like the drive sprocket's protectors and the lower front edges. Maybe I was a bit overcautious compared to what may have been the everyday life in Northern Africa.


This felt like the paintjob was pretty much done now.

Dullcoat and satin touch-ups

After a couple of days for the paint to dry I applied varnish (AK183 Ultra Matt Varnish) to seal it for the final touches. These photos were taken before all of it was dry yet. The end was, again, near.


Both the red reflector and the driver's periscope's visible glass part (where I didn't paint a lighter reflection along the bottom edge) got a gloss varnish (Vallejo 70510) treatment, and the unpainted metal pieces got some satin varnish (Vallejo 60522) with the thought that they'd reflect light a bit differently than the painted tank itself.


Olio macchinato

For some additional messiness I made some nasty-looking oil (ABT160 Engine Grease) and used it to make it look like someone spilled some oil over the jack, then on one of the roadwheel hubs, and as some crap flowing out of the small hatches in the side of the Panzerwanne. Just to add a bit of variety again.

Pigments to top it all

Now I used some light sand from my well-aged Tamiya Weathering Master A set with the applicator's brush in various places. I mostly used it in the lower hull and especially on the roadwheels. Did it stand out nicely or did I apply it wrong? We'd see later.

Very predictably I made use of my Carbon Black pigments with the thinner and used the very thin wash on the muzzle brake, on the MG tips and obviously also on the exhaust pipe.


Was it done now? What a disturbing thought, as I had just bought it a moment ago.

18.9.24

Panzer IV track installation

At this point at long last

I only had a few things to be done with the tracks anymore. The front's track armour was about 40% of what I needed, as the earlier one was a link too long. So I sat down and assembled what was missing, and was left with two links and some A/B pins.

The new part got primed black and I used the airbrush to dry the paint. Next I applied a general, imperfect and varied layer of brown (VMA 71077 Wood) on all three tracks from different angles and distanves. I most definitely didn't want a uniform paint coverage, but the opposite.


In addition to the tracks needing a bit more paint from the flat side angle, I ought to have used the graphite pen on the wearable surfaces, before the installation. I just wanted to avoid making a mess with the graphite, so I purposefully left it for later.

Before installing the tracks I glued the roadwheels on, and detached the drive sprockets and idler wheels to make my work easier. Had I thought of this well in advance, I'd left the return roller installation until the tracks were in. But as I've admitted before, I haven't often been praised for smarts.

The right track

One of the tracks had to go in first, and as I had grabbed the tank this way, it was the right track that got installed. For some reason I decided it was a great idea to connect the ends now and then put the track around the running gear. I guess I thought that the loop connection was easiest this way, especially if it had broken bits like the frontmost link of the track armour.

The biggest thing in this approach was to get the guiding teeth of the track past the outer return roller without breaking the teeth or the fender. The plastic was forgiving so with only a bit of stress the track was hanging by the return rollers and hugging the outermost roadwheels. Then I positioned the drive sprocket into one loop-end of the track and put the wheel in place. The toothless idler was left last and pulling it into place was easy, and the tracks settled into place very, very nicely. My track was pretty tight and there wasn't much drooping. In a standalone model like this that was all good, but a diorama tank might have benefited from a bit more of drooping on the upper loop.


Ah, it looked marvellous!

The left track

In the name of science I decided to try the other approach of track completion for the left track. I'd connect them after looping them in place. I expected this to be quicker and easier to pull the track in along its natural route along the return rollers.

Nope, I was wrong. The gap between the rollers and the fender was tight, but I knew that since the first time I tried the track behaviour weeks ago. Using my tweezers to pull, poke and push I managed to get the in millimeter by millimeter through the upper loop and to join under the roadwheels. Attaching the two ends together was a tiny bit more complicated now with the whole tank on the way, as opposed to freely floating tracks, but it didn't take much time. With the track unified I put the drive sprocket and the idler wheel in the exact same way I did before.


Nice, nice, I was very excited! In all of the side profile photos, and in the photos below, the unpainted A/B pin ends were pretty clearly visible in both tracks. Those had to be covered up, of course.


Graphite

With my tracks in place I poked the drive sprocket teeth with the graphite pen, and then proceeded to touch up the guiding teeth of the links, and the parts that the roadwheels kept clean. This was much more fun than ever before, as the articulated tracks moved gently out of the way and I got the covered up bits poked instead of suffering the glued-tight tracks.


After the tracks I did a bit of the same metal highlighting on some chosen edges of the steel tools. The key was keeping this in few pieces only so not everything would shine.


The track armour I left graphiteless, as it was just hanging there and wasn't worn in use like the driving tracks.

11.9.24

Panzer IV weathering

Washing with oils!

It was the time for the enjoyable but gently stress-inducing messing phase. I made up my oil wash from Abteilung's Sepia (ABT002) and had at it. The gloss coat did pretty much what was promised: my oil wash traveled very nicely in the crevices. Of course my wash wasn't consistent but I didn't panic because I could clean anything up even days after.

First evening - messmaking

Messmaking started in the turret and I truly enjoyed it. This time I left the barrel's tip alone, so I could grab a safe hold of the turret.


After the turret was nasty enough I proceeded to the hull and for some reason I started with the deck and not the lower sides. I went around the hull from top to bottom for shadows, and making a real mess on gaps, crevices and seams.


That's what I had time for on a single eveing, I didn't get to go through the whole tank yet. From below the fenders I barely touched the drive sprocket, idler wheels and the hubs of the return rollers. Everything else had to wait for the next time.

Second evening - cleaning up

The next day (evening) I cleaned up and blended the overflows, and made the fake shadows less strong. Not everything caught my eye, like you could tell from the shadow that was left above the top left front corner's hook. Also, I took the shadows down a notch or two too many from the right upper edge's weld seam.


These next two photos showed clearly the difference between the washed upper and unwashed lower half was. Of course I had started from the most visible parts instead of the more easily hidden lower half, in case I made some massive mistakes.


Some of the bits were a bit too strong here still, but the overall look was much better than two days earlier, as the details stood out from the sand yellow basepaint.

Panzerwanne washing

In addition to me working on things not mentioned in the different-level titles I started from the previously untouched muzzle break area and only then continued to the lower hull that had been the assigned holding area for the previous stages. When my washes had dried for a good while I cleaned the excesses off, and I also cleaned up the biggest half-ignored messes from the upper hull and the turret.


Being a huge fan of dry-fitting I again plopped the roadwheels on and admired the look of my tank.


Btw, the reflector in the left rear corner was still missing its red highlight and the later gloss varnish.


Textured surface overview

A colleague of mine asked for some closeups of the Night Shift method / steel texture, so I took a few photos from around the tank. These again revealed some ill-cleaned corners, or they just stood out more from these closeups than from the usual admiration distance.


What caught my eye in these photos was that the areas where my glue-putty mix had dried more while still using it (despite re-thinning it in the middle) the result was more like an orange than rolled steel. The worst culprits were the front and lower rear edge.

Detailing

With my first pin washing done I struck my greedy fingers to other detailing work. I had a couple of basic tricks in my mind and I liked to approach weathering just with my gut feeling.

Graphite

I started poking the metallified pieces that could be treated reasonably at this point, using my graphite pen. The things that made sense now were the drive sprockets and idler wheels, and I took a comparison photo halfway through: the left ones were treated, the right ones were not. I tried not to make this go overboard, but I also felt that the teeth especially would've benefited from more wear and tear.

And a dry-fit photo a moment later, what else did you expect?


Roadwheels

That photo above already spoiled what I had done with the roadwheels. I didn't catch the raised details in the photos (or with my bare, awful eyes) well enough so I mixed a drop of dark grey (RLM66) into a small puddle of tire black and drybrushed that over the out-facing surfaces. Now even I could see the Continentals in there!


A brown lower hull wash

Now I mixed up some brown (ABT093 Earth) wash and spread it around the lower hull and on the bogies as well. After a bit of curing time I blended it gently, even if it might not have been necessary.


Washing the wood

As some of you might remember, the T-34's wooden boxes got greatly improved with the brown wash, so I hoped that it would save something from these horrors. I used the wash (ABT080 Brown Wash) on all wooden parts, and they did calm down somewhat.

Apparently I overapplied some, I just needed to clean it up before it kicked permanently.


Overall the tools made me happy. Of course these photos showed a bit too well how bad I was with the most detailed brushwork (the tool clamps on the axe, for example). I tried to soothe myself by thinking that no one would see that from a normal viewing distance. But what did that help if they were clearly visible in closeup photos?

Sun-toasted steel surfaces in North Africa

Since I started with the oils I've done this same trick a bunch of times: I poked some dots of Buff (ABT035) from the modulation set and blended them with a circular motion around the upper surfaces and edges. The effect was exactly what I was going for, and I was content.


Before getting to my sepia fixing round I had to complete other procedures, now the tank just had to sit alone drying without me poking it every evening. On one hand chipping was calling me but on the other hand I didn't want this to be a worn out tank, and it already looked used to me without being sandblasted.

So I remained pondering if I did any chipping at all this time or not. The jack was also still unbuilt and not installed on the right fender, and at this rate it might never make it on the journey.