Mastodon

11.4.13

Almost there again

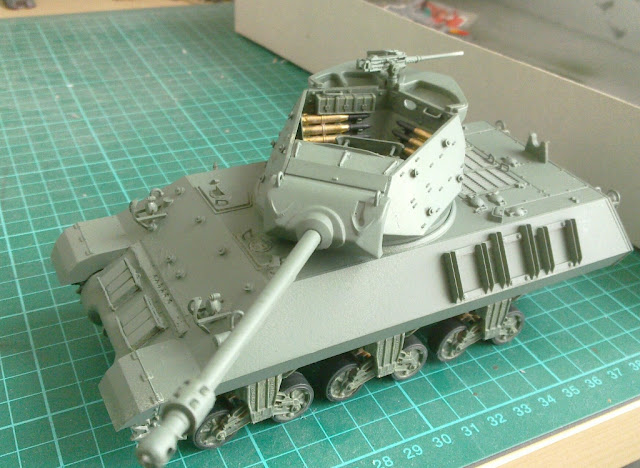
The steps done two evenings ago and yesterday afternoon: fixed the tools, did the tracks and filled those weird racks on the sides. Quick and easy? For a change, yes, even though knowing my history something else could've been expected...

Tools

The tools that got installed on the rear plate got a simple, basic treatment. I painted the wooden handles with Vallejo's Charred Brown, the metallic surfaces with Vallejo's Oily Steel. Any parts that looked like they were a part of the tank (holders and such) got the same Vallejo's Panzer Olive Green as the rest of the tank. After all that had dried I applied a wash of Citadel's Devlan Mud. To finish all this with a huge surprise I glued all the pieces to their places.


Odd things

Those racks on the sides got a set of random-looking whatevers in them. Again I wanted to avoid excess symmetry and loaded the left side rack with much more pieces than the other one. I don't really know what they're supposed to be but I guess they're mostly an extra protection against shaped charges and grenades, in addition to the slightly sloped armor.


Tracks

Both rubberband tracks got an ugly mix of diluted brown (the same aforementioned Charred Brown) and orange-ish (Vallejo's Bloody Red & Bad Moon Yellow) mix with a heavy hand on both sides of the tracks. Then I left them hanging and drying overnight. Next morning I drybrushed them heavily with Tamiya's Flat Aluminium so all the wearable parts would look like it.
While looking at the end result I was thinking that my coctail could've been a lot more orange, after all.

Almost ready

I worked the connected tracks to the pretty tight space they had and glued the idler wheel in its place. The same goes for both sides, obviously. I guess this project will be finished soon, even though it has taken a ridiculous amount of time. Luckily I haven't been in a rush.


The model looks a lot better with the turret on. At this point I can still fix some cockups and then all I have left is the barrel of the machine gun (I forgot it again), insignia and such and then some dirtification.


3.4.13

Something quick and simple

Returning from a vacation is always a heavy project. While working on all the mundane things I haven't had the time or interest in sitting down for a good while to mix up a good rusty slush or to ponder on the essence of the tank's tools. So today I quickly built the lego set I bought earlier today

The box

Apparently we're already on the third run of these Lego Star Wars miniplanet kits. There were a bunch of them, many totally uninteresting like the rebel scum's vehicles (though I was definitely interested in the Tantive IV (or I misinterpreted the picture) for a moment), but TIE Bomber is something I couldn't walk past. After a short argument with myself I said that "I think I need this one" and just got it.


Contents

This photo is horrible, I admit it. There's the ball depicting an asteroid field, the leaflet and two bagfuls of pieces. I guess you can't expect huge amounts of parts from a miniscale set. There were more than I had excpected, to be honest.


Assemblage

Everyone and their grandmother knows the T/B  so I shall not waste time in explaining it to you. The two-tube hull is nicely recognizeable and the neat TIE series window is also a clear identificator. I do approve of this.


At this point it was already done, just the wings were missing. While taking these pics I hadn't realized that the targeting sensor pod was on the wrong side in the instructions (below the cockpit unit) and I didn't think and flip it on the proper side. What kind of unexpert clowns do they hire to design these things... Details are important!


Because of the scale the wings ended up being completely black, as if there were no frames around the solar collector panels. Anyway, I think it's a really neat model for its size.


Ready

That's it, the pilot with his/her ship. All in all this was a fun and short tinkering project to improve an afternoon. This doesn't mean that I inteded to keep working on these things more than this. Not at least unless I encounter something interesting enough...


27.3.13

Dipping my toes to the MMO swamp

Myself and the different MMO games

During all these years I've mostly just laughed at WoW players and wondered the going of those who play fantasy-themed MMO games. Somehow scifi hasn't been a popular theme, the exceptions I know being Anarchy Online (that died pretty quickly, if my poor memory serves) and EVE Online that was mostly described as truly massive. My former costudent Teemu recommended Eve to me "this is definitely your kind of game!"  when he started playing it to ween himself off Wow.
I admit, the game sounded and looked pretty curious but I didn't have any misconceptions of a) having the time to play the game as much as it deserves and b) paying a monthly fee to play a game, especially considering point a. That'd just lead automatically to a pitifully insignificant ROI.

The first run's free

My coworker Sergei plays Eve more or less constantly (the rest of my multiplaying coworkers jump from a MMO to another every two or three months like a swarm of locusts, as far as I know) and he's tried to lure me in for a long while. As soon as I left for my two month long parental leave he sent me a three week trial invitation. I thought that what the hell, I could try it for a short while if I accidentally had enough free time.


Ok, let's give it a shot

"Country": Gallante Federation > Race: Gallante > Background: Immigrant
Myself, a Gallante Federation citizen
 

The unbearable difficulty of choosing a career

The initial situation: 21 days, a kiloton of options. Well, not quite like that, but after the first tutorial set it looks like there's six law-abiding careers: military, advanced military, mining, truck driving, wandering and industrialing. A galactic neighbour had also just declared a war so I could've joined that, too, I guess.

The default ship Velator somewhere in space
One of the countless enormous space stations

To war!

Rare as it is for a pacifist individual like me, I went and contacted the military agent straight away and started working on the missions with a rapid pace. Pretty early on he gave me a new frigate that was a bit better in the fighting department than the default one, some guns and ammo. The guns I got were, in the end, three 75mm gatling rail thingies with animatter ammo. I also bought some uranium slugs to the third one because "why not?". Oh yes, I'll vanquish all my enemies with these puppies! And as soon as I get to buy those missile launchers, this is going to be fuuuuuuuuuuuuuuuunmuaahahahahahahahaa!

Fitting the Vindicator

A dive towards the spleen of an enemy

Wrong.
I got my arse handed to me in the eighth tutorial mission, the enemies attacked from an insane distance and my poor (luckily it was insured) gunboat blew up before I even got within the optimum range. A change of career is what I needed, I didn't like this crap at all...


To the mines with my tail between my legs

It'd be easy to be a space miner, right? A couple of the first missions were done as quickly as they could. Then I was told to take some blueprints and to manufacture some junk for the agent. Somehow I managed to cock the industry view somehow and I lost my blueprints but never got the products I had ordered. Of course they sell the same junk in the market but they cost quite a bit more than what I was prepared to spend on them. So, another career path change took place just like that.

Dig, dig, dig...


Mining on my own

Not giving a damn about the missions at this point I taught my character to operate some drones (obviously you first had to learn to use drones in general (a couple of levels so I could run two at the same time) and then a type-specific skill, in this case the mining drone) and bought a couple of them to my drone bay. I thought that I could at least check how this mining business worked in general.


Dig, dig, dig, dig, dig, dig, di...

At the same time I put more mining to the skill queue and bought a few systems away a couple of better lasers (dual diode mining laser I). Why did I buy them from a place that took 15 mins to get to? Because they were cheaper there, of course. And I had the time to waste.
I think I was just reading a book while the autopilot was running around. When I heard the autopilot saying "docking", I woke up enough to slap the new tools to the ship and set up a new destination so I could keep reading. That sounds like an awesome sales pitch :P


Many against one, that's the way to go

Mining was somewhat faster with the drones, I guess, but as each tool has a cycle of 1 min and even the better lasers return something like 120m^3 per cycle and the flying things something I don't even know, filling the 5000m^3 ore bay took a good while. What do you do with all that spacerock? Sell it away or refine and then sell the components. My idea was that if I waste a couple of moments mining and getting slightly bored meanwhile I could earn enough money to buy some interesting toys to my remaining ship. In the end, with a couple of full loads my ISK stack went from mere 2M to 8M, so...

The biggest problem seemed to be that there are plenty of asteroid belts but depending on the time of day they may all be wiped clean. So all you can do is to drive around the universe, checking from one to a dozen locations in each solar system until you find something. And sometimes there's an unfriendly welcome waiting for you, that doesn't really make you feel too happy because your ship's both turret slots are filled with necessary tools instead of self-defence guns so you could mine in the first place...

Business is busyness

Fetching some cargo

The businessman's career that I earlier referred to as the truckdriver's job didn't really interest me. I checked a couple of the first missions but they didn't sound too fun and to continue on I'd needed to buy and learn some more skills. Considering that I only had ~3 weeks, I didn't have the time to check everything out. Anyway, I got a new Venture mining barge that I scrapped and sold the parts away.

Destination: a random, questionable station

Indiana Jones - in space

Exploration was one of the ways to learn your bread in Eve. Fly around the systems and scan places. You could even do like the Empire and jump to a system and launch probes to check the rest of the system while you snoop in one corner. Sadly I didn't find a single probe model that looked or felt like the Arakyd Viper, but I also have to admit that I didn't search extensively, either.

Scanning between space junk

Being smart I installed a gun in this ship, because I knew that at some point an Anomaly would have some stupid pirates just waiting to attack me. That happened, a couple of pirate ships were found in each of the few anomalies I found. Just like the businessman's career, I didn't spend much time doing the explorer's missions, for the exact same reason: time. If you have a few hours available, maybe jumping around the universe and warping all day long around the systems might not be the most beneficial use of them... So I ended up doing something a bit more active.

Back to the grinder

If you can't win, at least die with a huge boom. That's pretty often the way I approach things. Originally I wanted a set of missile launchers in my ship, so that's what I went for! Of course I first had to study them (skill: missile launchers) and to be able to actually load anything in the launcher I had to train a skill for a proper ammo type. Light missiles and  light rockets sounded like something that I could manage to fit in my ship so those were studied. Naturally I'd enjoyed cruise missiles with nuclear warheads quite a bit more ;)
So I bought a nice-looking launcher from the system where they were cheap and from a couple of other systems about 150 units of ammunition for my hungry, hungry launcher. For some reason the rocket launchers were cheaper than the missile launchers, but I guess I could always upgrade later.


There's a load of Inferno missiles to be stored for later use and tungsten ammo to be used straight away (they had a nice range and lighter requirements for the systems of my tiny ship). On the other hand, I could fit some drones to this one...
Of course I'd need to study for a few days to use them.
From the rocket salesman I bought a good load of Nova rockets to be spread all around the galaxy. Why exactly those? Because they had nuclear warheads, of course! Muahahahahahahahaa!

Finishing the set of missions

Without noticing it, I actually had fulfilled the requirements of the mission 8 that I thought I quit in the middle of. I wasn't even supposed to fight those clowns but to check that everyone I was to escort was already pushing daisies -> away. I think I felt myself a bit stupider than usual, when I was looking at the mission parameters. Again.
Then I proceeded to the next mission, where I was supposed to blow up a bunch of enemies and a hidden narcotics warehouse. I didn't quite expect that a hidden facility would be having this low a profile. Dropped a load of nuclear rockets on it and it was gone. Muahahahahahaha!


My last mission in this set was to kill a pirate called Wolf. They even gave me a new ship for the mission, a butterfly-like thingamagick that naturally didn't have any slots for rocket/missile launchers... what is this heresy? In three different encounters I had to fight a bunch of those pesky fighters and continue to the next one. One afternoon I had just killed the last of the last ones with a bit of "jump there, fight, escape and return when reloaded"-action and I was finally ready to warp to the last encounter when I ran out of gaming time.

Tristan

The next day I continued and what do I see? The daily mainenance downtime also means that everything resets and I got to repeat the whole procedure once again. I had to attack the last place three times: first I got beaten up badly but at least I got Wolf's base's shields down and armor chipped nicely. During the second attack run I ignored the flyers altogether and concentrated on taking down the tower with a slowdown device, managing to blow it up at the last practical moment. When I jumped there the third time I immediately found mr Wolf's escape pod pretty close to me. Lock target, fire and forget, jump away and leave the angry flying pirates behind. "Another job well done!" is what Bender would say and he'd be correct.
Perhaps I got some "you're a good person" bonuses that wouldn't really help me at this point in my trial period. On the other hand, I guess I got a bit of happiness myself for completing something in the game. Because things are as they are, this is just about the last proper session I had in Eve so I did pretty well for that, I guess.

Kaboom!

Deathwish

To finish gaming up on my last session in a nice way I bought a load of missiles, rockets and turret ammo. With the cargo bay properly set up I pointed my nose at a nearby lowsec system and started hopping towards it. Two minutes later my ship was reduced to a slowly drifting hulk through an old battleground. I left with a bang, as I had intended.


Fire at will, commander!

PLEX

Did I plan on  buing a plex (Pilot License EXtension) and continue my confused adventures in New Eden? No. I've had a good amount of fun, but unsurprisingly I didn't get to drive the ship I originally wanted, a nuclear missile cruiser, in three weeks but I was playing with the beginner's stuff.
No, I really didn't think I'd get to do that. I mean, think about it: if you got from zero to the cockpit of a fully armed and operational mothership, something would be awfully wrong in the balancing of the game.

The main thing is that I had fun. Thanks, Sergei, for the invitation :D

18.3.13

The second round of greenification

Paintpaintpaint

As I threatened, I applied a second coat of green on the tank to cover up some splotchy areas. There are some tiny patches that require manual touching up because they were in a shade, but that's not a noticeable problem. In general nothing spectacular or mentionable happened. I painted a bit and that's all.

More crap to join the chaos

The machine gun that was just hanging around the last time is now properly attached and it points a bit off, so that all the pieces wouldn't be facing at multipliers of 90º all the time. After that was done I decided that the lower hull is in good enough condition to get the road wheels (and those weird cradles they're connected in) installed. Finally.


At this point I started wondering what should I do next.  Maybe the tools could be painted and attached to the rear hull and I guess there are some tiny things to fiddle around with. Though at some point I also have to add the rusty, dirty coating on the tracks. To accomplish that I'll be using mr L's proven method.

13.3.13

Greenify!

Progress

Finally I found the time and energy to pick up my airbrush and applied some green on the tank. At long last. To my great surprise the painter's tape I had applied on the openings on the hull and the turret hadn't failed in any place! This is a real shocker, I tell you.


But...

Of course there are some places that need to be fixed later because some patches ended up looking a bit off. The main point is that it could've been so much worse.

5.3.13

Whoopsis, I completely forgot...

Oh, bugger

Just a few moments ago I started eagerly preparing my tank pieces for airbrushing. Then, as I was turning the turret around in my hands, I noticed something I was going to fix last week: the side panels of the turret didn't attach perfectly and the rear corners would require some filling.
What can you do, other than apply the putty and leave the damn thing to cure. I really didn't want to paint anything this evening, anyway.


That mg is just lying there at the moment

27.2.13

A fool in the turret

cont.

It's pretty obvious that the turret has been my #1 priority for the last couple of weeks. That's because it's just about the last incomplete subset of the model. There won't be much stuff on the inner walls of the turret, only a couple of machine pistols for close defence, a spare aiming device (I guess that's what it is), a couple of containers and an empty wheel. For a while I was thinking if I should fill the wheel somehow, but as I didn't have a good idea what I could use, I left it empty.
All the pieces got a couple of layers of green paint applied manually at this point. The externals will be airbrushed whenever I get to it.


Turret assembly

When I had finished the two triple sets of grenades in their racks, or at least I get them to look acceptable at this point, I started assembling the turret at long last. To keep my exits covered, this obviously meant that I only built the front- and rear parts and left the sides open. This was mostly because the side panels weren't even complete at this point, so it didn't make any sense to attach them (just look at those insane holes in the photos).


I had somehow imagined that those huge gaps in the insides of the armor panels left by the injectors would've been placed so smartly that the equipment would've hidden them at least half-decently. Oh my, no! There was little stuff to be attached anywhere and all of it was located somewhere else, maybe to underline the ugliness of the mould. Because my benevolent guess was (again) so wrong and I didn't want to leave my machine looking like a teenager's cheeks, I dug out my Tamiya putty and set to work. After a couple of extra layers of paint the result started looking a bit better. Yay.

Test fitting

Of course I had to try and see if my vehicle was going to look like anything acceptable. Yes, it is going to do that. These photos show you that I (once again) changed my mind about the handles. After all I used the kit handles on the hatches of the engine compartment, the driver's and the radio operator's exits. Those customized handles I tried to use didn't really work as I wanted them to. Shockingly the plastic monsters of this kit looked better.


19.2.13

Turreting

Slowly as usual

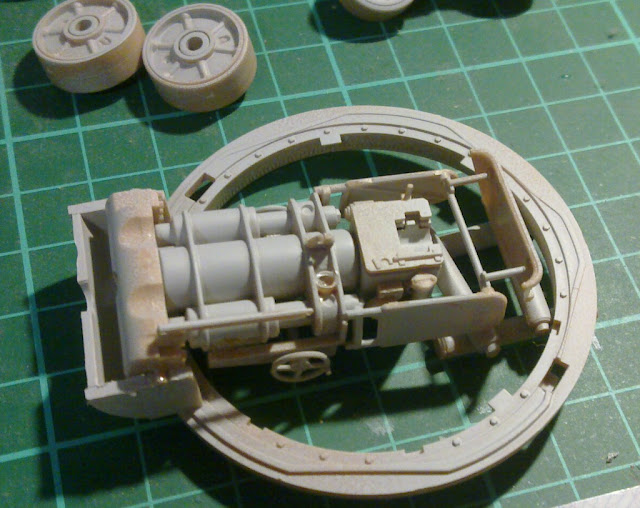
This week's achievements have been astonishingly few, thanks to the real world pushing my time usage on an interrupt vector a bunch of times. It happens sometimes and there's nothing to it. Anyway, I got the end part of the gun built and attached on the turret ring. Nothing more, nothing less.
One weird thing was tha the instructions pointed at a part 18E twice (in the E sprue the part #18 is the lower rear part of the turret) and in this pic that part should've been a pistol-handle like piece, attached slightly above the wheel. Didn't find anything like it anywhere on any of the sprues. I'm not entirely sure how to fix this thing. Bugger.


A new change to the build order

While I was looking at the instructions I decided that I have to change my approach regarding the next steps in this build. I'll assemble the turret with its toys while manually painting things as they come along. Whenever the turret's completed I'll apply the green paintjob on the whole outer surface of the vehicle. I was going to do it a bit differently in my origianl plan but as it'd be so damn difficult to detail the insides of the turret after its assembly, I must adapt.

12.2.13

The final form can almost be seen!

I got busy

The "let's get stuff done"-bug bit me pretty nicely, so I've been working just about every day on this monster. When I got the hull halves in a good shape, just a few options remained. First: build those custom handles I mentioned a couple of weeks ago, second: assemble the hull. As usual, I didn't remember to dig out my wires, so the handles are still missing in action. I'll get them done one of these days, I promise.


The road wheel cradles

When the hull was in an "almost complete" state, where it was only missing the tools, I turned my eager fingers towards the wheel setup. First things first, I assembled the drive sprockets and glued them in their places, my plan was to leave the idler wheels off until I was ready to attach the tracks. So the next task was to build the weird cradles that house the road wheels.

I think I'll leave them off and paint them separately, so I can attach them on the already painted hull. While I'm at it I could messify these pieces and the lower hull a bit more nicely than if they were all attached. If the whole setup is built they overshadow each other bothersomely while weathering.

Close the tub and get going

Why keep wondering and pondering when everything's just about done - as far as they're supposed to be at this point? After a bit of dry-fitting I slammed the deck on the bottom and let it cure overnight. I know these last pics are foul, I took them in a bit of a rush, I apologise. Though they are work-in-progress photos, so I do reserve the right to share some suboptimal pics at this point. The final pics are going to get a bit more attention from me, rest assured :)


Like so. Of course I have to apply another coat of primer all around, but that's something I knew when I started the whole project. In any case I think I'll attack the turret next and take care of the painting in the end, when everything else's done. Someone may have noticed that all the tools - shovels, sledgehammers and whatnot - are missing, yes, I will attach them when the hull is painted, not a moment earlier. Otherwise the british green might not get applied nicely enough.

7.2.13

Working on the rear and top hull

Business as usual

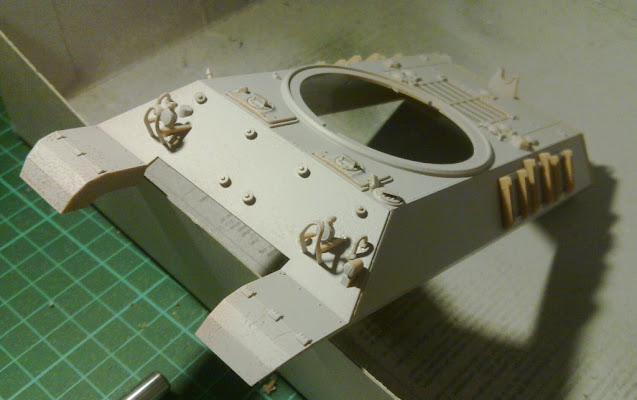
These last few sessions I've been working on mostly the same things as before. My order of assemblage is pretty random and depends mostly on what I intend to paint next. The latest additions have been concentrated on the rear and top hull parts, yesterday I slapped a couple of hatches on the top hull.
Both the driver's and the radio operator's hatches are still missing their handles because I felt that the cast pieces were way too large in comparison to everything else. I'll try to hunt down my thinnest metal wire, in case I could use that to make some sweet, custom handles. And of course, if I find something else that needs handles I'll customize them as well to maintain a unified style.
Otherwise I believe this'll be a straightforward OOB build because if I start fooling around it'll take even longer. And I would really, really love to complete at least a couple of projects this year ;)


Did I ruin something?

My plan is to leave all the hatches closed so I won't get too stressed with the interior of this vehicle. For some reason the rear hull causes some confusion, anyway. So far all the pieces had gone where they ought to go and without any fighting. But when I started installing the fuel tanks nothing worked. The bottoms didn't go as deep as they were supposed nor did they align properly - the rear wings were grimacing by millimeters! What to do? I mengelefied the pieces until they fit and I got my weird box assembled, because the interior parts aren't as important as the tightness of the exterior hull itself.


Now I'm just pondering in my mind if I should paint this weird box at all or should I apply a quick layer. If I just left them like this, mostly primed but with some bare plastic visible, it'd haunt me. Oh, and you could maybe even see these things from the bottom if you had a really (un)lucky angle!
I guess I have my answer.