Mastodon

3.7.13

My coding project, part VI

Another approach vector

Earlier I started coding straight with the game objects and their controls. At some point I tried to insert some stuff I had left out before but somehow fighting with that .py file wasn't too much fun. The existing code was plentiful and that alone made it unpleasant to refactor heavily in IDLE that I still use, thanks to my laziness. So I started another side project for the rest of the game and other additional neatness. Later I could combine my doings into one nice packet and enjoy/suffer the consequences.

From one state to another one

I decided to start by defining a couple of states for my program to be in. Handling the events would be nicely divided depending on the states:
  • in main menu
  • in map screen
  • in game
  • is paused
Like so. The main menu idea comes from the Apogee platformers I spent ages playing, I believe. The main point is that you can start a game and quit it - the other options, such as save, load/continue (depending on what kind of savestates I end up implementing) and the settings can be implemented much later, but they'd have stand-ins displayed already.


When the game is started, the game world is initialized by a set of parameters, all of which are hardcoded at this point. My Java-background could be seen as a contributing factor to the increasing amount of classes and inheritance.

Constructor of Worlds

I pondered for a good while, what would be essential in this game. The Game naturally has all that's needed to run the game itself, such as the state, settings and rendering of various views. Game has a World object that contains the game world's data, it's size (at the moment it's a 3x3 universe), things like the Factions and whatever they need. The World consists of Sectors, which translate into "levels" where the player will fly with his/her more or less battered cruiser. What does the Sector contain? Right now just its size (in x,y), its owner (either no one or one of the Factions). Later on it's going to keep track on whatever it contains, such as Fleets, Planets and what have you.

"Politics"

At the moment the Factions have a name, an identifying color, race, policy and zero+ Fleets. As far as the racial crap goes, they're either humanoid / insectoid / robotoid / mixed - I wasn't very innovative when coming up with these. The only effect the race has is through the policies. There are three different political ways of seeing the world: neutral, xenophobe, aggressive. The idea is that the neutrals don't care about your race, the xenophobes get mad if you're of a different race and the aggressives don't give a flying crap about what you are as long as you won't be that way for long.

Maybe it was a silly idea but I also decided that there are some ways for the Factions to work with each other. Allies, friendlies, neutrals, unfriendlies and enemies - there are five ways two different Factions can try to relate to each other, if they are able to.

Extending politics

Nobody's interested in giving flowers to passers by, so war is to be waged. To do that I thought that Factions should have Fleets. A Fleet could consists from one or more Capital Ships, that may or may not carry fighter-scale vessels and such. Just to try out the generator I set the world initializer to build a couple of Factions to share the universe with the player. One of them is hardcodedly named as the Subspace Pirates (race: mixed, policy: randomly chosen) and it has one Fleet called "Hammer of the gods" in the starting Sector and it consists of three Ships ("Thunder", "Wind", "Rain"). Fun. The rest of the names to everything and anything are going to be randomized with a bullshit generator with a very obscure resultset, I hope. I like randomness quite a lot, it makes testing quite a bit more interesting because not everything happens always 1:1 the same way, in the same order and so on.
Fleets can be assigned a target sector, so they wouldn't be tied to a certain Sector but they could move where needed, to harass the player or another Faction. At least on the idea level it should work. Of course it'll be a completely different story when I get to the scary part of trying to write a sort of an AI...

On the map or completely lost?

Whenever the game has been started and the World initalized the player gets to admire the wonderful map screen. The first Sector on the top left has a marker for the player's Ship's relative position in the World/Sector. I thought I'd use the same marker in the minimap, if I ended up implementing one later down the road.
3x3

5x5


At this point, when you leave the map scree, there's nothing else to do. You'll end up with an empty viewport and you can either go back to the map or to the in game menu (continue / settings / exit), which I set up a couple of days ago. Oh, and hitting the k key kills you and you get to see the Game Over screen and then you get to proceed to the main menu. It's all pretty important, in the end.

Perhaps my next step is to use my old classes somehow to get some action on the screen. One huge thing to ponder is the GameObject's speed... do I want to keep the previous implementation (x and y speeds) or do I want to have it divided into speed and angle variables. These things have to be poked at in any case so I can't just rest on my laurels and slack off.

26.6.13

On vacation: setting up the balcony

Rushing kills you

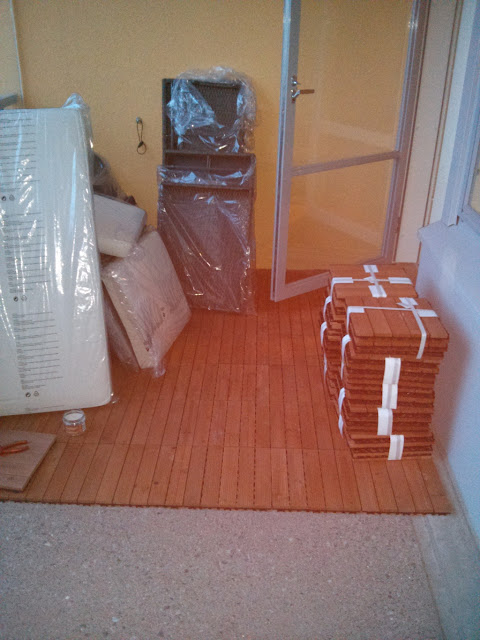
Now, after living in our apartment for about one and a half years we finally managed to get a grip of ourselves and invested into something to cover the depressingly cold, uncomfy and grey concete floor. The short-lived summery weather didn't hurt our interest in this project in the least.


To cover the floor a set of 30x30 cm puzzle pieces were assembled. All of them ended up pointing to the same direction because in the beginning we thought that the physical limitations (surface area) wouldn't allow us to set them up nicely in the chessboard pattern. Afterwards we noticed that, yes, indeed, we could've done that after all. Hindsight++.


All in all I think I wasted two about one-hour sessions with these tiles. Of course I could've done all that in one go, but thanks to other things invading my calendar, I just couldn't spare that time.


Who sits on the floor?

While the floor was going to be worked on, the old foldable and easily relocateable chair-table set had to be replaced with something sturdier, comfier and more permament. It took me something like those two one-hour sessions to assemble the sofa, chairs and the table of the set.


This was a nice, quick and easy project that improves the apartment quite a bit. As the end result the balcony has been much lots comfier and quite a bit more appealing, too, to sit in - and it's been used much more than ever before. It's very pleasant, thanks for asking!

19.6.13

Tinkertinkertinkertinker

Engine nozzles

These engine nozzles were in an interesting shape to say the least. As you can see in the photo, there's a ridiculous mold line in the middle of the damn things. It didn't take more than a couple of minutes to file that garbage out of the way, I was just baffled. Maybe it's just the age showing or a weird, weird planning in general.


Wings

Next step: I smashed the wings on and left the plane on its roof to allow the wings to cure in a proper-looking position. Thanks to that I couldn't attach the rest of the control surfaces and I'll just do that a bit later.  Though as it [the model] was belly-up, I went and glued the landing gear doors on. The setting up was fascinating to say the least because there were no attaching points anywhere, all I had was the tiny studs but no holes for them, so the only guidance was the tiny strut in the front of the landing gear well.

The landing gear itself will be built and painted separately and attached only in the end, whenever the whole plane has been painted. That's wisest, I believe.


14.6.13

Minor rhinoplasty and intake venting

Simple is beautiful

I filed down the nose cone's attachment points, as it ended up having some odd angles that didn't really belong to the plane. For some reason I didn't dare to go overboard in my fear of completely ruining the model. Basically in my mind even a minor improvement was much better and more valuable than a potential waste of the whole project. How very surprising, don't you agree?


While I was working, I slapped the engine intake vents on their places. Then I stopped to wonder if I should proceed to attach the wings or the landing gear doors. I wasn't really sure of which was the best approach, so I didn't do anything else. Maybe I'll attach those doors first. Perhaps.


11.6.13

The ongoing arms race

Old age doesn't come alone

My past birthday brought me, among some other things, stuff like this. I guess I'll come up with some kind of use for these artifacts... Bwahahahahahahaaa!


Washes, pigments and tweezers

4.6.13

More madness

The pilot

I worked out a set of belts that aren't supposed to be called seat belts but something else. In any case, I cut up a couple of slices of Tamiya's maskin tape and looped them around my pilot's shoulders and had them connect at his crotch. Then I applied a bit of Devlan Mud to tone the bright colour down, hoping it'd work here as well as in the M-10's interior.
While I was excitedly fooling around I bent a bit of iron wire to make the ejection seat launching handles. Somehow it just ended up being a bit too big... And the stick's way too weird, in an odd place and it even looks wrong. There was no way I could've started fixing that one as well. Enough was enough.


The workspace

Finding a good and clear pic of the Mig's throttle lever was surprisingly difficult or my g-skills are again a few points too low. In the end I decided that a black-painted handle-like piece attached to the inner left side of the cockpit works just nicely. Then I painted a few green lines and shapes to the display blocks I built the last time to pretend that the multifunction displays had some content. To their sides I added a few red dots to represent buttons and/or indicator lights.


The tools

I met the infamous Lasse last week one afternoon regarding this project. The totally casual and normal-looking plastic piece swap took place next to the Central Railway Station and no one paid any attention to us. What was it all about? Well, my model was unarmed and he just happened to have a load of excess Soviet weapons in the same scale... Air to ground weapons was the theme and what's better than that?


The pic offers some AA-8 missiles, PTB-1150 external fuel tanks, UB-32 M-57 rocket launchers and a S-250 OFM rocket. Excluding those ef-tanks this stuff looks like it means business and that's just what I like!

The hull

As my final task in this iteration I glued the hull halves together and tightened it with some tape. I'm afraid that the nose has to be filed and sanded a bit because it looks a bit rough just in front of the wings. You can see it in the photo, I believe. In any case I try to keep myself in check so this project doesn't get any more out of hand than it already is.


29.5.13

Some light customizing

Madness is contagious

I'm afraid I've read too many articles in modeling magazines and online because these cases of "this is so wrong, I had to make a kiloton of details myself" don't seem so far-fetched anymore. My first example: there was a piece on the front of the cockpit's instrument panel that looked more like a lego cheese slope than anything else. I started by cutting it away and searched for some transparent plastic so I could make a better targeting device to replace that hideous mountain of plastic.

That's nothing, I think. Worse is yet to come.

A pilot and his workstation

This pilot was like a character who escaped from the Spaceballs with his ball-shaped helmet. The instrument panel just looks totally wrong. No, I wasn't going to rebuild or remake or even fix everything, because I'm no scratch builder, but something had to be done! First I painted some gray-black areas where my reference photo showed some shapes. More or less.
Then I dug out a piece of greenstuff and rolled it for a while. I slapped a tiny chunk on his face and tried to remodel it to look a bit more mask-like. The mask alone wasn't enough so I took a length of wire and inserted it on the side of the mask and the other end between the pilot's legs. From the rest of the greenstuff I cut away a couple of slabs and set them on the instrument panel to represent those dark things on the link above. I guess, when viewed from afar, you could guess they're some sort of instruments, even in this 1/72 scale.


After my almost five-minute long handcrafting session I was left with painting Ivan and the mf-displays. The guy himeslf got a coating of green, his helmet ended up light gray and the visor black. With the same black I covered the freshly installed instruments in the cockpit. Whenever I'm done with the ejection seat and the pilot I'll add the launching handles on the seat.  Being bright red they should be nicely visible to the outside. Oh and of course I have to add the seat belts as well (or whatever they're called in fighter planes), if I'm going for this much trouble!

For a while I've pondered if I should add some cables and stuff to the inner sides of the cockpit. Perhaps. The sides of the pilot's tub are pretty ascetic but I just don't trust my skills so much that I'd dare to start changing the whole insides based on some pics in the net. Maybe I'll manage to achieve something semitolerable in the end, when I have painted some kind of views to the MFDs and other random things to represent dials and whatnot. No matter what, a throttle handle is an absolute must!


23.5.13

Project I/13

Mig-29 Fulcrum

The kit I bought from last year's Model Expo has finally reached the top of my todo-heap. A good bunch of Iron Wind Metals' OmniMechs have been skipped and I fear they've been ignored for a few years already. Oh dear. Whatever has happened elsewhere, this piece of engineering is now under the spotlight. The Mig-29 is really an unusual model for me: it flies, it's jet-powered, it's not from the WWII era but it's still a thing from the real world.
Really, really unusual and rare, that's what this is.


The contents

When I opened the box my confusion was noticeable. I really couldn't remember that this individual was, to top it all, a peaceful plane without all the awesome toys it technically could have. Let's not allow that to bother us, I wasn't going to touch those transfers in any case and the paintjob can be whatever I want (and can) conjure up. The bomb racks, missiles and other pretty and useful items will be left for others.


For a short while I thought of assembling a flying model but as you can see in the photo above,  there are about twenty pieces. So if I skipped the landing gear, there'd be even less to build. Whenever we get that far, we'll see what I've decided.
Stay tuned or don't!

14.5.13

Completed: project III/12

Final mumblings

At long last this NZ TD is completed. What were my finishing touches? I applied from my Tamiya Weathering Master set some "mud" pigment to the lower parts of the model, then to the general middle and top hull some "sand" and finally, mostly all around an amount of "dry sand". Somehow I felt this was a better approach than washing the whole model with black or brown.
This project took quite a long while if you look at the calendar. Counting the hours worked brings us to a much lighter workload in the end, even though I can't pull a decent number to give a decent estimate, even. If we agree that it was more than nine and less than twenty four hours in total, I guess we're more or less there. Maybe I should actually check how long I exactly work on a model (or a couple of them), to have a clue, just to see how it goes.

Final pics

Here's a set of pics, from various angles and various settings. The background is, again, instead of cardboard boxes and my workspace,  a Battletech map. Complaints and feedback are always welcome, I just refuse to promise or guarantee any sort of change in my ways of working ;)


10.5.13

Some more tinkering

Washing and rope tricks

The hectic week has set its own boulders on my path, either slowing me down or even stopping me. Mostly I've just applied some washes and hung those jerry cans to the back of the turret. What do you mean it's not a good place for fuel? I never said it's a smart place but that's where the crew set them up. You can't blame me for that!


What else is missing?

I tried to apply some muddy goo splashes on the lower hull, but maybe the deck, the turret and the front could use a bit of some crap applied on them. In addition to those, I believe that the sides could benefit from a bit of sand-like pigmentation. After these things I can't recall noticing any real things missing, so maybe this project is finally getting finished.