Mastodon

11.6.14

Project II/14

A secret surprise project

As a mad idea I ordered a Revell's 1:24 scale model of a Mercedes-Benz A-160 from the German ebay, to be represented as a birhtday gift. Because the details aren't mine, I'm going to omit most of them. I got the packet right after the easter vacation and thanks to the traditional slowness of post the thing had to be finished and sent around mid-May. In short: I'd have about six weeks.


The pieces

The shell was a single piece, the insides were pretty large chunks too. I was happily surprised by the tires: rubber wheels and chrome-like centers. There was a good amount of clear parts for windows and whatnot, I just didn't notice before the very end that the front door windows didn't even exist. You were supposed to see inside the car without any obstruction. Righty then.


The interior

I'm going to apologize already that I didn't take many wip pics. That's because I got carried away so many times that I just didn't remember to document most of the steps.

The assembly was started, as the instructions suggest, from the dashboard and the seats.


After a couple of sessions I had already built and painted the tubful of stuff. To decide the colour scheme I imagegoogled for the interior of an A-class Mercedes and chose dark insides with light grey seats. Not that I'd have time to work on fake wood strips and fancy stuff like that.
Btw, you can osmehow see the dashboard decal I used. The kit also included decals for the surfaces of the seats but I promptly ignored them, as they sounded like an idiotic idea to me.


For my own sporty amusement I painted the shock absorbers yellow and both the spring coils and the front brakes bright red. All the others were painted light grey, mostly because I haven't the faintest clue of how cars are painted and that's what the instructions suggested.


The exterior

When I was done with the insides and the base of the car, I allowed myself to attack the shell. I had already bought some VMA metallic blue (71.071 Artic Blue [sic]) for this project, even before I ordered the model itself. The blue appearance is therefore a funny coincidence and it also happens to suit the recipient. As long as it's not red, my sources led me believe.


The shell got two layers of blue because one didn't look nearly good enough. After that I painted the window frames, the "hems" and the door handles black, again following the google image search and the box art. Personally, I'd left the handles metallic, but I wanted to follow the real world as far as possible, for a change.


As everything else was done, I glued in the rest of the chromed and transparent parts. The glasses I glued in with white glue, in my paranoia of fogging up the clear parts with anything else. I saw a problem with this, however: connecting the shell with the rest of the model had a violent stench, based on a quick and careful pre-fit attempt. If something cracked off (thanks to the easily broken white glue bond), how in the Empire could I reattach them without ruining anyhting else? And we all know how gentle the post can be...


The result

For personalization I scribbled customized texts to the register plates. I even remembered to paint the insides of the rear light covers and touch up everything I had damaged earlier. There was a good pile of photos taken, but I'll display this subset:


Final mumblings

A peaceful modern civilian car was a fun snack project! It didn't take much time but not much was left, either, as I managed to send it off with Itella in the very last possible afternoon. Had I been less slow myself, I'd ordered it in January as I had originally planned, I'd had much more time and I could've done many more details differently and maybe do the insides completely differently. But no is ano and I don't think it went badly, anyway.
Actually, as a very rare thing, I'm quite proud of it.

4.6.14

A week off with some TODO mumblings

A breather

I'm going to take a short break from modeling, thanks to projects Stuka and Mercedes. So I'll waste a bit of time by showing off what got appended to my todo list in the end of April. Thanks to Lasse, my ground vehicle modeler self is going to stay far away from his comfort zone, independent of in which order I attack these four modern flying ... things.


Airborne weapons in 1:72

As you can see, there are two A-10 Warthogs. Two! [an erroneous claim removed] Also from decades past we've got an F-16 Falcon and an almost ridiculously modern F-22 Raptor. Because I am such a fan of indirect, or unfair attacks, these four can be overarmed from the Air to Ground weapons packet's contents.

I guess we'll get some fun out of these buggers, even if they come without tracks and other fun things. Just because I'm mean like that (or narrow-minded), I may paint each and every single one of them in something else than the american pattern. But then I couldn't use the decals that I had at some point threatened to try out, for the first time in more than half a lifetime.
No rush yet, I'm just mumbling out loud right now.

Extra pics

Academy A-10A - I laughed for real when I read the subtitle

Hobby Boss N/AW A-10A

Hobby Boss F-16A

Hobby Boss F-22

Hasegawa Aircraft Weapons I: bombs & rocket launchers

28.5.14

Completed: I/14

On Monday evening I fixed the landing light on the left wing as I had pondered on earlier. I sliced off some extra material to make the piece fit better and then I glued it on with white glue. While I was at it I also spread the glue around a bit to cover up the small mismatch on the bottom side.

Without further ado: it's ready. I only spent about four months on this, if we blindly stare at the calendar. The actual time spent is noticeably smaller, but who bothers to count hours for real, anyway?

The final photos

As declared, this is supposed to be (according to the instructions) Hans-Ulrich Rudel's plane. A Junkers 87 G-1, a plane with two 37mm AA guns under its wings. If it reminds you of the A-10, there's a damn good reason for it, as google will tell you.

Around


Higher up


Other angles


The Gimp is (not) strong with this one


26.5.14

The hopefully last missing piece

As I told before, the landing light's glass fell into the wing assembly while dry-fitting. I had two ideas regarding the impending scratchbuilding of a new piece: either some thin transparent plastic of a fragment from a transparent sprue. Both approaches had their issues.

Either/or

While working with thin plastic the main problem would be getting the tiny piece into a decent shape. The amount of burnt nerves could not be foreseen but it wouldn't be a small number. The end result, on the other hand, could be really pretty, if I got lucky.

A turd of transparent-ish sprue would be a very simple approach. All I'd need to do was to file off material to get the piece inside the bracket. It would also occupy all the given space and could not fall inside the wing like its predecessor - nor could it end up twisted stupidly while the glue cures.

An easy choice

Pretty predicably I chose the latter option. Below you can admire two photos of my first try. Either I'll try to adjust this a bit so the open edge in the bottom ends up sealed or I'll just mengelify a new piece and see if it works better.


19.5.14

The canopy is just about done at last

Yet more fixes

The last time I was wondering how I'd detach that antenna from the one-piece canopy. I shouldn't have worried, for in my paranoia of fogging up the clear pieces I had used white glue to attach the antenna! I realized it the moment I rolled the canopy piece in my fingers and peeked inside. Then I just gently pressed the end of the antenna's stub with the tip of my xacto knife and it fell on my palm accompanied by a faint "crack". For a change something goes really well!

While I remembered it, I took it upon myself to fix the Balkenkreuz. The slightly mouldy-looking markings were quickly and easily fixed with a stroke of white. Most likely I'd declared this model done and complete without this fix, if I hadn't done it right now...

Needless masks

I was staring at the canopy masks I had done much earlier and decided that they've no purpose in this project anymore. So I tore them off and painted the frames by hand, just like I did with the one-piece canopy. The lone unattached part only got its dark grey paint, while the green section was left for later.

As I was working on these, I also glued the antenna on its proper place. Such a tiny detail made quite a difference.

The final piece

I was thinking, in which position I should set the last piece of the canopy, while playing around with it. Somehow it looked a bit wrong in its "closed" state. Being completely open it didn't quite fit and I was slightly confused. This pic, provided by almost five seconds of googling, opened my eyes:(http://hsfeatures.com/features04/images/ju87g2bg_004.jpg.
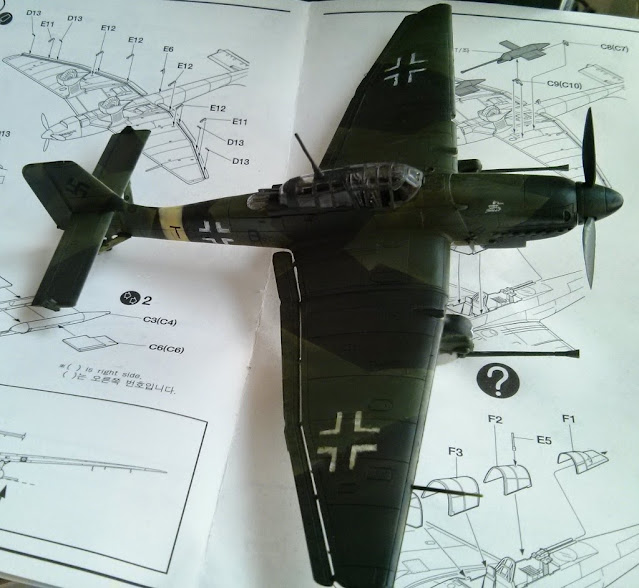
Being as uneducated as I am, I had painted the part of the canopy that should've been open so that the canopy could slide open without slamming into the antenna. After a closed inspection the part had a properly shaped area. First I drilled open the bottom of the enlongated U and sawed off the rest along the shape.

After a quick dry-fit I declared that "this is what I should've done originally!" So I glued that part in its opened state. Of course I could've also been a bit cleaner with the glue but I trusted that the final result wouldn't look too shabby.


Now I'm just working hard to remember that I didn't paint the right side's green camo pattern section yet. And if I somehow managed to scratchbuild a new cover for the landing light (if I didn't mention it before, the original fell embarrassingly inside the wing while dry-fitting), everything would be dandy and just about ready.


14.5.14

A necessary step backwards in the name of progress

Now that I had found that misplaced piece of the canopy (or more like because Lasse's comment in the Finnish counterpart reminded me of the possibility), I had to do something according to my original plan. For some reason it took me one and a half weeks to get something done, but I did it nonetheless.

Crack

Simply put, I cracked the monocanopy off and prepared the other pieces to replace it. My biggest problem will most likely (and hopefully) be the antenna, because I just don't believe it'll leave its current resting place without a bit of fighting and if my memory serves, there wasn't a replacement / alternative in the kit. This won't cause any sort of an emergency in any case, so we'll see what I end up doing.


Splat

Next I decided that I'll glue in 75% of the pieces: the frontmost and the two rearmost of them. Why so? Just in case that something goes wrong at some point. Then the pilot's hatch would be the one I could do something with. If it doesn't fit between the other two for some reason or something like that. Just like I didn't want to take the risk of trying to glue four pieces with slow-curing white glue, because they might very well slide around before the glue sets properly and therefore cause issues.


Once again, according to the finest Project Mumblings traditions, the last photo sucks like a black hole but I reserve the right to use awful wip pics while the current project is, indeed, a work in progress. I trust that this iteration of the cockpit and its canopy will be much better than what I had. Otherwise I'll have to swear quite a lot - and loudly.

5.5.14

We're just missing some final details

I washed the camouflaged surfaces of my Stuka with Vallejo's "for green vehicles" liquid. I even got a couple of silly photos taken, but for some reason everything else in the world pushed in front and I didn't get to scribble down a couple of words before now.


// TODO

One of Balkenkreuz looks moldy, so I'll fix it.
The exhaust pipes still need some crap on them. To be added.

Oh and now I found that cursed final piece of the four-part canopy. It was in the middle of the floor and I had absolutely no clue of what had happened to it and how it ended up there. Bugger.