Hw-314
The first thing I encountered was the Aviation Museum's Hawk, you could even sit inside. I was told by the guy watching over it that it had been shown to the general public three times before. They'd taken off the wings and the engine part (the rear), but otherwise it was complete. |
| The pilot's place |
 |
| Rear seat |
Palikkatakomo
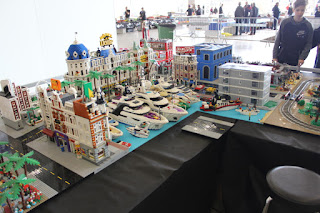
The usual madness was loose at the Palikkatakomo stand. Their city was, I think, a bit larger than the last year, but I couldn't say for sure. There were some more moving parts now, unless I'm badly mistaken. For example, there was a nice Viking ship that was rocking back and forth, in the first photo. Now if they added a tiny speaker blasting people's screams and yelling to enhance that amusement park a bit...I really couldn't think what these Classic Space guys were doing with that Tiger, but I guess it's not that important. The main thing to me is, that there's always something interesting hidden in places.
This time the load of cars we recognize from movies and tv shows were in their own exhibit, nicely with a cheatsheet. I do claim that I've seen a bunch of these before (or a couple of them, anyway) over the years, more or less hidden on the streets and alleys of the megacity.
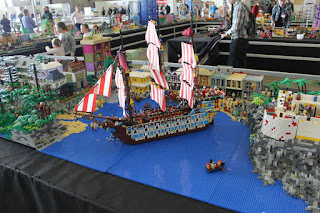
I absolutely adored the ship-and-fortress corner. And I remember, when I was a little kid when the pirates vs governor's troops was a new theme and I drooled and drooled at the pirate ship. Still, I never got it.
You can see the guy who got stuck into the revolving door. I was laughing at it, but I didn't get a handy photo that'd shown that the setup was moving. Now if you take a very close look, you may be able to tell that the guy is just a bit blurrier than his static friends.
 |
| The Simpsons theme ahoy |
Big boats
I had taken a load of photos of the large ships. Sadly only two of them were deemed worthy of releasing, all the others had a thing or two gone wrong. The Tirpitz was very cleverly laid on a printout of itself.The world's on its tracks
Someone or many someones had built some Finnish themed rail-going vehicles. There were both M100 and M200 trains (I believe) of the Helsinki Metro. Sadly they don't have the habit of using sound effects on these, as I've always really enjoyed the weird noise that the M100 train makes. Yes, I'm that weird and I admit to it.Next to the metro there were a few trams running in circles, too. Again I assume they were, just like the metro, all the tram types that have run so far. But if and when I'm wrong, please let me know.
In this very tight-looking corner a few trains were circling around, I claim I've seen those types live as well. Of course I haven't got the faintest clue of the types and models, but they looked very familiar to me. I like watching these things from the side, even if I don't really understand the finer details.
IPMS
I'll begin by admitting that I almost didn't find the stand itself on my first time around. Then I noticed that hey, "here they are, but with only one table? " And a part of that table was dedicated to selling some vintage model kits. I went through it and kept gonig. On my second pass I realized that they had a couple more tables after all. I blame this silliness on the early time of day (9:45).While looking at the photos afterwards, I thought (again) that I should've first taken a photo of the subsection's or category's title and then shoot the models. That'd made the commenting on these things a load easier. Now I'm just looking at the photos and guessing the themes is a bit of a dark art for someone outside the IPMSfi (or someone who just can't remember pointless details like that). So I apologize if I'm speaking sillily about any of these.
Centenarians
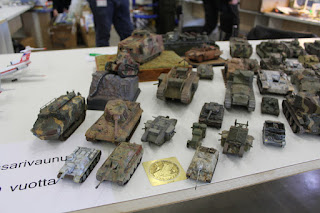
They started strongly with a huge horde of different sorts of tanks under the title "The Tank 100 years". Those machines used to be horrific, ugly monsters and the modern ones aren't pretty either. But hey, I'm a WWII-Wehrmacht tank guy, and I just can't appreciate the fresh tin cans :)Air fleets
Someone had assembled a respectable collection of civil planes. The flying doghouses in the last photos were cool too. I am the first to admit that my nerves wouldn't hold the fighting with all those cables and wires...The busts/figures were neat. I don't really think I'd dare to try something as visible and large-scaled as these. The 1/35 scale people are scary enough for me.
Under the war hammer
I think that there was somewhat less of the Warhammer 40,000 objects this time round. The heavy metal Orks were amusing. Those things in the middle photo, I have absolutely nothing I can say about them, other than I guess that they were some anime things. Then the last photo's GW world's tanks were exceptionally dark. At my first glance I thought they were only primed and waiting for the proper paintjob... |
| Don't ask, I've absolutely no clue at all |
From other times and worlds
Somehow I didn't take a better photo of the tiny soldiers, I guess it was because I got stuck staring at the scifi jet with forward-swept wings. I'd liked that one so much more with a proper camo instead of the boring air force grey. Somehow the rear part of the plane looks like a mecha, not a jet, but but but...The AT-ST was pretty and calmly weathered. I'm assuming that the pose has been modified, or this kit was just that much better than my ancient AT-ST kit and knew how to turn, twist and rotate straight OOB. Of course I could've wished for some footprints on the base, so it wouldn't look as "I fell from the sky" as it now does (and even then it should have some sort of a dustoff effect around it). That's the only complain I had.
Floatin'
There were loads of boats. A Vesikko-like submarine was cleverly sealed into a box. It had a few underwater friends, each from a bit smaller scale than the previous one. Then there was that microscope-scale aircraft carrier and a couple of reasonably large sailing ships.As I've said before, I just can't understand sailships, but the sheer amount of ropes, cables and what wires is just fascinating. And how accurate that stuff has to be. I raise my hat and steer clear.
More flying deathtraps
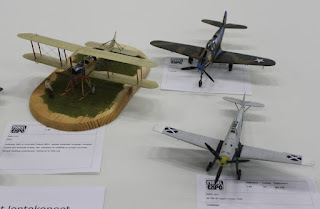
After the ships I found myself looking at a new set of planes. They always seem to be the most popular theme, year after year and Model Expo after Model Expo. I'm most cool with that, I like watching and admiring the results of skilled builders and painters (and secretly loathe them, for I suck at those). |
| A Salamander with the frog-eater's roundels? Wth? |
 |
| F-18E Super Hornet |
 |
| Not a Fw-190 D but a Ta-152 |
 |
| P-43 Lancer |
 |
| Bf-109 K 4 |
 |
| Nieuport 17 |
Back on tracks
My path took me back on the ground and on tracks, as it should be. The same basic types have always been popular and therefore most presented. That's why these photos always contain loads of SdKfz 251/xs, Panzer IVs, Panthers, Tigers, Königstigers, T-34s and so on.Then there's always that someone (or more of them) who has done Something Completely Different, such as that Mk A Whippet, that was a mindnumblingly ugly tank, even by the Soviet style standard of that time. But they bring a healthy, nice change to the more typical setup. I don't mean that there's anything wrong with building Tigers and those, on the contrary. I do that, as my favourites are what they are: the usual ones. I just enjoy everything that breaks the routines and reminds that hey, even I could do something else every once in a while.
 |
| Mk A Whippet |
 |
| Ps 273-39, Leopard 2A4 |
Dioramas
The diorama section is one of my general favourites. They always have something clever, like this Gladiators in the year 100. This sand-arena base worked exceptionally well, I approve!It took me a second glance, but the burned-out hulk of junk KV was a reimagining of an old photo. I guess these are also seen before here and there, but I liked the idea.
 |
| "A British task force in Käkisalmi", year x, if I recall correctly |
 |
| Auf zur Ostfront |
 |
| Auf zur Ostfront |
 |
| I love this pose |
Civilian vehicles
As is known, I just have no competence saying anything about trucks, lorries or racecars. They looked fine, so good job from my amateur point of view. |
| Adam West's Batmobile from the preproduction phase |
The special table
There was a lot of not-plastic-models on the last table, such as this 1:1 driveable horse.A heavy artillery truck (Uragan - MAZ-7310 (or some other variant)) with a firing-ready missile. I really don't know why, but from the Soviet hulks these have always fascinated me. They're insanely ugly, bulky and look ungainly as hell, but still I find them cool.
The Komet capture by the British was handily broken into parts. Out of these planes I couldn't say why they were here and not earlier with the other planes. Maybe I really remember this the next year, so I can comment a bit more cleverly... or less idiotically at least.
After the planes there were a couple of doll houses or something like them. Neat builds, I say. After the houselets there were some weaved things and I really couldn't say a thing about them... they were so far away from my area of expertise.
Working with this Devil's Fist would require some more brawn than the palm-sized ones. In addition this one had 2x6 ends while the ones I've frustrated myself with had just 2x2. No, I'm not a puzzle person.
The 1/10 scale Spitfire was awe-inspiring. Just like, as the paper slip said, that it was self-made and not a kit. But I guess that's what many RC-people end up doing if they want something less ordinary - and if they have the skills.
This baby blue Bugatti was completely scratch built. The guy watching over the desk said that there was one mistaek. It was the wrong shade of blue (iirc it was too light) but I didn't think of asking "compared to what?" Anyway, it was insane.


