Mastodon

29.4.14

The end is near. Again.

Previous evening's doings

I washed the bottom and the gun pods with Vallejo's "for grey vehicles" wash. The difference between the previous state isn't grand but somehow noticeable. Those gun pods and especially their attachment racks (pylons again?) would maybe be the most clearly affected pieces, but I didn't take pics of them separately.


Tiny details

Within thirty minutes I had scribbled those T6+BB markings to the sides, the T-34 -like silhouettes in the nose and the 2B/B2 markings on the wheel pods, as the instructions suggest. Therefore, according to the painting instructions, this is supposed to represent Colonel Rudel's kite.

The tube I mentioned yesterday got back to its place on the right wing. As well as the antenna I had previously ignored. If I get to apply the Vallejo's "for green vehicles" wash on the top surfaces, we can almost declare this beast done! Zum Teufel!


28.4.14

Belly up

Redoing the Balkenkreuzen

As I've said before, the bottom crosses didn't end up too well, so I pretty much repainted them. First I masked off the main shapes and covered the mess with black. The next evening I applied some masking tape to cover the centers and the edges of the crosses and painted those white edges. While I was fooling around, I also painted the wing tips with the same pale-ish yellow that I used on the band on the rear hull.


Good enough

After several tiny fixes done with the light grey, I decided this was enough and glued on the gun modules. Oh, and if you're wondering where the pitot tube went from the wing, the blame is mine. I just didn't notice in time my heiress being playful...

Whoops.


The canopy's front panes got some green on themselves. now the canopy follows the camo pattern of the rest of the plane. I guess I should glue it on next. And I guess I'll try to freehand the tank buster insignia on the nose too. Maybe it'll look good, maybe it won't.
After those things I'll apply some soot here and there and then consider using a wash all around.


16.4.14

The fixing operation x

I spent my last pre-vacation evening covering up my ugly mistakes on the upper surfaces of my plane. There just wasn't enough time to start with the bottom, which is slightly better than what its reputation suggests.

There was nothing mentionable about covering up the overflows around the Balkenkreuz edgs. I just - very carefully - painted over the over- or underflowed white parts with the camo paints. Improving the whites I left for the next time.


At last!

Finally I got to have a go at the long-ignored canopy. I decided to paint everything with the darker (VMA 71.056 Panzer Dk Grey) paint and ponder later what sort of an edge I should paint green (VMA 71.104 Green RLM62) to follow the overall pattern.


It isn't pretty at this distance, but you're not even supposed to get this close anyway. And yes, I'm going to work on it still, no worries.

A temporary showdown

At the very moment I'm typing in this, the Stuka looks like this. Of course I took the photos with my phone, in a funny light and at the last possible moment. So they might not be too good again.


9.4.14

Not learning from your repeated mistakes is stupid

First: why?

Based on my previous post I got a comment (in the Finnish version), why do I waste so much time and effort in masking and painting instead of just applying the transfers.

The simple answer is: because I want to.

My somewhat longer answer is: my earlier experiences with decals have been random to say the least and most unsatisfactory. If a gigantic major piece doesn't end up being in a ball of thousand wrinkles, overfolded or just plain skewed when cured, some others end up being rotated, wrong, badly, broken or otherwise annoyingly wrong.

Because I haven't, to this date, bothered using a drop of laquer on my models (and I guess someone takes offense at this one as well), the awful silver lines have been shining all around the planet from every single angle you can look a model at. On the grooves they've been tenting or bubbling over the bulges. Or bubblied on their own, because why not?

Of course all of this can be avoided with some Skills and Tools. When I did bother with decals my skills were even worse than today, if you can imagine such a thing, and my tools. Well, they've been worse fewer and much simpler. These are the reasons why I decided to leave the decal circus for other modelers and the thought of trying again hasn't simply occurred to me. Perhaps I haven't felt like endangering my models at the last stage of building anymore.

No matter what, the essential and the most important thing is: I happen to enjoy painting those things myself. Oh I do admit that the results are what they are and I almost always have to fix them up. But in the end, I'm doing this for my own amusement and to relax (hohohoho).

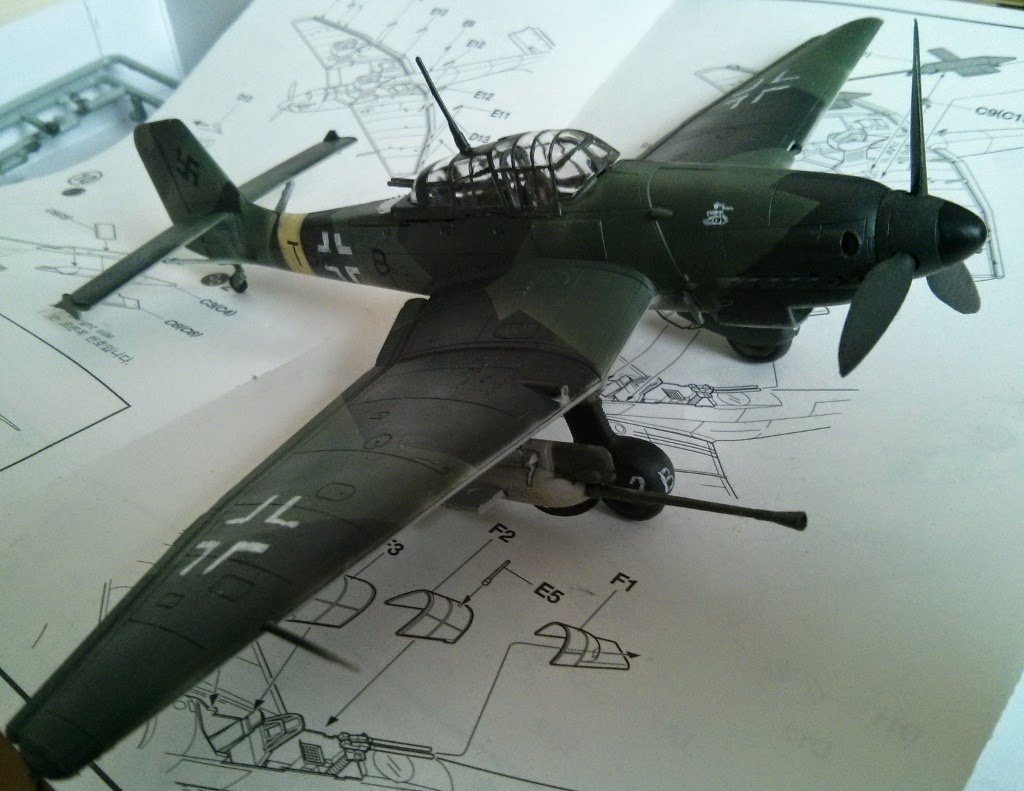
Let there be insingia

The 45-degrees rotated swastikas made it to the tail, the Balkenkreuz edges on the sides and tops of the wings. For a really good reason I'm not going to show the bottom at all, because being as stupid as I am I had not remembered the lesson I supposedly learned the last time.  And that is: don't use that tape for anything delicate or important. My proof shall be presented in photo #3.


As the last photo also shows, I fixed up the cockpit tub surroundings and glued on the propeller unit. I also fixed some small patches on the belly side, but as I said, I'm not showing it now.

Vacatioooooooon

I just realized that this weekend's Model Expo 2014 is going to be missed, thanks to traveling. I didn't get to build up a run of eight consecutive visits. Bugger.

Therefore I'll return to this topic in a couple of weeks again. Or not. That depends on my nerves and level of motivation.

3.4.14

More masking

A temp result

Greatly excited I tore off the tapes to see how my fixing round had gone. Apparently it had gone pretty well.


At this point the main paintjob was done, if you ignore the tiny fixables in the tail and the cockpit's edges. Next I'd tackle the various markings on the plane. As everyone knows, I don't bother with decals.

Taping, taping, taping

Following my customs I sliced and diced shapes off of the decal sheet. Those I used to cut painter's tape stencils. The top wings will get just the corners of the Balkenkreuz while the bottoms will have full ones. Naturally the full ones have to be painted in two steps: first the black base, you can see that area in the pic below. Then I'll apply a new stencil for the corners and shoot the white paint through that.


Funnies at work

For some reason (Germans) my decal sheet had no swastika decals for the tail wing, not even split in two. So I misused my workplace and printed a pic of a decal sheet I found online. That one had swastikas. It happened to be the 1st of April and a coworker of mine just happened to be a target of some oh-so-funny pranks already. He went by the printer (which was offline, for whatever reason), turned it on and immediately the machine churned out my printout. "I was just staring at the nazi markings. Is this some kind of an April Fool's?". No, it wasn't but I was amused anyway.


Cutting off such tiny pieces from tape is damn difficult, you know? I ruined three to get two done succesfully. It could've been worse, it always could, but come on....

The yellow ribbon

My Stuka is not supposed to represent any given plane in a given place, time and with a known pilot. That level of (sometimes insanity-inducing) accuracy is something I'll happily leave for others. I wanted my plane to have a yellow band in the tail section, so that's what I did. For a short while I was pondering on doing those potentially cool-looking  yellow > signs o nthe wings as well, as I had seen in some reference pics. For whatever the reason I chose not to.


While I'm writing this all I think I'm missing are the stencils for the markings on the sides (iirc my decal sheet has at least "T6+BB"). After those are cut and applied, I can proceed to spraying some greyblack and white, before doing the last fixes. And that still untouched canopy piece.

26.3.14

Waiting for the paint to dry again

Last evening I quickly cut some lengths of masking tape to protect the surroundings of those places I had inteded to repaint. Apparently it was only to be done on the left side of the model. If my (horrible) memory serves me correctly, that's where I started painting so I guess it explains a lot.


More greenery means that the spring's coming

As a super surprise move I took the badger in my hand in the afternoon already and did all I could to fix my earlier mistakes. While I was doing that I also painted the gun pods green (they could've been dark grey but looking at the pattern, green suits it better). Then I airbrushed the propeller pieces that were still in the sprue. Those I'll fix up when everything else's out of the way.


That's it?

Almost. There are undoubtedly some small (I hope) pieces that I have to manually fix. The last fortress of paintlessness is the cockpit canopy. And I still haven't found the missing piece!

Now I just have to wait for the paint to dry. I guess that I'll leave it for tomorrow, just in case...

24.3.14

Otherwise it's neat, but...

Just like I bragged last week, I applied the dark grey (VMA 71.056 Panzer Dk Grey) paint on the top surfaces of my plane the same evening and a light grey (VMA 71.103 Grey RLM 84) on the bottom surfaces. The next day I tore off my masks and alas!

A minor setback

The pattern was really good, I thought. I was really pleased.
But then I saw that the green (VMA 71.104 Green RLM62) that I had apparently painted a bit too light-handedly got partially torn off near the left wing's base. My guess is that some residue from the bad painter's tape I had had there before was left behind and that ruined it.

I briefly pondered on my options. Either I reapply masking tape here and there and apply another layer of green where needed or I try to make it look "worn through". For whatever reason the second idea doesn't appeal to me much, so I guess I'll go and airbrush a new layer of green to some places.

So the camo pattern may change a bit, in some places the faded green is a bit too faded. In some places it looks really good to me (more natural, I guess). Maybe that's why it would be a good idea to pick up the airbrush and fix up my mess.


At least the beast's belly wasn't troublesome at all. While I painted the bottom I also painted the gun pods with the same grey. When I mask the fixables, I'll mask off the main bodies of the guns so I can apply a green on their front-top subsections while fixing the rest of the plane.


19.3.14

Starting on the splintery camo pattern

Redo

The first thing I did was to tear off the (bad) masking tape I had applied the last time. Then I painted the tail, the hull and parts of the wings with green so widely that all and more that I wanted to be green was green. After this one dried properly, it was easy to pick up the lines-to-be for the camo pattern I intended to have on my Kanonenvogel.


Going on with the tape-mess

Last evening I spent about half an hour by attaching strips of masking tape here and there. Because my idea was that I'd paint accurately, not all the green surfaces needed to be totally blocked. Of course the tiniest green bits were covered to avoid accidental spillage.
If I got the colour #2 airbrushed on the top and side surfaces today, I'd be quite content. After that I'd do the light belly side and later on the decorations like country insignias and the yellow stripes.

13.3.14

Holding my breath

I have to admit that I had postponed and delayed with the painting part of my Stuka project this far. Why did I do that? Because I really wasn't sure if my new Badger would work just like that - plug and play -  with my current setup. To my great (and happy) suprise I found myself sorely mistaken. I didn't have to postpone it any longer, I didn't need to go and buy more crap to get my airbrush running.
So once again we found out that I was worried for nothing. Once again.

The first attempt

Of course using that device differs quite a lot from the old one and the result was obviously "I'm new to this"-like. Maybe I'll do better when I apply some real paint on it. My only excuse for a sucky priming job is that light gray plastic + light gray primer provides quite a bad contrast for someone equipped with as bad eyes as I do.
I trust that my plane's going to look decent at least, in the end.


I started the masking for the camo already, as the photo shows. This time I wasn't going to first coat the whole model with one colour, apply a mask and then recoat the remaining surface area with another colour. I may end up approaching the paintjob a bit differently from this, though.

...errrrwhat?


Oh yes. The canopy. I had finished applying the self-cut masks on the last piece of the canopy and I was just attaching it for painting, when my fingers said sssslip! Then the foremost piece fell somewhere. Even today I've no clue where it ended, as despite my attempts to find it failed miserably.
Everybody knows the legendary carpet monster but my workspace has no carpets, the piece I lost wasn't a sub-millimetre photoetched piece but a damn chunk of the canopy! In the end I gave up my hopes of finding it anymore and moved on to the one-piece part.