Mastodon

9.3.16

Ordnance pt III

As soon as I had the Mavericks taken care of, so to say, I returned to the rest of the junk. Mostly I was pondering what sort of pylons I'd need and where. Somehow I didn't think that the triple and hex-ejectors wouldn't have carried AGM-65s so I'd load these units with something else.

Not that I cared how realistic my hardpoint loadout was going to have (coincidentally the Hog could carry all six Mavericks that I had prepared) of any sort of importance in this project. The primary goal was to make this plane as impudent as I ever could.

Before we continue I have to mention that the wall of text below was written over nine different evenings and the stuff kept changing constantly. So if some timeline or a thought pattern doesn't seem to make any sense in the context, the reason is that: I just didn't notice it afterwards while doing some final quick spell-checking.

More, more, more and some more weapons!

I had already prepared four rocket packs (according to the instruction sheet they were of the LAU-3 variety), maybe they'd be enough. Or I'd have to assemble a couple more later on. My idea at this point was that maybe I'd have two on the outer sides of a TER and in the middle one I'd put a bomb. That'd maybe look a bit less overpacked than three rocket launchers in a bundle.

Or I'd set up a MER (Multiple Ejector Rack, because apparently the American Air Force counts "one, two, three, many" with rocket launchers in front and bombs in the rear. No matter what, I just thought that shooting sick amounts of FFARs against bombs or other rocket launchers just didn't sound safe...


After a very short pondering break and dry-fitting I decided that the rocket pods would go on to the TERs and I'd indeed install a normal bomb to accompany them. Then I glued the last bomb-halves together and cleaned the bits up all around. Two of the MERs I glued into the hardpoints so that the middlemost one was left empty (maybe it would stay empty in the end).
There weren't that many bombs after all.


Don't worry about the roughness, I was going to patch the paintjobs later, but before installing them onto anything.

Testloading

As soon as all the bits were at least ok to be touched I started laying them out over the belly of the plane. My goal was to set them up symmetrically, that's why I had made an easily shareable amount of just about everything, except for the special bombs, which were to break the pattern a tiny bit.


Right at this point I woke up to the reality that the AGM-65s would've fit like a glove on the two TERs I had and that I had no more than that. And of course I had already loaded them both and I wouldn't have changed their loadouts in any case, even though I could've done so with a bit of violence.

To figure out my mind I fiddled with the sprues with all the still unused bits and then decided that I'd prepare a third MER for the middlemost hardpoint. Now I could share, with ease, 6 missiles, 6 napalm bombs (M117) and 6 poison bombs (Mk.82 Snakeye) between the 18 slots available. I immediately built three new fat ones to be my extra napalm-filled bombs and painted both those and the tiny Snakeyes just like the preexisting ones. Then I improved on the markings of all the bombs and I even painted the metallic triggers of the bombs.


Reorganizing

Bah. Three fully loaded six-bomb ejectors would have never fit in line, so I left the middle hardpoint empty, as I had foreseen. Into the rearmost side slots I glued some poison bombs. I had thought of filling the inner slots with those, but then I realized that if I do a fourth MER the same way I did these first two, I could load that one with Mavericks and fill the other ones' outer slots with napalm bombs! While I was working on that idea I glued napalm bombs on the pylons 2 and 3 internal front slots, as the space wasn't any sort of an issue unlike fifteen minutes before.


The new MERs (I still had to paint the fourth one, I just didn't have the time for it during that session) I'd put just on the base of the wing (hardpoints 4 and 5, I would guess), just on the inside of the main landing gear bays. Into the next hardpoints I installed the GBU-12s (Paveway II) and against all reason and common sense, the next ones would get the GBU-8s (Rockwell HOBOS) on some sort of pylons. And to the outmost slots I glued the TERs that I had finished off ages ago. This way those wouldn't be on the way of everyone else.


While taking the photos above the situation was that I had some empty slots for six things at best/worst. Of course I could leave them empty, but where's the fun in that? And there was so much unused stuff in the air-to-ground box...

And more

Curses. I did not have a fourth MER anymore, as I had used it last year on my N/AW-10! There went my idea of symmetry. So, either I'd fill this one with Snakeyes and Mavericks and put a single, lonely bomb on its opposing side or leave that last hardpoint empty altogether.


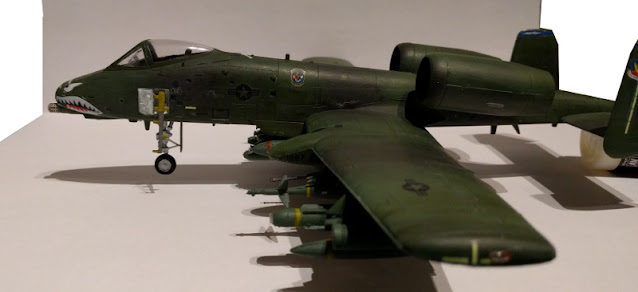
This photo ended up missing the GBU-8s (which also got lenses for their B/W camera seeker head lenses at some point) from the second-to-last hardpoints. I also gave up and succumbed to Hasegawa and just glued the Avenger's disgustingly awful end piece into the nose of the Warthog. There just wasn't anything I could've scratchbuilt a new one out of with an acceptable projected result - and within a tolerable timeframe. Then I painted it chromey and washed it with Citadel's Agrax Earthshade so that it'd look a bit more worn out by action.

In case all this has started sounded a bit strange and jumpy to my potential reader(s), do guess how confused I have been myself? AT this point I was getting to the Samuel L Jackson-like point of "I've had enough of this".


The last bomb problem

Finally I found a pylon and I just glued it on to the last unused hardpoint. Then I painted it green just like everything else (VMA 096 Panzer Olive Green), just like the bomb I had chosen (Mk.82 w/ Fuse Extender) with a yellow band. As soon as the glue had dried I painted the rod (the FE) metallic (VMC 70863 Gunmetal). Some source photos showed the Fuse Extender green and some as unpainted metal. I decided to go this way after consulting Stetson-Harrison.


At long, long last I could misquote my idol, the great and powerful emperor Palpatine. "Now witness the firepower of this fully armed and operational assault plane!"


2.3.16

Customizing the Mavericks

The lens factory

The genious (in my mind) plan was simple: I'd make the lenses/tips for the camera / laser seeker heads from my trusty Vallejo Still Water. Even the bottle's description said that you could drop droplets on a flat surface, let it set for 24 hours and then peel them off for later use. And how would one get good-looking lens-like bits in a semidecent size if you didn't do them yourself?

Eagerly I dug out my bottle of VASW from its hideout and noticed a funny effect on the side. I thought it had maybe dried a bit. Shaking the bottle didn't do a thing to it, but when I pressed the side a huge lump detached from the bottle's side. There were two alternatives: either it had dried up partially and the rest of the liquid would work as usual - or over the years the components had separated as if centrifuged and therefore useless.


There was only one way to find out: experimenting! I dropped a good amount of droplets of varying sized on my cutting mat. Some of them would be too large, some maybe too small and some, hopefully, would be of proper size. This was a smarter approach than preparing four and then finding out that they all were missized. In case that this crap was useful anymore, that is.

Next day I checked the results. Ruined, all of it. So the following day I went by the Hobby Point on my way home.

I really can't recall how old my VASW was but it can't be eight years old yet. Something between five and eight, most likely from the older end of the scale, in any case.

As soon as I had the chance I did a new set of droplets and let them cure for a day. Below you can see a comparison photo where the ruined stuff is on the top and the fresh acrylic droplets are in the bottom.


Using fresh produce

Now that I finally got back to speed with this subproject (and as I was in the mood), I was quite trusty in my idea's decency. Carefully I peeled off the first lens and dry-fitted it on the tip of one of the missiles.

The seeker heads painted all chrome-y


Not all the lenses were of the same size, of course, so I would have to modify a couple of them later on. Still they looked pretty nice. Next I dabbed a bit of white glue on one of the missiles and then from that I reapplied the same glue on each of the rest. This way I'd maybe avoid the issue of overflowing glue.


In the photo above the lenses' glue was still drying, but as I said: they could've looked a lot worse. Of course I'd have to work on the missiles a bit more still, but I was more than content with my idea and its execution. Why, oh why didn't I get this idea in good time and do the same for the Pave Penny pod?

24.2.16

Ordnance

After a very noticeable break I returned to the Warthog. The first thing I did was to file off a few millimeters off the wheels so that the bugger would stand on its own. Despite the weights glued into the nose it was still a tailsitter, so I was facing the prospect of making a sort of a baseplate in the future.

Prepping

As is known, I'm not too well informed about these things and I have never bothered to get worried if a TER can carry three MOABs or not, as long as my model has had something decent installed under it. I just started painting some of the random bits I possessed based on my gut feeling. The A-10A kit's sprues contained a few different types of pylons (I assume that at least one of the types is TER) and brushpainted all quickly green (VMA 096 Panzer Olive Green).

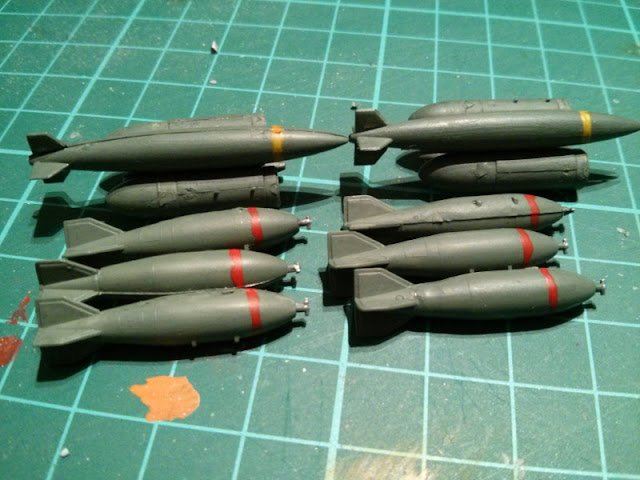
While I was at it I also painted a few bombs and four/six LAU units with the same green. In the photo below you can see a couple of lazily positioned old tv-antenna -like pylons, a couple of long-nosed bombs (GBU-10 Paweway II), a pair of GBU-8's (which I had already google-identified while working on the F-16) and a set of heretically (I assume) green-painted AGM-65s.


Some research

I thought that I'll let this weaponizing part of the project to get completely and totally out of hand. To get an idea of how to get things looking the best they could I searched the net for the colours and markings of the bombs. My first idea was to make all the Mavericks to look exactly the same, but the quote below opened up my eyes for some possibilities.

"When it comes to the actualy seeker head section (meaning the glass up front): Clear means it is a EO (TV or CCD) or a laser variant, and the dirty tan/yellow color means it's an IR variant." [source]

Shamefully I have to admit that I once found an awesome source for these markings, but guess if I every wrote it down, saved it anywhere or found it again? Of course not. Later on (yesterday, actually) I encountered a table that you can see in pic 2 that provided me with what I needed. Some of those I had actually remembered correctly, but having a proper cheatsheet has always been a necessity to me.


A yellow band (VMA 71002 Medium Yellow) signified a HE warhead, a brown one (VMC 70872 Chocolate Brown) a rocket motor (as far as the 'mumblings was concerned at the moment). Under these you could use whatever colour you wanted to, which suited me perfectly. The heresy I had blamed myself for earlier was not iconoclasy but an accepted approach.

Just for the fun of it I decided to make a couple of them somewhat questionable, at least if you consider the Geneva conventions. So I painted three little bombs grey (VMA 71120 USAF Medium Grey) and later I tried to apply a green (VMA 71124 USAF Green) dashed band to signify a toxic warhead.

To accompany these buggers I wanted at least a couple of napalm bombs, because why not? These'd get a red band (VMA 71085 Ferrari Red) on them, as the table above tells us. That's what I had planned on before I actually got the paintbrush in my hand...

From the plans to the workbench

Optimizing my time and all I started with the rocket motor markings of the Mavericks, because I only needed to do six of them and I didn't need brown anywhere else. Cleverly those bits had the panel lines in them for the bands (or they were intended for something else but I didn't care) in the front and back. So I painted the brown bands between the wingsets.

Then I went through all the bombs from the known to the unknown ones (the GBUs 8 and 10 I had also recognized from the A2G box's instructions, of the rest I'm still blissfully ignorant) and painted a few layers of yellow on each. All this was done with a paintbrush because I was feeling way too lazy to go through with the hassle of masking tiny bands and fooling with the airbrush.


Just when I was done with that I noticed that I had done a bit too many of the yellow bands. To fix it I just painted the triplet's halves green again (see second to the last pic above). Then I glued the halves together and a bit later I painted th red bands around them. Those units just had the "I've eaten napalm" look on them.


Next to the napalm bombs you can see three small bombs with double wingsets. I painted them grey and tried to get some kind of a dashed green line painted on them. This I accomplished simply by painting a green band and then cutting it with grey length-wise strokes. I guess they'll do their jobs.


Customizing

During the earlier weeks (as a result of that aforementioned googlage) I had got an idea that I thought was awesome, would look awesome if it worked and didn't sound difficult at all to make. A subset of the Maverick missiles would have an IR seeker head, the others a laser-or EO seeker. I decided that two out of six would be the easy ones and simply painted their tips (VMC 860 Medium Fleshtone). The rest I cut off and filed off the tip that was unnecessary in my plan.


Would this be worth anything? Perhaps. At leat I hoped that the result would be something more than one to entice "what have you done, you fool?" kind of comments.

17.2.16

Endless abhorrent hours

"They" keep saying that the thirhd time's the charm. I was on my way to get to the decals phase, that as everyone knows, I dislike quite strongly. For the third time in a row I was about to apply the varnish-decals-varnish method that had worked nicely twice so far.

A glossy layer

What would I say about this part? Not much, as I just applied a layer of Vallejo Gloss Varnish on all the surfaces that would get decals on them. That being: over and under the wings and the airframe.


A deep breath

I gathered my nerves, the decals, tweezers, my hobby knife and a saucerful of warm water on my workstation. I had also decided to ignore the fact that the decalset and the camo pattern didn't even belong in the same millenia. Just before I started I removed the canopy masks and noticed that the masking had been a bit misaligned and I'd need to fix the paintjob a bit later on.


Session 1

The first decals to go on were the most important ones with the stupidest shapes, also known as the sharkmouths. €%£#€#¤.... No, it didn't go as planned. For some reason the airframe-hugging decals didn't follow the contours of the nose of the plane. Instead, they flapped like the cheeks of Chief o'Hara and didn't grab a hold of the damn thing at all.


After a few failed fixing attempts I decided that I should do something else to save my nerves and went on applying the larger decals around the plane. My plan was to change the area I worked on after every decal so that the last one applied would get to dry in peace and I wouldn't find out that it had got stock to my thumb or something while I had been applying another decal right next to this one.

During this first session I finished applying the decals in the nose, the roundels, and some coats of arms or whatever they were. Those, and the bigger markings on the horizontal stabilizers. Why didn't I paint the tops of them blue instead of using silly blue decals? That's because I hadn't looked at the decals properly (as I didn't expect anything as weird as this). Oh, I also decided that if those sharkmouths don't start behaving, I'd tear them off and paint something myself.


Session 2

There wasn't anything special to tell about this session. I was just applying decals here and there, going from the largest towards the tiny ones. Getting the decals on was so insanely time-consuming, thanks to the "soak it first, then fight it into its place and repeat" way of working.

Somehow I think that especially in this scale those smudgy pseudo texts are juts pointless. They seem to be more of a hindrance than an asset, especially if they end up being a bit off in the end. The same (or even neater) effect would be gained with a tiny hand-painted irregular line and that would be a) exactly where and how you want, b) without the danger of silvering and c) ludicrously faster to do...


The decals in the last photo were somewhat more challenging than the others. And the worst of them was the tiny non-text between the Pave Penny pod and the front  landing gear. Getting anything of that size into that kind of a tiny space was not too simple. But there it ended up, after a long time and a good handful of swearing.

Session 3


On this third and hopefully last sting I wanted to get the last markings applied. As the photo above shows, there were just a few silly texts and the "NO STEP" markings for the wings. And the photo below shows both the model and the cut but not yet soaked decals.


In all honesty I have to admit that they went surprisingly painlessly and relatively quickly (did I spend only 45 mins on them?). Still, while working on them I decided that I would not do the even larger amount of "2" decals that were to go on the wings and the horizontal stabilizers. Instead, I threw them all away and was happy.

Oh, and for about the fifth time I tried in vain to get the sharkmouths to set without success. I had one last idea, though...


The finishing matt layer

I had got it into my small mind that as playing with water didn't help with the floppy decal pair (too much water and everything moves out of place, too little and their glue doesn't dissolve enough to get a grip on anything), maybe if I could force them in place with the dullcoat! They couldn't end up looking any stupider than how they already were so what did I have to lose?

So I started applying the Vallejo Matt Varnish starting from the nose, and my first idea was just to use it to press (and stickify) the floppy decals flush against the nose cone. That didn't work, as the lower parts sprung out again after a short while. Then I got the brilliant idea of applying a bit of said varnish on the glue-side of the decals and then swiping them down. That finally did the trick and I got those monstrosities where they more or less belonged to!


Because I was still going to work on the canopy's paintjob, I left a glossy area around it untouched. As I was also prepared to touch up some of the matt surfaces later on, I was completely prepared for at least a second round. That's why I didn't touch the engine units yet, so that I'd have something to grab a hold of while working (on the bottom side I had the landing gear units). At least I made my work that much easier this way.

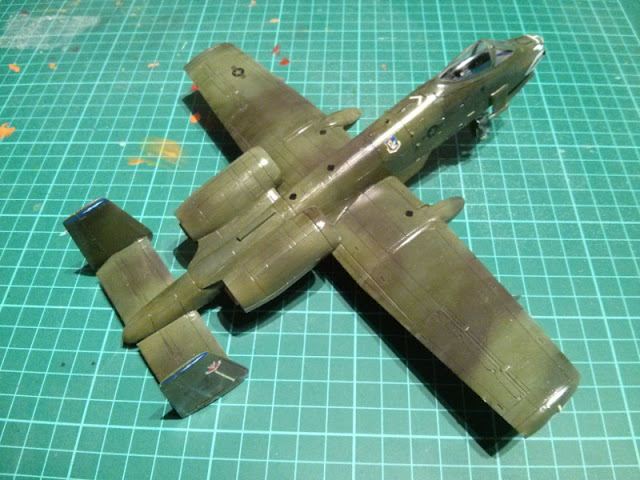
One evening I painted those parts of the canopy that needed to be fixed and after the paint had dried I applied a wash to achieve a uniform style. The next time I worked on the model I applied the matt varnish on every glossy bit I encountered.

The next time I'd return back to the building bench and maybe even a bit of painting, on the underside of the Hog. All the wheels would need to be modified to be in a proper shape (so that the plane'd stand upright), painted and glued on. Also the  defined amount of weaponry (I fully expect that to be both rules-breaking and mindboggling) for the Hog hadn't been started at all yet.