Mastodon

28.8.24

Panzer IV priming and basecoating

A bright red primer

While I still had some red primer (VSP70624 Pure Red), I used it with the assumption of that keeping the upcoming yellowish basecoat from becoming too cold. Black primer might have a cooler effect on the yellow, also it might require more layers to cover up. Of course I could be absolutely wrong in my assumptions here.


Most importantly I wanted to see how my texture fooling would behave with a paintjob. At a first glace it looked pretty fun!


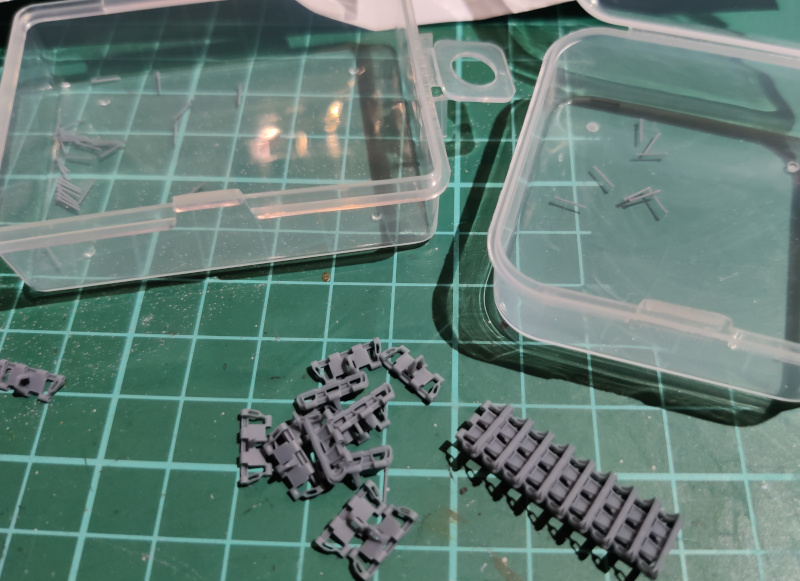
My tracks also got their first paint layers, but in black (Vallejo 74602 Black). I somehow managed, as you could see in the photo, to blow or knock a short subsection off.

A bit later I was trying to reattach the broken off pieces, but the connectors were broken in a way that they didn't grab on anymore. So I built a replacement chunk and attached it to the existing long bit, and the broken off part I thought to use as a short track armour somewhere.

Sandy yellow for the Deutsche Afrikakorps

Deutsches Afrikakorps was in my mental model always Dunkelgelb, while in some photos their tanks also had some green camo over dark yellow base. For a very short moment I pondered if I should go for a camo scheme, but decided to stick to my primary idea.

Round 1

I airbrushed the hull, turret and the wheelsets with Sand Yellow (VMA 71028) instead of Dunkelgelb. I didn't paint the road wheels from the flip side and left them red to depict the rust-protective paint on the invisible side, just like the bottom of the tank. Both the drive sprockets and idler wheels I did paint from two sides as they were very visible.

This was a funny thing to realize: had I caused this orange skin effect by airbrushing, I'd been very annoyed, but now as it was purposeful I was quite content.


Here in the lower front edge the effect was more to the Soviet casting quality than the neater stuff. But it was all my doing so I couldn't blame anyone else. The photos revealed, again, more unpainted parts with high efficiency, unlike my bare eyes. I honestly hadn't noticed the left edge's redness at all.


Round 2

To cover up my failings I did a second pass with the sand yellow, in thin layers from different angles to try to make sure there were no more missing parts. The tracks also got a new (or in the case of the fix-up bit, their first) layer of black primer.


Faking the insides

Just in case someone found a gap where the insides of the tank could be seen I decided to paint a basic main colouring just to call that done. The hull's floor and the lower sides were painted red, the upper half or so was painted white (VMA 71119 White Grey).

The insides of the turret I painted completely with the off-white. If I got bitten by the painting bug, I might consider painting the gun's lock and some random details but I most definitely wasn't planning on spending much time. As I said, you were not supposed to see inside. At worst I'd take a photo like the one below for documentation completionism.

Starting with dark grey

While I still had some time, I loaded some dark grey (VMA 71055 Black Grey RLM66) in my airbrush and worked on the tracks. I wasn't going to weather the tracks heavily, just some gentle sandlike effects in addition to the graphite pen.


While blasting dark grey around I used it on the muzzle brake and on the coaxial machine gun's armoured sleeve. Now they didn't look like the tank had just rolled off the Vomag assembly line.

This was the general, overall paintjob, next I'd get to work on the details. This time I wouldn't forget the insignia before starting the weathering operations.

25.8.24

14 years done

A year of trying out new stuff

All in all this previous year of Project Mumblings has been an example of trying out some new stuff. I got properly started playing with the oil paints, dared to try out the jeweling effects and even the Jump Jet nozzles. Despite that I've left the OSL and NMM off my traveling workstation, and I felt those two would be much more at home in a more fantasy-themed paintings.

https://deathgenerator.com/#mi1

Oil paints

Yup. I did bring the oil paints up a year ago, and now they felt like they had sat nicely into my toolbox and hobbying processes. Of course there was a lot to learn, and I didn't do anything special with them yet, but there was space for that.


Jeweling

This thing I had avoided long but started pretty happily with my Heavy Star's numerous death ray lenses and even continued even happier on Morgan Kell's Archer and of course I kept at it for the Doomguy Urbie and Grendel A. On an insane moment I also gave this a shot on a more serious model, the mine-clearing T-34's side lamp.


As a decorative detail this was astonishingly much more fun and suitable than I had ever dared to imagine. My own requirement level was of course a tiny bit lower than what the actually skilled mini painters had for themselves, but I was content myself.

The non-weapon lenses, like laser pointers, cameras or who knew what sensor lenses, needed a specific colour. I didn't want them to be confused at a quick glance with S/M/L Lasers or PPCs. Otherwise the grey I used on the T-34's lamp was fine, but that wouldn't stand out from the common grey surfaces on the 'Mechs. Or maybe it would, I had to try it out somehow.

Chipping

Also the first time I dared to try out the self-made scratches on the tank, as the mine-clearing tank sounded like a prime candidate for uglier dents and such. This, too, proved to be incredibly fun to paint, even relaxing. The biggest challenge was to keep the chipping and my evergrowing excitement in check so the model wouldn't look like it stood in a heavy meteor shower.

At some point in history I read / listened to / watched some other modeler's thoughts and they always said they painted radial scratches around their turret openings to do exactly what I had done: to depict what had happened with random rocks, tuna tins or squirrels being lodged between the hull and the turret. So yeah, I felt this validated my idea and that it wasn't a complete brainfart as I wasn't the only one doing it.

Surface texturing

This trick was just freshly on my table and I didn't have any results on how it looked with paint. My first feeling was that just the paintbrush-stippling might be enough for my very basic needs. In the second stage the quickly drying putty was way too quick to kick, so that didn't build my confidence. Maybe I'd try this extended method with a different (and fresher) putty before tossing it into /dev/null.

It was worth noting that soon I'd have a layer or two of paint over this attempt, so it'd give me a better viewpoint on how this worked out. The future was always in motion, but I was confident in being much wiser about both stages of this method by the 15th anniversary of the 'mumblings.

21.8.24

Panzer IV surface texture

Trying out uncle Night Shift's methods

The occasionally mentioned work Slack's miniature painting channel had a colleague asking about my T-34 turret, if I had made the cast texture using Night Shift's method and they said they'd used it on some concrete floor basing on WH40k bits and that the method was pretty simple.

That encouraged me to try out these two methods for creating the steel texture.


Method 1: liquid cement and a stiff brush

Because all new experiments and such should always be tried out in an invisible or easily hidden place, I started from the turret's left front corner. I had an old and mistreated brush that I was going to throw away. It had its chance to serve the last time before being released.

I used the brush to spread the Tamiya's thin cement like paint and left it for a short bit to do its thing to the plastic. Then I stabbed the plastic with the brush pretty randomly. Softened by the glue, the plastic deformed gently. This effect looked pretty neat so I continued around the turret's vertical bits.

From the turret I proceeded to the hull full of tools and did what the space allowed me. In the first photo the surface was just softened by the glue, in the second photo there were some markings caused by the brush-stabbings for comparison. I also processed the Panzerwanne's sides even if they really weren't going to be much seen in the final model.


Excitedly I also did this on the front- and rear armour plates. The vertical or vertical-ish surfaces like the decks I didn't touch.


This final photo showed some brown tint on the rear armour and that was caused by impurities on my ancient paintbrush that started affecting my operation only in the end. I thought that this'd dry mat after drying by the next day, but I was wrong. The glue-affected bits remained glossy which was a bit confuseing, but didn't affect the end result.

Method 2: putty diluted with liquid cement

I truly could've left it here and be happy, but while prototyping I wanted to try the next stage as well. As I didn't currently own any of Tamiya putty that mr. Kovac recommended, but Mr Hobby's Mr White Putty that I have never liked too much as it started kicking quickly and immediately after getting exposed to air. I trusted that diluting it with the thin cement the drying time would be somehow slower.

Using my old jar lid as a mixing palette I used some putty and quickly mixed glue into it. As the putty was so eager to kick, I used more glue than I expected to need, so I could get it into a paintlike consitency to be brush-appliable.

Dried glue-putty effect

Sanded-down glue-putty effect

In the front of the tank I did my best to avoid going over the edges, so the result was more cautious than what a bit more experienced user would've achieved. Had I been more eager and daring, I might have used this on the radio operator's machine gun mount and more on the driver's periscope shield. On the first try I thought it was better to take it easy.

Working on the right side of the tank I was cautious of the antenna system and trusted in the method 1's texturing worked nicely enough on its own.

The left side had lots of junk attached, so I mostly concentrated on the areas where applying the glue-putty goo was safe.


None of these showed that after a bit of a break to let the stuff cure I sanded down all of these freshly textured sufaces with a sanding sponge. As it was now it looked pretty weird, but I had confidence in the power of paint making this make sense.

14.8.24

Panzer IV and the third party tracks

Articulated third-party individual link tracks

The title may have spoiled the decision already, but I wasn't going to bother with the kit's own link & length tracks at all. My first tracked model ever (Revell's 1:72 StuG III with a Saukopf) had those and I didn't like them one bit. Either I got traumatized by them or maybe I was just an unforgiving person.

Panzerwerk Design

Some time earlier I encountered Panzermeister36's review of a bunch of 3d printed tracks in YT and based on that I ended up looking at two different companies. Wasting time with the customs didn't really entice me so I thought I'd prefer the EU inner market and order something from the Polish Panzerwerk design, if I could figure out which of the track types (1-8) was correct enough. My other options were T-Rex studios and Tankcraft, the latter used to have the Adam Mann -consulted tracks but all of that had disappeared from their webshop. I guess they didn't want money.

Of course I had been thinking about this for ages, and during easter '24 I finally pulled my shopping pants on and dragged myself to the online store.  Then, for a good handful of days the site only returned a HTTP503 error and the console logs weren't too useful. When complaining about this out loud the store got back online the next day or the day after that in the middle of all of my back-and-forthing.

Only in the checkout stage it was said that the only payment method was paypal, which I was a bit allergic to and avoided whenever possible. So I left the almost neighbours hanging and checked my second option (spoiler: I didn't choose them but went with this set here), which I documented in the next chapter for the sake of completeness of this story.


My calendar in the Spring absolutely horrendous, so on the Monday when the courier was supposedly delivering my order the window was "during the evening" and on that single day we couldn't guarantee that someone would be home to accept it. So I accepted the shittier option of "I'll get this from a nearby fuel station instead of you carrying it to my door like I've paid you to" and another day's delay because why would these companies work in a reasonable and sane manner?

The funniest thing was that there was someone home all evening that day, but we didn't know that when the decision had to be done :D


T-Rex Studios

These people also had some Type 3a tracks available, so I took a closer look. The price was lower and the webshop also appeared to work.

So, sixy 'murican monies for the bits and S&H, plus customs and VAT. This would be tolerable. But when I got to the payment stage the only option was, again, paypal.

If I really had to use paypal, I'd at least then skip the customs part if I could. This was the only reason I rechecked the Panzerwerk store and would you look at that,  now it worked. Otherwise I'd ordered the T-Rex tracks without any additional grumbling.


Resin tracks in action

On a Tuesday evening I fetched my packet from a fuel station that doubled as a courier's client's pickup point. The box contained very simple instructions and three ziplog bags full of pieces: the track links and both A and B pins to connect the links together.


The track assembly operation

Those A and B pins were just about the thickness of a cat's whisker, and using those with these (comparably) sausage fingers of mine was interesting to say the least. I assembled my track one link at a time by holding the two attachable links tightly between my fingers, then inserting the pins one by one and immediately pressing them in with my flat-tip tweezers until they made their tiny "prip" sound.


You all knew I had to try the track out as soon as I had a short lenght completed to see how it wrapped around the drive sprocket. It fit like it was made for this.

Supposedly I had an excess of track links so in addition to the driving tracks I could maybe make some track armour from these.


Getting the right side track built took three evening sessions from me. Some of the time went to fiddling around, pondering, and finding out the way to work on this thing. And let's be honest, playing dry-fitting and testing took some time too. After the slow start I found a good method and the throughput got noticeably improved with time.

Thanks to that the left track progressed and completed much more rapidly, as I now knew how this worked. And I also had the feeling for the pieces.

While working on this I also made a short bit to be hanged in the front. Of course I didn't dry-fit enough at this point so I accidentally built it a link too long. I still had a bunch of links and pins so no panic, but I still paranoidly hoarded two pairs of A/B pairs to connect the actual tracks in the end.