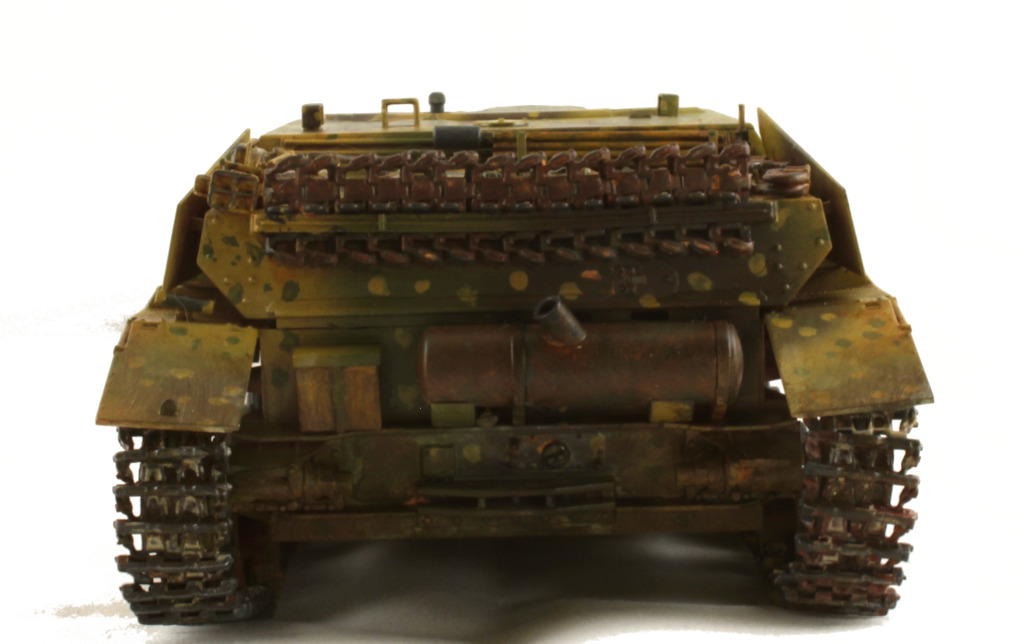
Vogtlandische Maschinenfabrik AG (Vomag) SdKfz 162 - Jagdpanzer IV L/48

The Tank Destroyer project that I started barely in the year 2022 was now finally completed, in June. Not that I had rushed around with this, nor had I dragged my feet on purpose. This project, just like every other one, lived on inspiration: sometimes I got a sick amount of stuff done in a handful of consecutive days, then I tinkered with other things for a good while as the Jagdpanzer IV was simmering in the background.
Timeline
My timekeeping was pretty unstructured, I mostly used the timestamps of the photos I had used to follow up the different modeling sessions. If the whole show lasted 28 about 45min sessions, then we got a 28 * 0,75h = 21h, spread nicely over six months. While spinning these numbers up I took a look at how the Königstiger went, and it had only eaten something like three more months from the calendar despite being a lot more complex a model and the build-paint process was quite a lot more intensive.
New method invocations
In an earlier related post I was ruminating that being practically a random gift, this was a great model for testing all sorts of weird new things. As documented, I got carried away painting the metallic parts with a non-metallic paints (excluding the final highlights on the tracks), and that seemed to be a neat approach, at least with the engineering tools.
Oil paints had been tickling my curiosity for a longer while now, but until this early year I had managed to squash my interest in the subject. Luckily, however, my colleagues were even better with their sales pitches than the random internauts, because those things were damn comfortable to use! Their drying/flashing/curing times were incredible, but especially considering my weird schedules that was most often a good thing. Curses, I couldn't fix my overapplication of mud over a weekend? No worries, the thinner reactivated my paint and I could salvage the situation. There was nothing like this with the acrylics, but I was going to keep using those as my main painting tool in the future.
Applying pigments with the thinner was also a new thing for me, that I encountered accidentally, and good that I did. I was most definitely going to play even more with the pigments in the upcoming projects.
Photography
With all this newness, I got inspired and played with my final photos much more than before. The backgrounds of my light tent photos had been bothering me because they (the backgrounds) weren't smooth and clean fresh out of the camera. For reference, any of the recent "Finished: Project n/yyyy" can be checked for examples. For these final photos I spent some more time, checked for some useful processes, and ended up taking my photos three times until I got what I more or less wanted, thanks to someone missetting the DSLR's aperture parameter to the opposite end of what it needed to be.
[0] – Photos in the light tent
Simplest thing first, I set the background roll so that its folds (packed away it was folded twice) would jump out as little as possible. I took my photos with the camera's (Canon EOS 60D; kit lense with specs I never have bothered to memorize) manual mode; ISO 200; aperture f25; exposure time 0"6 aka 600ms if I read these correclty. So far I have not shot these photos of mine raw but still jpeg, despite the seriously committed people swearing by the wonders of the raw format.
[1] – First edits
When finally done with the photography I dropped my shots into my work laptop's Photos, where I bumped the colour temperature a notch upwards, then adjusted the Levels. Being a total amateur I just looked at the spectrum and dragged the dark handle to where the graph practically started and the light handle to where it pretty much ended.

Unlike in this pic here that showed the Levels of a WIP photo taken from the tabletop, my final photos had a pretty much gaussian curve in them with a noticeable amount of emptiness. With the unnecessaries trimmed off, the colours in the photos started looking much more than what my own foul eyes told me of the model in the real world.
[2] – Artifact cleanup etc
Cropping the Levels didn't remove all of the nonsense, even if it helped quite a bit. As the second editing stage I threw my photos into Gimp, where I picked a white and simply started painting over artifacts with it. The result was a pretty uniform white background (or blue in the few photos I took with the blue background).
Being my lazy self I got most of the junk just along the edges of the model with Gimp's magic wand tool's "select by color" mode. The last fine-tuning I did by hand, sometimes poking individual pixels. Whenever needed I also rotated the photo to get it to an angle I felt I needed to get, then cropped it nicely, and finally resized each photo down to n*1024.
As you could see from these photos below, you didn't even need to squint for it, the results didn't end up being nearly perfect. They were much, much better than the ones that I didn't play with this much, that was for sure.
[3] – Photo gallery


No comments:
Post a Comment