Mastodon

7.9.14

Finished: project IV/14

Some last minute doings

I painted those extra track links with Vallejo Chocolate Brown that I had modified with some red and yellow. For that sort of stuff I think I really need some better colours, but that's a general improvement issue for a later time. Then I coiled up the thin copper wire around the cable holder, painted it with chocolate brown as well and later washed with some devlan mud. Some wearable parts of the tank I gently touched on with Vallejo's Oily Steel. Just a bit and lightly. As my final silly idea I decided to use that on the teeth of the drive sprockets: I wiped the excess paint off the brush, turned the motor on and let the motion do its magic. Automatically applying the worn out effect to proper places.

Perhaps there could've been some things I could've touched on a bit, some things to improve and so on, if I had felt like it and had something really popped out to bother me. For a change I did a mostly unruined model and a pretty much pristine paint job on a tank. I guess I have to change things every once in a while to keep things fresh, eh?

Photos

I tell you, I took the photos happily and quite eagerly. While doing that I drove the tank back and forth along the sofa, through the silly obstacle course (multiple implementations) I had set up. Somehow I managed to forget to shoot the video footage that was the whole point of driving around in the first place! *cough* *cough*


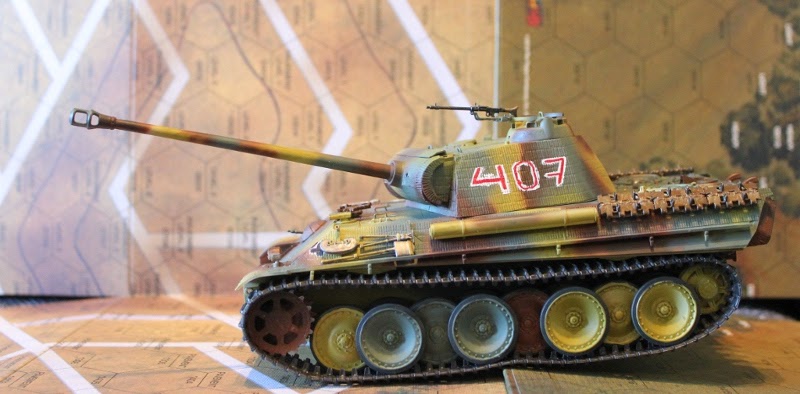
Some stills taken on the go


Thoughts

I believe I said earlier that this model kit really reminded me of the often heard "shake the box, done" description of Tamiya models. Building this was really quick and easy. The motor setup was a fun thing and made me seriously consider that maybe, perhaps, I could potentially consider a remote-controlled Tiger with sounds and whatnot.

The Zimmerit stickers were extremely good. I would really like to encounter those things in a box in future projects. Of course one can buy those in AM sets for other kits, but it's not OOB then. Not that I care much, though. Anyway, this made me think if I should dare to take another shot at Friul tracks and if so, what else would I get into and would this ever end?

The Panther with some other same-scale German units

2.9.14

Tools and not much else

As I predicted, the spatial dislocation of my workspace has caused a tiny but hopefully temporary slowdown in the amount of progress I've been able to achieve. Not that there's been much to do with this beast anymore. In short bursts I've mostly worked on the tools, painted the Balkenkreuz in the front corners and the large numbers on the turret.


On my latest stint I assembled the commander's MG and mostly painted it too. Both the kidneys also found their places at long last, the jack is still waiting for its turn. After a bit of pondering and what-iffing I ended up using all the six pairs of spare track links - their paint cocktail I'll be mixing up (much) later today. All in all, I think I'll start calling this model done soon. In case you were wondering, I'm not going to use any pigments or anything on it, as it's a mobile unit and therefore potentially poked a lot. That means I'll prefer cleanliness more than pretty dirtiness.


27.8.14

Commando - for action and adventure, now under the seas as well

At this point everyone knows that my work heap has consisted of tracked vehicles and a couple of jets. One of these days I happened to offer a home for a started type XXIII U-Boat. That beast is almost a meter long!


Jagpanther came to offer some scal assistance


I really don't know when I'm going to start working on this one. Whenever the battery operated Panther has been finished, we'll know if the answer is "next!" or just "later".

20.8.14

It's alive!

Thanks to the workspace modification project, I simply offer you my silly test video #3


13.8.14

The pitter patter of a Panther's paws

All the wheels

While I was setting up the interleaved roadwheel system, I really didn't envy those poor bastards who had to work on these in the real world, in who knows what kind of weather. Quite handily the outermost set of wheels held all the others in place and even they were held fast by screws so that all wheels could turn freely but without jitter. Just because I wanted to prepare for the possibility of some adjustment later on, I didn't install the screw-end hiding caps, as you can tell by the photos.

I

II

III

The idler wheels, according to their names, were just idling on their own axis where they were simply pressed onto. Both drive sprocets had tiny screws that hold them tightly attached to their axes. In the pic below you can see the place of the screw on the right side drive sprocket.


Track setup

As usual, the tracks were my biggest concern in the whole project. With surprisingly little effort I got them on. Of course, as I followed the instructions, I then had to remove them, because they were blocking the top hull's attachment screws! After that was all done I had to reinstall those tracks. Graah.


A test drive

Now my worry was if the tracks, wheels or something else would tear off when I turned the engine on. For the first few seconds the assembly made the weirdest of noises, but after a couple of track lenghtfuls things settled into their places and the racket ended then and there.


It wooooorrrrrrks!


Of course I took a video of my first test run, but I think I'll take a better one when the tank's done. And when my over-eager two-year-old assistant is not helping me. If for no other reason, but to hold up some sort of fake facade of seriousness.

7.8.14

The panther's fur

Here's another rapid-fire post so that the blog keeps a bit better up to my realtime pace. I had originally scheduled this one for next week, but as I got the road wheels done last evening, I thought I could release this one already.

I

I decided to start painting with Dunkelgelb, as usual, and that the lower hull would be mostly painted that way. So, in short, that's what I did: I airbrushed about a third of the road wheels etc, the bottom hull almost completely with it (VMA 71.081) and applied a bit of a pattern to the rear. Then, for the turret and the top hull I pulled a pattern from my magical hat and painted it.


II

The next evening I took about half of the unpainted road wheels and did them with brown (VMA 71041) and painted some stripes and shapes on the hull and the turret as well. I tried to keep the pattern, but so that I'd fix up errors done with the Dunkelgelb portions. Not that the result was perfect at this stage, but I didn't worry about it as I was still missing the third round of painting.
Then again, a perfect paintjob might not be the awesomest goal, if you keep in mind that it wasn't perfect on the field, either. My honest opinion is still the same: fussing is pointless and having fun is more enjoyable than "hobby-naziing".


III

As everybody knows, the third and last colour for my camo was green (VMA 71.096) and when I thought I was done, I realized that I had forgotten to paint any kind of a pattern on the lower front of the Panther. It really couldn't stay 100% Dunkelgelb, so I had to prepare for a fixup round. Whoops.


Oops

IV

On a hot afternoon I took it upon myself to attempt to fix my mistakes. Nothing special there. And of course, only now as I'm looking at the photos, I noticed that the left side stowage bin's Zimmerit sticker has been flapping for a good while. Later on I painted the rims of the roadwheels with greyblack, but didn't bother taking photos (I mean, who wants to look at road wheels?).


6.8.14

Panther priming

Despite the heat of the late July I took it upon myself to cover the tank with the primer, one of those hot afternoons. The effect looked pretty fine on the Zimmerit stickers, but we'll reserve judgment on the time when there's some proper colour on them, right? Of course, in the pretty much saunalike room the paint ended up flowing worse and worse while I was working my way towards the road wheels etc. I guess they'll need some more work done on them, just like the top of the hull looks slightly suboptimal.

Photos from the first iteration