Mastodon

13.4.15

Model Expo 2015

I can't really say much about the size of the Model Expo's scale model section (I guess it's run by IPMS Finland as usual) except that I think it was about like the one two years ago when I last attended. If I had anything displayable, you can be sure I'd dropped it among the other models just for the fun of it. Maybe next time, whichever year it ends up being.

Without further ado, here's a pile of photos I took hastily. Most of them have been heavily cropped and each of them has been scaled down at least to 1/3, otherwise they'd still be uploading.

There's almost a hundred of them. Consider yourselves warned.

IPMSFi

Dioramas


A convoy somewhere in the Baltic Sea (I guess)


This one I liked a lot


Someone got insane and build a diorama inside a Guksi cup/mug

Figures


A SS officer somewhere

A Lotta entering service


Collections


Finnish Air Force fighter planes '39-'44


Gravity defiers


Ju-88 A/4

I think I was staring at the glass panes of the huge plane almost with an open mouth, looking slightly silly :p


It's surprisingly rare to see plane models with open panels around here

Military vehicles


88FlaK37 or 88 ItK/37 as it was called here


Cars

I am sorry, as I am every year I think, that I understand little about cars. So I can't show the respect the car models should receive. The best I can do is limited to "Oh myyyy, that's nicely done" and "Wow, the details are insane" kind of reactions.


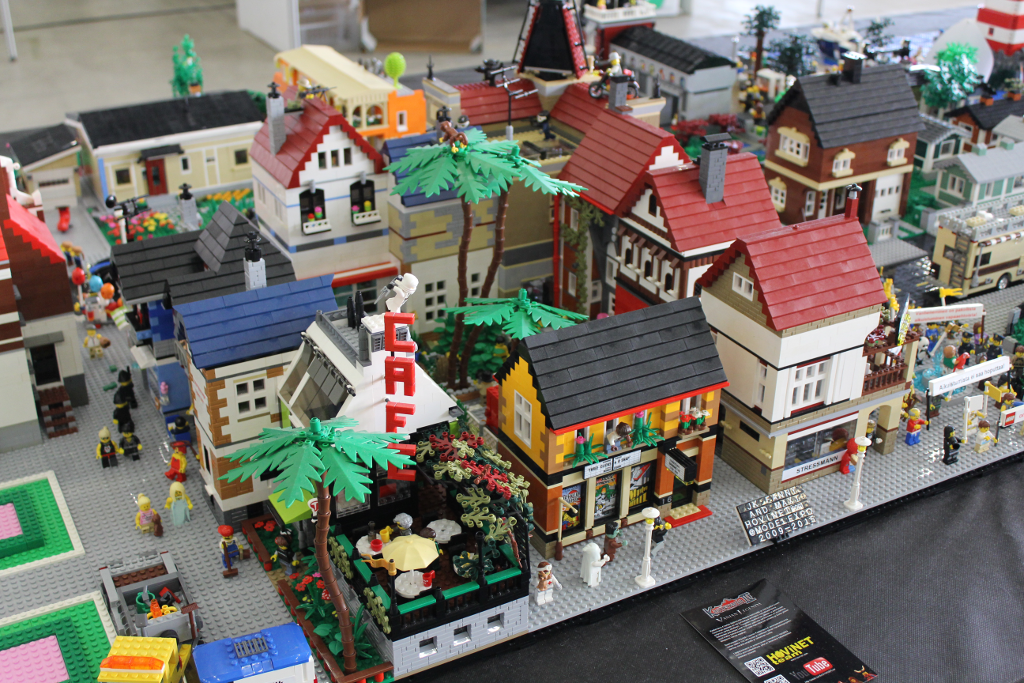
Palikkatakomo

Year after year I admire the palikkatakomo stand. Now I'm very eagerly waiting for the time when my project assistant has grown a bit more and reaches the lego age. I hope she gets into them.

Individual setups

A wonderful rocket from the Tintin comics


Video game characters


Century tank aka TIE Crawler was a curious detail

An overwhelming Imperial presence is always a good thing

The dogfight was fun

The City


For some reason I found the waterfall effect awesome


In hopes of catching some obscure, amusing details I tried to peek into all the buildings


Monaco?


Not as enormous as in '12 but it was not a small stand anyway

Fancypansy


Didn't notice him anywhere :/


A horde of kings on their way to a castle


That's just about it, then. I didn't get any impressive or shareworthy pics of the boats, shops or trains this time. It was lots of fun to watch them live, though. I think there were something like four, five booths just for the trains (or train-related folk) alone.

I wonder if it could fly or is it just static decoration?


On the 501 stand I got lucky and encountered his royal highness, the Emperor himself! He was, naturally, protected by his Royal Guard

8.4.15

My multiphased painting process

The madness gets worse

I worked on the landing gear bay doors and filed and sanded off the worst edges. The results weren't convincing. There were mindbending gaps between parts. The joint between the plane's body and the wings on the topside also didn't work for me: the gap was small but it ended up eye-searing. These didn't use to bother me before!
Or they did bother me enough to dislike airplane modeling, but not enough to actually bother fixing them. Who knows? Now they annoyed me and I dug out my tube of Tamiya putty and went to town with it.

One afternoon I applied the putty and the next one I sanded off the chunks. I guess it would've been workable much sooner but I thought I'll give it a day and be sure. To my amateur eyes the results were fine. Could be that some of the panel lines can't be seen anymore after all the work, but that might depend on the paintjob, too.


After I was finished with this surprise phase, I primed the whole setup again. Perhaps this iterative learning sinks through my thick skull one day and I stop doing all these pointless things (like prepriming things I shouldn't prime yet) as supposedly good and timesaving. Or not.


Paint scheme

I had thought of the paint scheme earlier. The box cover's image looks like a basic, ultraboring USAF grey and the "prototype model art" pics show a dark paintjob, just like the painting instructions suggest. Neither option really inspired me. For a change, instead of my favourite feeling-based Stetson-Harrison approach I decided to take this project seriously. For a change, variety and fun, if nothing else.

Some references

There was a good pile of reference material I went through, as my Finnish commenter Lasse provided some A-10 docs. My main interest at this point was the version I was working on (which was either referred to as "N/AW A-10A" or "YA-10B") and its look. Below I have attached two example photos I found useful.


The darkly painted model was going to be the result. Of course it could have been theoretically possible that after the flight tests depicted above (see the sensor stick) the prototype plane could've got a different paintjob, but as far as I could tell it wasn't mentioned anywhere. I decided to keep the "what if" world far away from this one and stick to the facts.

Let's go dark

As I said, the painting instructions talked about a "Gunship grey" colour. The VMA series I use doesn't, of course, use that name anywhere. The infamous internet suggested, among Dark Sea Green and Black Grey (VMA 71056) in this role, but in my eyes BG looked too dark. For a short moment I thought of using German Grey (VMA 71052), which was pretty nicely dark. Then again, I also had an unopened bottle of USAF Dark Grey (VMA 71132), so that sorted it out quickly.

The first paint layer


An error-fixing session

Lasse dropped a comment to the Finnish post two weeks ago, regarding my painting of the cockpit. I had left those parts one can see through the canopy as grey, when they should be more like black. For some reason I had encountered a wrong type of a cockpit image (or more likely: seen whatever) and did what I did based on that. To keep my build on the facts and within the limits of reasonability I cracked the canopy open and was glad to see that no paint had leaked through.

I manually painted the shameful mistakes with the aforementioned grey-black and while I was immersed in my momentary insanity, I went for the insides of the canopy frames with it as well! I was beyond shocked by this, really. A perfect coverage wasn't what I was going for, but a decent and a really careful one. Avoiding overspill was the reason, of course.


When the paint had cured I reglued the canopy on. You can see that before that I had attached the Avenger's tip on the model as well, while the paint was drying. I thought about the best approach and decided to mask the nose cone so that with a bit of very careful airbrushing I could get just the minigun painted and leave the rest clean. With very gentle whiffs I painted the business end with Steel (VMA 71065). While I'm writing this the result is a complete mystery.


1.4.15

Airframe assembly and some special modifications

Just about all the photos show that especially the bottom of the model looks quite peculiar. This is due to the previously primed areas being sanded clean(er). I do think I have mumbled about the Tamiya rattle-can primer flaking earlier, at least, so the flaky places needed to be cleaned up before any serious painting could take place, of course. While doing this I've noticed that priming the pieces in their sprues simply does not fit my method of working, my work-order nor the style.

Hog's airframe

When my cockpit was built and cured, I built the rest of the plane. Everything fit in rather nicely and without insane crevices, which was a huge surprise to me. Oh, I'm sure it'll eat some putty later on, whenever I've got the weirdest parts sanded smooth.


Sealing up the cockpit

My construction had reached the point where I decided it was the time to seal up the cockpit. Before that I did remember to paint some grey on the joysticks, on the bend and to represent the thumb hat-switch. Then I added two red dots for the thumb- and normal triggers. No further details could be seen, if even this much.


Next I cut a thin rectangular piece of transparent plastic for the gun sight and white-glued it in. And with the same wave of arms I glued on the canopy and started wishing that when I start painting no paint would leak through.


Gears: up

My very first idea was to build this kite in the flying mode, with its gears up. Naturally the kit was designed the other way, so I had to cut off a bit off the gear wells and doors to get them sit more or less flush. The front landing gear didn't even fit inside its container (not that you could see it, anyway) so I just glued the doors on.

The main landing gear setup was a completely different story. Had I guessed in advance, I'd crammed the wheel units inside the wheel wells before gluing the wing halves together. But I didn't, so I cut off unnecessary parts so that I could insert the pieces with only a modest application of violence. The three-piece landing gear doors went 2/3 on with ease, but as the wheel's scissor-thingy was in the "down" mode it really didn't cooperate with my plans. The frontmost door part would be partially open and look quite stupid. Of course I could claim that my plane was just taking off or going to land and the doors would be "in cycle", but that would smell like an awful excuse kilometers away. Fixing that last part was left for the next session, as you can see in the photos.


Pylons

There was a staggering amount of pylons to be installed under the Hog's wings. Not that I was necessarily going to install much,  if anything, under my prototype plane, because I do feel that the other models could benefit more from the AtG-arsenal available. We'll see how I feel like when I get to that part of the project.


25.3.15

The cockpit area

The Pick a Shade - game

Finally I got to start painting for real. The lightest of greys didn't sound too appealing so I went with the yet untouched USAF Medium Grey (VMA 71120). Simply enough I just airbrushed all the cockpit parts, the insides of the airframe and the parts that can be seen through the canopy. I did my best to cover so much that no observer should see anything unpainted, no matter what the angle - as if anyone could see much through the canopy, anyway.


Rapid fire

After this was done I took a small step away from my comfort zone and sliced off the necessary decals (9) from the sheet. My first stop was, naturally, the back seat, because it's instrument panel only required one decal. The front one took two and they overlapped each other a bit vertically. All three of IP decals were somewhat larger than the pieces they were to be set on.
When I was done with these, I applied the "armrest button banks", all four of them were slightly narrower than the tub's edges, with was handy and I didn't need to swear that much while working on them. And then someone wonders, why I loathe working with decals...


The instructions suggested painting the ejection seats brown so that's what I did (VMC 873 Tierra / US Field Drab), even though the area to be covered looked quite oversized in the instructions. But as my intention was to get this model done pretty quickly*, I didn't stop browsing a mountain of reference material and just followed the suggestion.


At this point it was the time to install the black-painted joysticks onto the floor. When I took the pictures, I hadn't remembered that I wanted to paint a small grey dot to represent the thumb-hat controller and a red one for the trigger. As if anyone could really see those details, either, but the importance is knowing they're there. Then I glued the cockpit tub on the nose part.


To wrap up beautifully I glued this subassembly into the airframe and looped some masking tape to hold it tighter. I know rubber bands would've been much more effective, but I just didn't have any of them handily available.


Coming soon

Next I'll need to glue on the glass panel of the gun's aiming thingy, do the aforementioned joystick details and then I can actually glue on the canopy. And assemble the whole airframe while I'm at it. I was just pondering, if the landing gear setup fits inside the wheel wells in the closed position...

*) My original plan was that if I got this done quickly enough, I could drag it to the Model Expo 2015 - but as time has flown like a headless chicken, it doesn't look too good. At the moment of writing there's something like three weeks to go, but I can't remember when the signup is closed. And yes, I know, you can take WIP models there as well, but but but.

18.3.15

Priming and masking the canopy

There wouldn't really be much more to say about the priming part of the project than "I primed the pieces", had I not thought that the rattlecan I got for the XXIII sub  would've been ok to use. In plain English: I did something wrong and a good amount of the applied white primer just flaked off the model when I was going to proceed to the next step.
So, now I had to reprime it with the airbrush, which is a bit slower but at least it's much more reliable in my hands. I don't intend to repeat my mistake anymore.

To get something more concrete and slightly more display-worthy I covered the clear canopy piece with masking tape. Then I traced along the lines with my x-acto knife and tore the excess crap away.

It went better than my attempt at masking Stuka's canopies
When I primed the last parts (top surfaces of the wings and the end of the airframe) I course primed this piece, as well, instead of waiting for it to be glued on. After a bit of good old-fashioned googling I should be aware of which paint to use for the insides of the cockpit and if I need to pop by my royal supplier of paints. Which would be a shame, right?


11.3.15

Hogstruction

Action!

After a few weeks of not modeling I sat down and dug my tools into pieces of plastic. Because doing everything always the same way, in the same order is boring, I took a slightly different approach to this protohog. To make painting and decaling supposedly easier I decided, that the cockpit would be completed before it was taken off its sprue. Only the joysticks I skipped at this point, because they'd be only in the way of just about everything.

My idea was this: attach the seats, attach the instrument panels. The next time I'd prime it, the following time do the decals(!). After that nothing would prevent the sticks from being installed and this important subassembly from being crammed inside the airframe.


Initially I was almost gluing the bottom part of the cockpit / front landing gear wheel well under the cockpit setup, but then I figured out that it'd be much smarter to glue that part onto the GAU-8 piece instead. This way it'd be already aligned and when inserting the cockpit interior it'd be a classic plug and play operation. In t he second photo the aforementioned wheel well -setup is curing and being aligned inside the airframe, without being glued onto the airframe part yet.


To finish up my short stint I glued the wings together. Those pieces were hell-bent on grimacing like the Joker himself, so I pegged them down. In these cases I trust those much more than plain tape, based on previous experiences.


The plan

In case my order of assembly seems confusing, my idea is and will be to make the priming as easy as possible, as far as the model assembly is concerned. The simplest subassemblies that can be primed with the fewest painting sessions. As the airframe's top and bottom parts will require two sessions in any case, I can't get better than that, but I shall work on making those then only ones taking that many. If the rest are done with just a single spraying, I'd be a happy camper.

4.3.15

Project II/15

The prototype master of night and crappy weather

From the two available hogs I chose to begin with the funny prototype. That's the N/AW ("Night Adverse Weather") A-10A, a two-crew version modified from the normal Warthog everyone knows.


There's a boringly gray flying thing on the box, then the painting part of the instructions seems to suggest a really dark surface. Of course as we're talking about a proto, it could be painted bit more hysterically as well, but I guess talking about the paint scheme would make sense when the model itself is ready for it.

My building blocks

I got really surprised when I was looking at the sprues and pieces included. It's got something like twenty pieces and the largest pieces of the plane are cast as single parts. Maybe the biggest surprise (I keep repeating myself: I'm not a plane modeler) was that the airframe wasn't split in two along the lenght-axis, but the whole frame is slapped on the bottom wing-setup. Exciting.


Everyone's most interested in seeing how the GAU-8 is modeled in this model. Or at least I was interested in it. There's the business end, in the middle of the last photo: one piece. Considering the scale it's more or less the size of the pilot's head, if not larger.
As long as I don't go overboard and paint it shut, it'll be just fine.