Again we're looking at a Metal Earth Models kit. As I bragged earlier this year, I got this AT-ST kit as a birthday gift and to honour that I took it up next before the pitiful remnants of my work queue.
As before, the envelope contained two sheets of pieces and just like with Megatron the instructions were surprisingly long. Maybe these newer sets just have more detailed instructions, not more complicated models? That's at least how I felt: less guessing and more seeing.
This would be lots of fun, doubtlessly! I could only hope in advance that I wouldn't ruin my thumbs totally. Let's suppose I got wiser. But don't bet on it :p
Maybe slightly and gently wisened by a couple of MEM kits under my belt, I didn't follow the exact order of the instructions that strictly. That means that I didn't bend all the main components shut but first attached the greebls and whatnot and only then boxed them in. That made things much less aggravating as I had more space (and I didn't need to open the leg bit just to have the space to tighten the seals of the greeblies). And maybe this time I'd remember to triple-check the alignments so I wouldn't have to undo bits misaligned by 90° or 180°.
While assembling the tiny discs on the sides of the knees I managed to draw blood. As the depth of the discs came from a rolled up strip, that when closed had two of those attachment lips poking from both ends. I was holding the two-piece hamburger standing on my thumb, pressing the disc on the cylinder so that I could bend the parts to seal the connection. Maybe I pressed a tiny bit too hard as I got the damn thing into my thumb. Sigh.
Assembling the first leg took just about 40 minutes. The second one took a nice bit less, not that I paid much attention to the clock.
Sometimes the already built pieces took so much space that closing the remaining attachers wasn't as nice and clean as I would have liked to. Mostly I just bent the bits flat, but in a few places I decided that twisting them would make that much of a difference in the connection's tightness (and would not require space that wasn't even available). Wherever I didn't have the space for more than a twist, I had to be very careful not to scratch the neighbouring surfaces while poking around with the tweezers.
The legs that got attached to the hip complex ended up in a very masculine pose on just on their own. I had to bend them shut quite a bit when I was attaching the feet to the baseplate. Nothing squealed or snapped off, so I wasn't concerned for the durability.
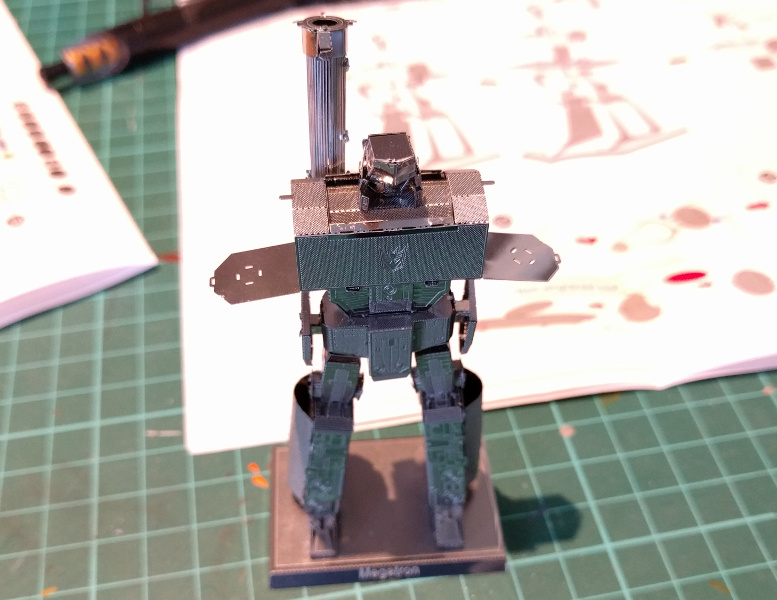
Based on the photo below someone could imagine that I was working on a Rifleman BattleMech. But no. And for some reason after this part I was led to work on something completely different.
Gunnery
I got to build Megatron's gun form's barrel now. Rolling up the tube went pretty well even if I said so mayself, it actually looked round. I almost did the barrel's end piece wrong but noticed that it was going inside out, but I noticed in time. The biggest problem was to get the end piece to slide over the whole barrel's lenght without getting caught on all the protrusions along the way.
The torso
In another surprising move the next part was the torso and the head. Megatron's hatholder proved to be quite a lot more complicated than what I had expected. Still, it didn't cause any problems and allowed itself to be built very nicely.
After the head was done I built a support structure for the gun-mode's barrel and installed that one on the right shoulder blade.Then I attached the head itself and finally the whole chest unit on the hips. All this was pretty quick and problem-free.
Gunnery, pt II
At last! The scope of the gun-mode was the awesome arm-mounted cannon of the robot-form. Somehow, being too excited I assume, I managed to do something wrong. That funnel-shaped piece was supposed to have the grooves on the inside, now it wasn't. It was actually quite curious that all the tubes were sealed with solid bits and there were absolutely no surface details on the arm cannon.
I had decided to use my own judgement regarding the instruction's working orders to make my life easier. The instructions suggested, again, that the box would be mostly closed (3/4 pieces bent to their final positions) before attaching the other pieces on the box. That was always so very complicated in a very restricted space, so I've taken the habit of attaching the details first and closing the boxes when all the essentials were done.
The paws
The arm building took a fairly good amount of time, thanks to the greeblies and details. What I had feared the most were the fists but they were just about the easiest part of the arms in the end. Again breaking some patterns the right arm that I built first was much quicker than the second one, most likely because it had less extra bits thanks to the arm-mounted cannon. This way the right arm needed less extra bits than the left, empty one.
Yet again I deviated from the guidelines to keep my own sanity levels high (or at least trying to do so). First I installed the cannon on the right arm and only then did I attach the arm to the torso's side flap, which was obviously closed up last. At least this sounded better and less annoying to me. Installing the left arm was just as quick and easy as the right one. And see, Megatron was completed.
He ended up pretty coo. Nicely I didn't leave many fingerprints, which is mostly due to the textures on the surfaces which didn't grab as much crap as the smooth, flat surfaces. This robot was pretty sizeable, which is something that is much easier to notice with some comparison shots. The traditional half-an-euro coin was there to provide the perspective.
My long-ago gone birthday had provided me, among other things, a couple of Metal Earth Models sets. The first one was the awesome leader of the Decepticons, Megatron. You may have guessed that I was quite beside myself!
The envelope with its bits
As we've become used to, the envelope contained two sheets of pieces to be bent until my neck got stuck and the air was filled with profanities. Typically a G1 Transformer, Megatron was pretty angular, so I wasn't going to be too frustrated with round shapes. The cover art Megatron was in a pretty silly, zombielike pose, though .I hoped that the left arm could be repositioned a bit at least.
Sea of instructions
This set differed from the Star Wars models by its instructions. There were a total of eight pages of them now! Based on a quick skimming, nothing too weird was to be expected. Good, good.
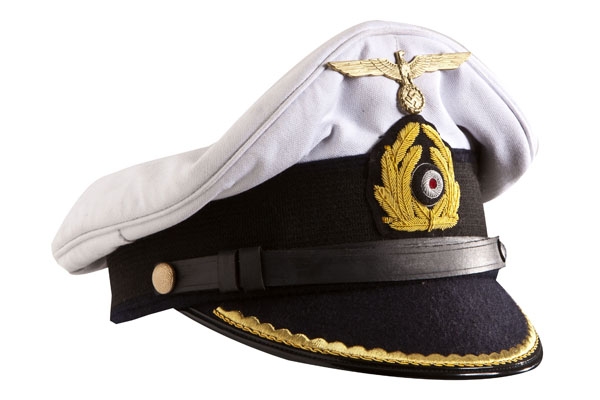
The captain was completed as soon as I had painted the Reichseagle onto the top front of the hat. I didn't go for the stubble after all. As a finishing touch I went over the whole guy with Vallejo's satin varnish and then, after a decent curing time I did the binocular lenses and some splash-like surfaces "beaming" from above with gloss varnish. The result was pretty neat.
Lastly I took a few silly photos of the cap'n on his command tower, observing the seas. The tallness of the edges managed to surprise, as you could see surprisingly little of the guy.
I started painting the skinny bits again with a coat of chocolate brown (VMA 70872). On top of that I applied an almost as covering layer of dark flesh (VMC 70927). Finally I painted a bit lighter but still not entirely dry brushful of medium fleshtone (VMC 70860). This recipe had worked just nicely on the Deutsche Afrika Korps guys, so why not again?
I happily gave this guy a white sweater that'd bring some variety on the otherwise dark figure. Generally I used this pic as a reference, because I thought it looked amusing enough. There was no way I could get such an expression done, but one can't have everything.
What sort of a face would I like to show around?
After the skin was done I did the eyeballs with two tiny droplets of white in both eyesockets. Then I dropped an even tinier droplets of non-aryan chocolate brown for the eye colour, managing to achieve a really suspicious look on his face. I also did some buttons on the coat, again looking at the ref pic, using old gold (VMC 80878). Six out of eight got to the photos. There were no other markings to be done on the coat.
Put on your hat, man!
Lastly I attacked his hat. I painted the lip, the brim and did a larger round on the forehead part with black (VMA 71057). The rest I painted white (VMA 71001) to add another layer on top of the white primer. A bit later I scribbled some leaf-like things on the front edge of the visor(?) and a wreathlike thing on the round bit on the front of the hat. In the center of that I attempted to paint the roundel by dropping a drop of white and then its center another, smaller droplet of red (VMA 71085 Ferrari Red). For examples and inspiration I had found this photo.
While I was typing this up I noticed that I had forgotten the Reichseagle from the hat, so I had to add that sooner rather than later. I had also thought that I could maybe attempt to create some sort of a beard's shadow effect on the face, but I wasn't sure if I dared to.
Apparently my evidence recording conventions have got weak lately, as I almost completely forgot to take any photos of the puttying and sanding stages. Not that there was much to see, but the principle is what concerns me. What I had done was that I had applied an amount of Tamiya's putty to cover the insane gaps and rents and then sanded away the worst lumps.
After that I had glued his arms on in a "I just lowered my binoculars to look at something with my own eyes" position, or that was what I was aiming for anyway. Again I puttied gaps and after letting it cure over the traditional 24h time I sanded the excesses away. I even glued on the head, even though it may have been a bit easier to paint off the torso. Being a bit paranoid I decided that I'd paint it on its proper place to avoid making a fingerprinty mess by accident or plain carelessness.
Airbrushing
Now I primed the guy and his unattached hat with Vallejo's White Surface Primer. Then I proceeded to blast his pants with Panzer Dark Grey (VMA 71056), his shoes or boots plain black (VMA 71075) and finally his coat department with German Grey (VMA 71052). These colours were chosen by my googling results.
All the rest I'd do the old-fashioned way. I am completely and totally aware of the fact that no marine historian would accept this coat as a correct one, but I was looking for a long coat that could be called a raincoat of a U-Boat commander. At this point I was already thinking that maybe with a creative use of varnishes I could get a neat splashed wet effect by first using a satin varnish and then using some gloss varnish on the splashed on surfaces. Maybe.


