Mastodon

15.2.17

Working on the basics: the Russian Green

A very multistaged basecoating phase

Following the priming piece by piece approach I also painted them green, applying the same method. So far I had been following the idea of the kit's painting instructions. My pretty obvious choice for the colour was the Russian Green (VMA 71017 russian green) that I used on the Stalin 2 tank a bit earlier.

The framework and the engine

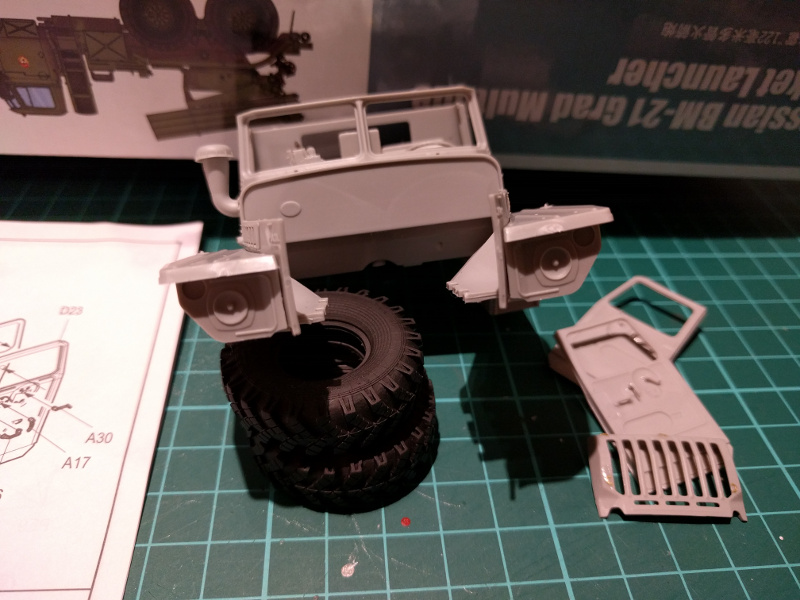
The Ural's truck with the cabin ate an eye-watering amount of paint, especially the bottom that would be mostly hidden from sight in the end. I started working on the engine compartment, the nose and worked my way through to the halfway point.

On impulse I dug out a bottle of a bit more vivid green (VMA 71093 field green) just to add a tiny bit of variety and airbrushed that into the engine compartment and the insides of the cabin. After that I airbrushed the engine grey, based on some googling (VMA 71050 light grey). At this point I realized, chiefly thanks to the photos, that the engine room was actually missing a load of stuff and was pretty empty. That didn't make me go all "well, I'll scratchbuild them while I'm at it, then!"

Based on some strange internal process I decided that the engine should be grey when viewed from below. While doing that I also sprayed the gearbox and most of the driveshaft parts with grey just to make them look distinct.


Extras

The friends of the cabin, or better known as the doors, front grille, roof, hood and the spare wheel rack (and the hub) took two painting sessions a piece as they'd be seen from both sides in the worst case scenario. This took quite a bit of time, because I didn't dare to paint the flipsides while the paint was still wet or not totally dry at least. In hindsight taking a couple of tactical sick leave days would've helped the progress quite a bit :p

(No, I don't do that for real)


The M-21 Field Rocket System

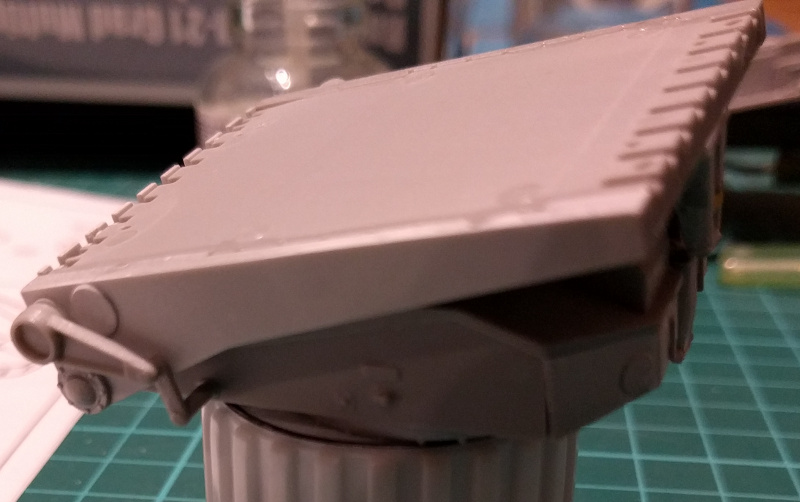
To the back of the truck I had built a platform-like thing + mudflaps, on which the launcher would be installed. Again I painted the top and bottom sides on separate sessions just in case. I also left the decoration of the rear lamps for a much later stage, of course.


The launcher itself got painted and started looking decent. Thanks to the shadowing (and my own tiredness) I had to touch up the tipside one extra time.


Before I took the photo above I had already gone and painted some details of the panoramic telescope and the controls with flat black. Yep, it really started looking like the real thing.

Cabin detailage

Thanks to the approach I had chosen I detailed and weathered the cabin's interior at this exact point in history. By the time I got to the next phase I really couldn't do much about it anymore, or at least as easily. I painted the cushions of the benches with simple brown (VMA 71041 tank brown) and their trimmings with a different, lighter, shade of brown (VMA 71038 camo medium brown).

Then I went through the faces of the dials with black (VMA 71057 black) and later poked at them with the tip of a paintbrush just barely loaded with white (VMA 71001 white) for the markings - as if any of this could be seen ever again through the roofs and doors. While I was playing with the black paint I also painted the engine's radiator so that you could maybe see a hint of it through the front grille.


After I was done with the blackness I iterated my way through the pedals, sticks and the steering wheel with grey black (VMA 71056 Grey Black, nowadays also known as Panzer Dark Grey)


8.2.17

A multiphase priming process

for thing in things:

As I've mumbled many a time, I had decided to take care of the painting and final assembly a bit more complicatedly than usual. The hulk of the Ural was already weird enough with its structure (to someone like me who's very used to the sleek and clear lines of Panzers), so I decided that I'd save my few remaining poor hairs if I painted all the main subassemblies separately and only set them together when they weren't overshadowing each other while painting. Some guru could've painted everything perfectly on a fully assembled BM-21 but I'm just a nonsense-class amateur who does this for fun, so I chose this route.

Of course I had to do all this in many sessions to achieve the cleanest results. I started by setting the smallest bits on masking tape strips so that they wouldn't fly around under the air pressure coming from the airbrush and so that I wouldn't have to fight with my fingers being on the way, either. On the first session I painted one side completely and the next evening I flipped the bits around for the remaining sides.

The spare wheel rack I painted 90% on the first go and then just fixed what had remained obscured. This bit was a very simple thing to paint and I guess I could've glued it onto the chassis but somehow I had the idea of it ending up being on the way or something being blocked annoyingly. So out of convenience I did it separately.


The bulkies of parts 

The truck itself was just insane. Especially with the power transfer system that was blocked by the frame and, well, absolutely everything on the bottom. They were casting shadows over each other and were generally difficult to reach. I couldn't leave them untouched so I spent a huge amount of time in preparation and going over things with the airbrush multiple times just in case.

In the end the truck took two very long priming sessions, of which the first one was the more complicated one by a long shot. I started with the engine compartment, of course, and the nose area in general. When I had painted my fingers into a corner, also known as the rear axles, I left the model to dry overnight. Then I finished (and did some touching up) the rest the next evening.


The carriage

What remained was pretty simply painted. Luckily I realized at this point that I'd actually want to paint the core of the spare wheel as well, so I quickly detached and cleaned the halves and took them onto the painting station. Again I took care of the priming process in two stages, especially as the tubes ate paint like a starving wild beast. I also had to leave some parts clean to avoid those annoying "wet paint got stuck here" effects.


1.2.17

Sub-assembling

Progress

To begin the assembly I glued the cabin into the framework. It settled in pretty decently. I chose to leave the front grille off still so that I could paint the engine compartment somehow nicely. The best result would've been achieved by painting these separately as well but that would've led to the glue-paint mess and I really didn't want any of that if I could avoid it.

While the cabin's gluing was curing I assembled the exhaust pipes and then glued these rather complicated setups into the framework. Those holes I had to drill ages ago were very well positioned and of the perfect diameter so I didn't get any more grey hairs while installing.


Then I proceeded to the spare wheel rack. The instructions told to use a bunch of PE stiprs to hold the wheel in place. That didn't appeal to me as I wanted to keep the wheel off for a good while still. So I used a couple so that I could slip the wheel in and out without a fight. The rack itself was neat.


A tactical choice

I decided to build the next few main subassemblies separately again instead of blindly following the instructions. Again I'd first assemble them, then prime them and basecoat them all separately. Only then would I put them in their places and attack the truck with some sort of a camo. I was thinking of checking how the Ukraine-invading Green Men looked like. Or I'd just paint some kind of sand-coloured bands to break the form a bit.

Following these guidelines I had just made pu I left the wheel rack on its own and continued on the next piece. Not that I could tell you what the function of this one was, but I can tell that it had boxes on it. This'd be located just behind the wheel rack, below the rocket tubes in the transport mode.


After the mysterious box setup I finally got to start working on the final missing main component: the M-21 Field Rocket System. I had been waiting for this for a long time, a long time, as this was going to be the crown of the whole model.

The base of the launcher, the system that controls the traversing and elevation of the launch tubes was fascinating. It had plenty of space to adjust the position for the pieces, but as you can see in the first photo below, the elbow joint locked the launcher's vertical angle when it was glued together. I was boring and left the elevation at its lowest setting, so it would look ok in the transport mode as well as in a firing position.


Some plumbage

With my experiences so far I was somewhat scared of how long I'd spend working on the 40-tube launcher. Cleverly the launcher started being formed with three 8-tube rows, with each tube getting a rocket's tail end glued in. Of course I could've left some of them open for a partial load, but I went with a full loadout so that it wouldn't run out of rockets that quickly. A fully armed and operational vehicle, just the way I've always liked them.


Then, on top of the triplet built earlier I built another almost identical 8-tube row, the only difference were the missing top attachment points. After that, to hold the packet together from the sides I built two 4-tube rows (or columns in this case?). I was honestly surprised by the sheer weight of this tube setup as it was actually a bit on the heavy side.


As soon as the glue had cured I attached the launcher's tubes onto the elevator mechanism and then added the last missing decorative and supporting pieces around the tube pack. During the next evening I built the last missing parts, which included the traversal and elevation controls and the PG-1M panoramic telescope that's used to aim the thing. Now I was a bit disappointed that there was no K-1 collimator for those who are into dioramas... That piece could've pushed me over the edge.


That was it, I think. Next I could start priming this monstrosity for real.

25.1.17

Cabin fever

The cabin and the controls

Last time I got just about finished with the framework, this time I glued on the last missing pieces. That included the steering system's attachments to the front wheels, both of which were three-piece monstrosities but attached very nicely to the wheel cores and as expected, locked them straight. That wasn't an issue as I wasn't planning on doing a diorama.

After all this tiny stuff it was nice to get to do some broader strokes, so to say. I assembled the seats to the cabin. Of course the pedals were tiny, but not problematically so.


You couldn't really tell by the photo, but the back wall of the cabin was built out of two pieces. Luckily the rear glass pane (and all the other glass panes int this kit) were to be installed from the outside, instead of being sandwiched between the wall pieces. This allowed me to leave all the windows off without a care until I was done with the painting. And I didn't have to mask them both in and out, either.


The driver received a very flimsy-looking steering wheel, a handbrake handle, the gear shift lever and the aforementioned pedals. That stick that was installed in front of the map reader didn't really say anything to me, but I assumed that it had something to do with the rocket launcher's controls. That or the Soviet view on user (driver) ergonomy was on par with the British one...


A ridiculous number of tiny knobs, dials and PE bits were to be installed on the dashboard. Luckily I had no fitting issues with them and each settled in perfectly. There was also a decal for the dashboard but there was no way in hell I was going to use it here.


A curious control box was to be installed on the middle of the dash, just in front of the middle beam of the windshield, I guess I could've built it open but I went with the instructions and left it shut. There was also a complicated setup that was installed on top of what should be the glove compartment, in front of the map reader. I assumed it to have something to do with aiming the rocket launcher itself.

At this point I decided that I'd assemble the cabin as far as I could without severly crippling my ability to paint its insides, so I was going to leave the doors and the roof off for a while still. My idea was to minimize the amount of shadows, considering the paintjob, but also to minimize the post-painting gluings. Maybe I found a good balance point and maybe I just cocked it up, we'd find that out soon enough.


Getting outside

At this point I was quite pleased with the two-part setup for the doors. Thanks to my strong pareidolia I was very amused with the right end of the inner part of the door, as I saw an amusingly horrified face.


Before anything was too far done I dry-fitted the doors into their slots (so I'd see if something was skewed wrong) and just for the fun of it I laid the whole setup on the framework. It actually worked nicely, this'd go well in the end.


I really have to say that I liked the emount of details in the Trumpeter kit, but damn, did it make my progress slow. While gluing the different handles and levers to the doors I was thinking that I had worked on the Ural truck for over a couple of weeks, on and off, at my usual pace. No, this was most definitely not a "shake the box and you've got an assembled model in your hands"-like Tamiya, not by a long shot. But what's more fun than a set that offers you plenty to do?


I guess the lightning bolt shapes in the doors were to make the beast a bit faster-looking?
I managed to get the front bits of the truck, or the engine compartment's walls for the general public and the front fenders with their lamps. I didn't glue on the engine grille as I thought it'd be better to set that one in place when its attachment points were ready. Of course the instructions suggested gluing the transparent bits on at this point but I'd leave them until I was done with everything else.

Along with the rest of this I also glued on the previously ignored snorkel piece and a couple of climb-on handles to the back of the cabin. The side view mirrors I left for a later, safer moment, as I assumed that the installation of the cabin on the framework might end up being more violent than necessary. This way these flimsy-looking bits would not be in danger of being cracked off accidentally.


18.1.17

The Truck Framework 1.0

On the unknown roads

Let's get this confession out of the way already: I have never had a clue of the mechanical side of cars (normal ones, vans, trucks of any sort, armored ones). Or I know the basics, that they typically have a motor, a gearbox and some wheels - if we're talking about a rear-wheel drive, there's also an axle taking space from the feet of the passengers. So if I keep talking complete and utter nonsense during this project, the reason is and will be that: I just haven't known any better ;)

Framework work

I started assembling the Ural 375D by setting up the ladder-like structure that forms the structure of the whole vehicle. Between two C-shaped steel beams I attached some support pipes / tubes and a monstrosity that I assumed to be the radiator. I started swearing about the instructions at this point already: the layout (or the placing of certain bits) wasn't too clear and I was on the second step.... The pieces themselves didn't "speak out" either.


Next I started building the first surprise of the kit: the engine! I was actually a bit shocked to find a detailed-looking engine straight out of the box. Judging by the angled pieces on top I thought that it's a V-8 to top it all (wikipedia confirmed my guess). I did remember that the Kraz trucks (KrAZ-255 which were given to move some field guns) that I had seen and heard go by had a very fuel-hungry V8 petrol engines, but I guessed that the Ivan used those kinds of engines quite a lot in general.

But I digress. While looking at the round bits that can be seen in the front of the motor I was pondering if I should fetch some thread or play with masking tape a bit to set up some narrower or wider belts as a detail. Then my eyes picked up the PE# markings in the instructions - they had provided photoetched bands. What in the Empire?


The gearbox was a simple box. Attaching these two into the truck's framework was a show of its own but with some swearing I got them settled in nicely.


That huge block that had appeared behind the gearbox was some sort of a power-transferring thingamagick, as some axles were going to be inserted into it going both forwards and backwards. My guess is that it had something to do with the front-wheel drive / six-wheel drive, but how was it called for real? No idea.


Next I got to build something that had to do with the differential locks or whatever those were called again but as far as I knew those things allowed the L/R wheels to spin independently or forced them to go in sync (and the point and usefulness this I learned from the relaxing and amusing Spintires). There wasn't much to say about the plastic bits, they settled into their places pretty decently, the only parts that gave me some business were the axles, mostly because they went over and under random other pieces and the instructions weren't too clear on the routes.


More mystery pieces in the photo below (going from the wheel axle bits towards each other to the center of the cradle). I guess those tiny, flimsy bits were just for some support or something, if nothing else.


After these I built some rack-like bits. One of them was the fuel tank and the other one a mystery box.. My money was on either a generic toolbox or a handy setup for some external electric connections. But this was guesswork and I wasn't curious enough to actually as google for the secrets of the Ural.


The front axle had a similar bin for the differential system, just like the rear ones. This one required an axle for the drivetrain and again my biggest issue was to figure out which route the axle was supposed to go over, under and between the other pieces.


After all that was done I got to build the cores for the wheels. There wasn't anything strange about the four rear wheels but these front wheels were more special than that. First of all there was a free-moving bit to be sealed between the inner and outer halves. Then the inner half needed some pieces, two of which I assumed to be related to the brakes and the third one was very obviously for the steering bits to attach to. Those caused me a bit of worrying as I couldn't know at this point if it was impossible to say if they were set at correct angles. Of course I could always force them in place later on, but I much rather avoided that.


Had I been planning on a diorama I'd praised the articulation possibilities of the front wheels even more than I did. Of course fooling around with them was amusing, but I just assumed that they'd end up being locked tightly straigh ahead in the end. Which wasn't that much fun, if you asked me, but having them actually articulated... urf. That'd been hair-rising.