Mastodon

22.8.18

Finished: Project VIII/17


Sienar Fleet Systems

TIE/sa Bomber

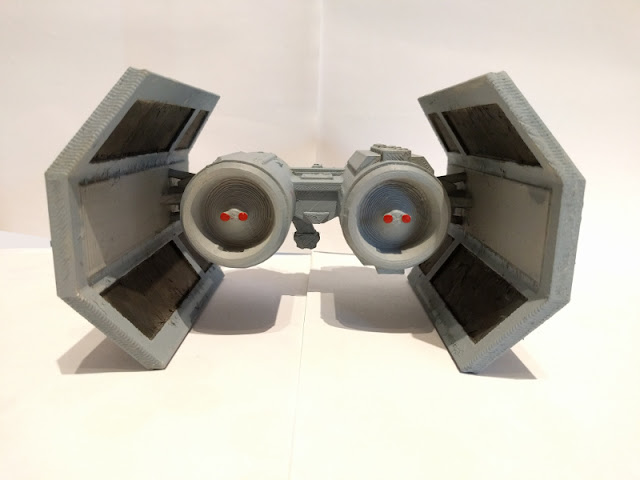
To be honest, I cannot recall ever seeing this TIE/sa marking anywhere else but the wpedia, everyone else has always talked about the TIE/B or TIE Bomber. All the same to me, now I've used this marking as well.

I took a bunch of photos from different angles and as usual, applied them below. The next day I brought the model back to the office and proudly presented it around. Confusingly few people recognized it, but as the hit percentage wasn't a flat zero, I couldn't complain much.

With a very little coercing I ended up promising to show the Bomber and a couple of "real" models one Friday afternoon at the Tinkering Club. Their response was somehow staggering in its positivity.


15.8.18

A sickeningly quick proto-paintjob

My first thoughts had been to clean up the model and so on. But then I thought, why bother being fancy with a prototype? Especially, as I didn't have a clue of how this material would behave with the paints or anything.

Primed

White Vallejo sufrace primer, what else could I say or describe? Same, same. I just sprayed it on and enjoyed the whiteness.

Airbrushed greyness

Just for simplicity I started by blasting Vallejo's USAF Medium Grey all around (VMA 71120) and then dusted it a bit with the USAF Dark Grey (VMA 71123) for some hopefully subtle variety. Then I  attacked the solar panels with a bit of some of a much darker grey to make them stand out more.


The paintbrush approach

Later I thought that maybe I should do the most visible surfaces again, with a thicker layer of paint. In this case losing even some of the model's surface scruffiness would only be a good thing. To protect the command pod's viewports I applied a bit of masking tape before blasting it with a dark grey, just like what I did with the solar panels. These pics below are from the "just before removing the masks and actually taking the paintbrush in hand" phase.


One final round for the detailings

To wrap this one up I applied some Citadel's black wash (Nuln oil) on the viewport transparisteel bits and the solar panels. The double sticks in the rear parts of the pods I painted red (VMA 71085 Ferrari Red) and then I used some plain black with a piece of a sponge to mostly-drybrush and dab at the port of the missile/rocket launcher and its details that always have made me think of exhaust redirection vents.

As soon as the paints had dried I applied some semiglossy varnish on the black-washed pieces (Vallejo 70522 Satin Varnish) because that one looked more natural than the wet-looking gloss varnish. In this case the result wasn't optimal, as I think that my varnish had gone beyond its best before date already. Some of the photos still showed the effect, which was good enough for a proto model.


8.8.18

In the footsteps of sculptors

Aiming at perfection

"Perfection is achieved not when there is nothing more to add, but when there is nothing left to take away." That was said by some pen-spinner back in the day. It sounded like it fit this moment perfectly, as I was just ripping off extra crap that had no place in my model.


A closer look. Too close.

I took a couple of photos of the model. Looking up close the printer's resolution on these settings was pretty obvious. I showed a file at a couple of the corners, but then decided that the prototype wouldn't actually need to be slim, sleek and smooth. This'd look decent when observed from at an arm's lenght :p


1.8.18

Project VIII/17

[edit] Yeah, I know this postset is coming out almost a year after I had this one done, I just didn't want to intermix these with the T-35 posts, in case I ran out of stuff to say before I had time to work on something more reliably again. 2018 is, has been and will be a bit of a weird year for the 'Mumblings

Hello from the 'labs

I had heard of (and seen) a couple of months before my first workday, that my new workplace had a few 3d printers. My first idea was obviously Nemesis the Warlock's Blitzspear but I just couldn't find a model of it. Well, someone sold a file for 80 USD but that was a bit too much for a silly test. And I really had no skill nor experience with any 3d modeling software. From a different universe - Farscape - Moya and Talyn did raise lots of interest but then I somehow remembered my often-repeated complaints about how there have never been TIE Bombers as scale model kits...


From plans to action

I consulted a colleague of mine who played more in these circles and on a half-rainy early-autumny Thursday afternoon we went and pressed the "print" button. The slicer thought after a bit of rotating, setting up and setting-adjusting that it'd eat half a day.

This was what a single extruder would take, the moarxtruder that had still been installed a week before would've been noticeably faster (with worse resolution) but what can you do? As the quality settings we opted for the normal ones, not the fast or the best details presets. Because of the funny shapes the Bomber also required a check in the "all supports" checkbox and of those we went for the volcano-like shape of supports, as the model itself had such a tiny footprint.

There was a handy webcam view where we could check if the damn thing even started working. Oh yes, it did, oh yes.


Hurmh.. About three hours later there were still over 12 hours of printing time left.


A four-hour checkpoint

On my way home I popped by the office to check how it was progressing. Slowly. Luckily I (nor anyone else) didn't need to stay to oversee the process.


The Friday morning experience

As usual, I was pretty early at the office. This time I didn't start by making coffee but went to check the webcam feed from my 'puter - for nothing. The device claimed to be done, the temperatures were down and because the room itself was dark, the image feed was pretty much useless. So I ran to the printer, again passing by the coffee machine rapidly and unnaturally.

I may have made a bwahahahaaa-like sound when I found my print. It was both larger than I had expected and also lighter than what it looked like. Cleaning up all that support framework did sound unfun, though.


25.7.18

Finished: Project VII/17

T-35 "APTEP"

Specification

The T-35 itself was of model 1938 and in nature it weighed 45 tonnes. It was 9.72 meters long, 3.43 meters high and its armour plates were 10-30 mm thick, which couldn't have been worth much even back in the day. With its V12 engine this ugly beast went tops 30 km/h for a maximum distance of 150km, I'm boldly assuming that was only under optimal conditions. This beast required a crew of 11. For its 76.2mm main gun there was a set of 96 grenades, for its 45mm guns a total of 220 grenades and the 7.62mm LMGs had 10 080 rounds (about two thousand per piece of hardware).

Engineeriness

I had mumbled about the idea and the background of the tank before I actually started on it, so I'll spare you from that bit of repetition. Instead, let me present you some numbers!

Over the duration of the project I published 23 session posts, each containing 45 minutes of doings on average. A huge amount of those minutes, as I have mumbled before, was spent on context switching, also known as getting started and winding down, in addition to some random interruptions by the project assistants. So: 23 * 45min = 1035min / 60min = 17,25h which turns into... phew... Over two full workdays without lunch or coffee breaks.

Despite the monotonic tank colour and the total lack of camouflage the monster ate about a dozen different types of paint and paintlike substances and three types of glue. I meant to use two out of the decal set (the rest were mostly plain white stripes) but as the second red star went into a roll, I threw them both away. Zero percent success there.

I guess I could've laid out some wiring / cables for the lamps, but I went OOB instead. The star-shape on top of the main turret could've been painted somehow, but as I didn't find* a single useful reference photo of it, I let it be. That's the way I handle stress :p

*) not that I spent ages searching, I gave up easily as the tank was obscure and not too many were produced

About the kit itself

All in all Zvezda's T-35 was an interesting kit to build. Somehow the bits demanded a huge amount of cleaning up, which then caused the assemblage to be slower than something like a Tamiya or a Dragon kit.

The bits fit all nicely, there were no serious fitting issues, only the deck of the tank caused some problems, but I fear that as it was the only one, the fault was mine alone. Generally speaking the build was straightforward, the most obscure and stability-wise the most dubious one was the bottom of the main turret, that consisted of odd strips and to my great surprise worked out just fine. The other turrets would've wanted a clamp-like piece to keep them in, but to make my life easier I just ignored those.


Imagery

Following my own silly traditions I have left the usual "all around the model" photos also now as the thing's officially done. During the project I've taken so many dry-fitting pics because the tank's so amusing / odd / weird, that the excitement of seeing it this way may have worn off for the reader.


A meta moment on one Thursday afternoon

When I started taking the photos above my main and first problem was, that I didn't know where to take these damn things. New (to us) home's problems, say. The hardcover Jeff Smith's "Bone" One Volume Edition inspired me to take it up for rereading. Jumping off the topic, I hereby officially give it the readability recommendation of the 'mumblings!

11.7.18

Session XXIII

The final touch for prettiness

I went through the metallic bits of the engineering equipment with a black wash (Citadel's Nuln Oil). After that I finally glued the glass plates on the front lights. All this took about twice as long as it needed, as my younger project assistant decided to come to assist me.


Stupid as I am, I tried to apply the red star decals to the skirt armor plates, but the second one was torn useless (it also went all boiled spaghetti and folded itself under its own self and I got pretty well pissed off). At least I got the first, the perfectly aligned one, off and to the garbage. Damnit.


I. Loathe. Decals.