Mastodon

6.12.23

Finished: Project II/23

The personal BattleMech of the Arcduke of Arc-Royal

First things first: my memories and knowledge of the co-founder of Kell Hounds were mostly based on the Classic BattleTech novels I read in early 2000s that told the main storyline. Of the Inner Sphere side, I've only read the Blood of Kerensky -trilogy multiple times, but I was going to get to reread the Warrior trilogy soon enough.

During the Clan invasion Morgan Kell didn't seem to spend that much time on the battlefield (excluding the Battle of Luthien, of course) as the stories concentrated more on the next generation. Somehow I had this idea that such a big shot, mister-sir colonel was mostly operating a propaganda-worthy 'Mech. Pretty often the artwork of 'spheroid 'Mechs had lots of personalizations like graffiti, victory markings, catchphrases and whatnot. In my opinion those didn't suit this character, which is why I painted this mini as a "pure" Kell Hound.

I felt that the cockpit effect worked pretty nicely from a certain point of view - or some points of view, even though it had its issues. The next ones would be better again.

ARC-2R Archer Morgan

The original stock-set ARC-2R had been updated during the Clan invasion with some Star League and tech stolen from fallen Clan Warriors. Its LRM launchers were relaced with Clan LRM-20s with the fantastic Artemis IV fire control system, single Heat Sinks were replaced with doubles, which freed up space for more armour and missiles, CASE, and for an Active Probe. None of this was visible outside except for the CASE panels, so all this was just for backstory purposes in this project.


One thing I was wondering, how didn't they replace the Diverse Optics lasers with Clan-sourced ER Lasers. Perhaps the greatly improved LRMs with Artemis IV were a performance leap enough.


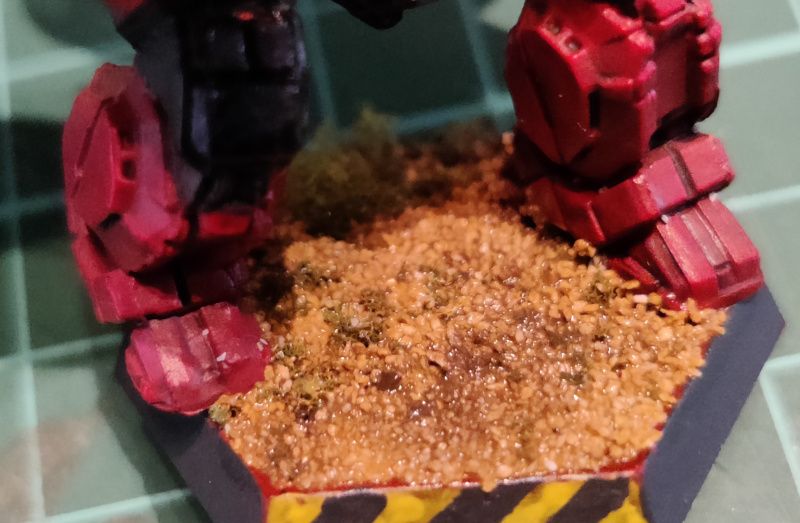
This hex base looked neat. Maybe I should repeat the same process a couple of times in the future to be sure.


That was it, of course I forgot to actually check how much time I had used, but I didn't think it took even three hours of active work time. I wrote up five process posts, in the calendar I think it spread over seven different days.

Taking and editing this handful of photos didn't take much time either, less than an hour in all. My original guesstimate was that I'd get this completed within a 7,5h workday and I ended up using about half of it. In a way it was funny to think that one single miniature took a bunch of hours, but on the other hand maybe I've moved forward from the time when I managed to build, paint and (badly) photograph a Ju-87 in one short evening... Hopefully the end results have improved since that.

29.11.23

Lasers, Viewports and the Hex base

The fine-tuning stage with fine details

After the oily weathering sessions the Archer had been sitting in a dry and hopefully dustless place for a few days. Now I only had a couple of quick, easy but for an eager person very time-consuming details left. Being an amateur and otherwise quite unskilled painter, I wasn't going to spend hours on the lenses and their jeweling effects. The same method that I used on the Assault Star was going to suit this as well.

Lenses on the Lasers

I had four pieces of Diverse Optics type 18 Medium Lasers to paint. Two of them were in the Lower Arms, according to the lore there was supposed to be a turret-like thing over the head for the remaining two but the mini looked like they were in the backside, L/R Torso. I may have called them exhaust pipes a couple of posts ago.

These four ERLas cannons I painted the exact same way as the previous lasers: a green (VGA 72732 Escorpena Green) layer on the bottom. Then I mixed in a drop of white (VMA 71270 RAL9001 White) to get a lighter green, painted the lower right sector (if we were looking at a clock, it'd be something like the 1600-1900 area). Had these been larger, I'd done a third layer but nope. Instead I added a white drop to 1700 on each.


 At least they stood out nicely.

Cockpit canopy

I had chosen green as the cockpit colour for this unit some twelve years ago, so that's what I kept using. The viewports had already been painted dark grey, so I didn't need to worry about them anymore.

The base was a green (VGA 72730 Goblin Green) layer on both panes. Then I lightened my paint up a bit and added a slightly smaller area from the bottom right corners. Due to the smallness of the bits I only did three layers. Finally I painted a white dot into the top left corners. The dots could've been smaller, but such was life.

After that I painted the hex edges dark grey. Now they looked uniform and also fit in wonderfully with the caution stripes on the front edge.

I certainly wasn't going to become a shade or gradient master. If needed, I might still fix the armour edges with dark grey if the greens went annoyingly over.

The ground to stomp on

Now the hex base was the difficult one, as I hadn't decided it years or months ago. I didn't intend to do anything complicated, especially on a quick snack project.

Somehow I remembered that I had somewhere the years old Woodland Scenics stuff and when checking I found I had two bags of those (Ballast, Fine, Light Gray and Buff - the light gray was open so I used that). I covered the ground with white glue and let it cure a short moment.

On the base I sprinkled an amount of the light gray ballast and added a couple of shreds of their fake greenery (I had two types of that too: Coarse Turf, Medium Green and Foliage, Light Green). This was a generally functioning base, I have done these before.


I stopped to think if I should tint this pretty light-coloured ballast a bit? I could mix some sort of a brown oil wash, that'd bring the ground more to the earthy look, now it looked like sun-baked desert. While thinking of this option I left the mini to dry overnight.

Oiled earths

Luckily I had a six-tube weathering colours set, that was a great source. I started by making a brown wash (ABT093 Earth) and applied it just about all over the ballast ground.

Something made me think that I shouldn't leave it this way, monocoloured. The set also had two different mud colours, so I made a tiny amount of dark mud (ABT130) and dabbed it into some random spots.

For extra variety I made a bit of light mud wash (ABT125) and dabbed that into some other spots, including the 'Mech's feet.

Now the ground wasn't uniform or boringly monocoloured. While taking these photos the paint was still wet, so the actual end result was going to be visible the next day.

In addition to the paint drying time this miniature had nothing left, unless I spotted some tiny fixable spots, and applying the gloss varnish on the lenses and viewport panels. Of those I wasn't going to write a separate post anymore, for the next week I intended to get the final photos taken and gimped.

22.11.23

Oil painting

A slow-drying weathering operation

The story so far: I had painted the BattleMech in two short painting sessions on two consecutive evenings. After this I'd have to let my paintwork dry a bit longer, from a couple of days to up to a week, depending on how my calendar behaved.

Sepia

Preparing the wash for panel lines and gentle shadows was becoming familiar: a small dollop of paint (ABT002 Sepia) onto the palette, add drops of thinner until the result got thin enough. Now I didn't get too stressed about overapplying the wash somewhere, as I knew that it went away quickly and easily whenever I wanted.

Edge by edge, corner by corner I applied my wash on the panel lines and all the darkenable surfaces. On the LRM launchers the effect was quite nice, even though I hadn't drilled the individual missile ports open. When I had applied my wash thoroughly, I wiped off the excesses pretty soon after. I wanted to keep the flat surfaces, especially the topmost ones and the forearms, clean while the joints, corners, nooks and crannies were allowed to remain darker.


This was the state I left it, to dry in peace. The shininess would be mostly gone by the next day, but it wasn't going to be touch-dry anytime soon, but sooner than if I had applied thicker paint. In any case I decided to give it a few days to begin with.

Three days later the Archer's look was somewhat more subdued. Now it was ready for the next treatment or toning this effect up or down. I was pretty happy with the panels and the shadows, so I didn't give it a new treatment.


I had pondered if I should give this 'Mech a dot filter, but I was a bit worried about getting carried away and the effect not working that well in a small-scale item like this. A gentle lightening, on the other hand, sounded nice so I decided to go for it. Lightly.

Buffaliciousness

I chose a random, very small amount of spots where I applied a dot of paint (ABT035 Buff) with a toothpick. The colours and the sizes of the dots made this look almost symphatetic and something completely different from a warmachine from the future. It was almost a shame to not leave them be.


As instructed by smarter and better people, I blended the dots away with a rolling motion using my round-tipped blending brush. Then I left the mini to wait for a better day:


The effect was pretty strong when wet. For comparison purposes I took a quick set of photos a couple of days later. Of course I ruined any kind of comparability by taking these photos in a different lighting set, opposite corner of the apartment and at a very different time of day.


I felt the efffect worked better with a bare eye, but I also didn't spend that much time setting up my photos. Hopefully they gave some sort of an idea anyway.

15.11.23

Project III/23

Running in the Death Star trench

The Autumn side Father's Day brought, in addition to the mumblings-unrelated things, some Lego! This has been a good theme for years and I was more than happy to build things.

It was an action diorama. I remembered seeing someone building (or upgrading) this one as an automata, but it could also have been a yet another fake memory of mine.


The trench

Building this set was quick and hassle-free, just perfect for a quick afternoon build. It only had almost 666 pieces so the expectation was "almost done".

With the first bag's baseplate done, the next couple were full of greebling at random places. My set was missing one light grey ingot (99563) from the center-middle, that I could complain about to the Danes and get a replacement. I just wasn't familiar with the process and wasn't sure if I wanted to bother.


With the floor of the trench done I moved on to the sidewall, that received a good amount of greeblies. In the middle you could see a couple of the claws that I had set 90° wrong, but I fixed that as soon as I noticed.


The completed sidewall sat sturdily on the baseplate and it got then impaled into it with two (for some reason of different length) studs. Undoing this might be interesting, but I didn't see that appearing into my calendar anytime soon.

Black squadron

In this scene Darth Vader was escorted by two wingpeople, both in TIE/ln starfighters. Unlike what the instructions said, I set the green laser blasts a bit offset for both of the firing units, because I just found it more visually appealing than the dual-firing ones.


To get the best-looking and most active scene I might have to fine-tune the angles of these a bit still.


Red 5

Then the baddie of the scene, flown by the Red five from the Red Squadron of the space terrorists, his Incom T-65C was a pretty decent representation in this scale. While building it I was wondering a bit why the spaceframe's front and back halves were only connected with two studs instead of all the four available, but maybe it looked better this way, greeblie-wise. The S-Foils were not adjustable: the split-wings were going to stay open so you couldn't use the fighter on a more calm scene just as it was.


Diorama

With the fighters built and installed only the Taim & Bak XX-9 heavy turbolaser turret was missing. It was a pleasantly poseable piece, even though it didn't have any green turbolaser blasts for the barrels. As befit the scene.


We were running seriously low on space on the shelves with these various Lego sets we had accumulated over the years :D