Mastodon

24.1.24

Chipping attempt

Flakiness on my tank?

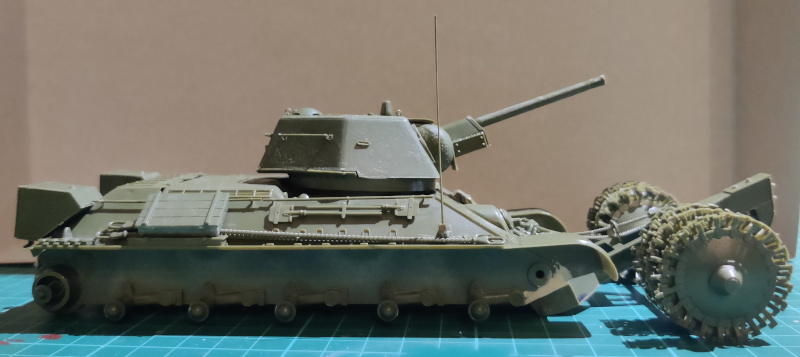
I decided to give uncle Night Shift's chipping process (or a part of it) a shot in the hands of a complete fool. This plan of mine was, to let most of the tank be mostly clean and concentrate mostly on the front of the tank, especially near the mine roller. Somehow it felt like the most natural place for the worst mistreatment to happen where things would be blowing up constantly.

Attempt #1

My first attempt was dangerously based on my memory. I did a few test scratches with the lighter green I had used before, to get some of the lighter chips or scratches marked. They didn't stand out too well, so I didn't keep at it for long.

Then I mixed a bit of red (VMA 71003 Red RLM23) to the dark grey to play at the rust-protector somehow on the exposed steel. The colour itself turned out really nice-looking in my opinion, but the completely unplanned and manually made test flakes didn't really work out.

Especially here on the mine roller structure they were completely off. Luckily it was quick and easy to cover them up at this point.

On the turret's edges they looked somewhat better, but still a bit detached somehow. Maybe my effect was too subtle and didn't stand out in scale as they were.

The very same evening I rechecked the uncle's method and got a better idea for my next attempt. In short I would just need to lighten up the Russian Green and try again. Maybe I would need to airbrush the already made things out of the way.

Attempt #2 - first evening

I started all over again. First I mixed a couple of drops of lighter paint (VMA 71075 Sand(Ivory)) into a squirtful of 4BO. The paint was still a bit on the dark side after the first sponge-dabbings, so I mixed in another drop and then another drop a bit later, because the second mix still didn't stand out well enough. It was a bit surprising how light the light tone had to be to work in a way that looked good to me.

Stage one - the light chips

Against all the basic guidelines and common sense I didn't start this from the most hideable and out of the way place, but straight from the turret itself. To get my chips started I used a sponge and a 10|0 paintbrush to make dents and scratches. Sponging wasn't too good-looking in most places, so in the end I did chips just with the paintbrush.

Especially with the scratches the paintbrush was good. With the sponge I could make some random sneeze-patterns but I just felt that the brush gave me more control. Of course, I had absolutely no experience with this business so far, but I had to start somewhere.


That turret ended up looking used and mistreated. Either this got already completely out of hand, or it worked out just fine.

I had a vision of a sort about the mine roller, I just had no idea how realistic it was. The frame and the rollers needed some touching up, but I could do those separately. Because I had never seen how one of these devices looked like in real life after blowing up some anti-tank and anti-personell mines, I trusted on my gut feeling that told me those explosions would be tossing amounts of rocks, shrapnel, and whatnot.

Here I concentrated on painting mostly glancing blows -kind of strikes. At least I tried to paint some kind of radial scratches going tangentially from the pressure point.


On the tank's hull I thought that because of the mines blowing up constantly the front would be the most harmed area. The rest of the tank would be in a much nicer condition, of course there'd be some engine deck -themed wearing out by the edges and the hatches, and by the anchor points. The left front corner of that steel box on the fender was supposed to look like it had been dropped a few times and lazily or hastily dragged around.


I was pretty content with most of this work. To see more of the effect, I didn't want to spend all of the time available only on the light chips, and also to enjoy some variety and also to avoid going way too far in my excitement, I jumped (again) to the next stage.

Stage two - dark chips

Ok, my first attempt with the dark chips had worked decently, the red-tinted dark grey looked very fitting after the paint had dried. Trying to repeat my previous mix I added three drops of red into a squirtful of dark grey.

Like before I started with the turret. I followed the lighter marks I had made earlier, and mostly tried to fill up the larger ones with this dark grey. It was slow and delicate work. While looking at this photoset here I could notice that I hadn't gone through all the light chips that I should have.


The mine rollers got the smallest amount of my attention, because there was stuff to be fixed before these details. Here the outer left roller got a bit of a treatment, and the looked nice on it. In the photo the roller was in a silly position, which made the locking piece look like it was actually falling off.

The effects on the frame looked somehow working, at least the radial scratches had the look I was hoping to achieve. Like I said earlier, I had no idea if this was realistic or not.

During this chipping session I didn't get that far on the hull, I did some work on the front and the mudguards. Based on the photos I definitely didn't touch the cable loops, hooks, and guide bits yet.


Amazingly I managed to use a bit more than an hour on this session in one evening. This was very slow, but also surprisingly enjoyable stuff to work on. Even in the middle of this WIP stage the tank started looking nicely grungy.

Stage two - second evening

I checked the turret and fixed what stuck me as fixable. Maybe this was it for the turret.

The wheelery got me swearing a few times, I worked on them at a different pace than with the rest of the model, especially as on these little bits the original chips didn't show even as well as on the tank. During the evening getting darker I realized I had chosen maybe the worst workstation, the lighting conditions were a bit annoying to work on things like these.

I added a few more chips into the front of the tanks and fixed the ones that I felt incomplete from the previous evening. In this photo here I feld it was a bit too clear that I hadn't been as meticulous as I should've been while cleaning up the cable loops from mould lines.

After painting the dark chips on the bits left from the previous session, I felt that the deck and the rear hull were a bit too clean in comparison. And no, I had not forgotten that I wanted them to be cleaner than the front.

I added a few extra dents onto the engine compartment and got this mad idea to make some ringlike scratches to depict something getting stuck under the turret's lip while it rotated. Something like loose rocks or something hard and grindy.

Those two boxes in the rear edges were a bit weird, I just hadn't come up with anything for them. I also didn't want them to look either untouched or completely mistreated, so I just added a couple of horizontal scratches thinking that maybe the driver had been rotating the tank too close to trees. That trick was to be seen a few photos later, here you could see some general walked on bits and careless box-carrying -caused marks.

Around the engineering shovels I tried to make some marks that would look like whoever put the shovels in place didn't really care how they did and what sort of a ding it made inside the tank. I wasn't sure of how that came through in the end.

Overusing the same idea I tried to add a few dents by the place where the tow cable ends lied, to show that the crew just threw them around without much care.


In this set the wooden boxes looked pretty silly, but I'd get to them the next time I painted. For those I had a new set of paints from sometime last summer.

17.1.24

Steel details

More dark grey steel

This effect seemed to have worked nicely in the last couple of different-scale projects, so I stuck to it. The tracks I had already treated with this same approach, so it wasn't that different.

Starting in the front of the tank I painted the tip of the machine gun that barely peeked out of the armoured shield. The next I painted the short track bit on the front glacis plate and proceeded to the cables. All the tow loops I left purposefully green, they weren't supposed to be fully worn down to the bare metal.

We had a couple of tow cables on the right side of the tank, I painted them the same way. Later I should do a tiny highlight on them with a slightly lighter grey, perhaps. The only engineering tools were a pair of showels, they too became grey-tipped. While I was on this side I painted the antenna grey as well, but I thought I should check my Armoured Museum reference photos because I wasn't entirely sure of this approach. In the rear end there was that one track link to be painted steely.

The flipside had just a saw and another track link.

After these I painted the roadwheelery. Here my idea was that while the tank was on the move, the outer rims of the road wheels (etc) were going to be pretty clean of rust and dirt, due to the constant movement. That would look much better than the bright steel -painted ones on my T-35, I felt.

At this point I remembered that I had just plopped the attachment bolts on the road wheel arms for painting. I plucked them all off, except for the return rollers. This'd be a good-looking setup.

While I was spinning the model in my hands, I realized that the exhaust pipes were still green and they weren't going to remain that way for long in the nature, so I painted them grey for some upcoming mistreatment. In the same instant I decided to paint the engine deck's partially curved grille as well, I decided they had also suffered enough to lose any paintjob they had ever had.

Again, I wasn't 100% sure of the last bit, but there was time to change it still. It wouldn't be the first time my gut feeling was a bit off, right?

10.1.24

Priming and basecoating in Russia

Ideologically correct shade of primer

Fun discovery, I had some white primer in a big bottle left, and I thought I'd use that instead of fooling with the small dropper bottles. This wouldn't run out in the middle of priming.

The goo was, of course, way too old now and airbrushing it didn't work at all. Damn. After a bit of a cleanup and tossing trash out I returned to the lately often-used red primer (VSP 70624 Pure Red). Despite my concerns I didn't run out of it, I even had some left for any patching up later on. Just in the end while spraying the turret from high above the airbrush started spitting out flakes, that I had to clean up later.

Blasting the mine rollers with air and paint was interesting to say the least. They spun like windmills in an Autumn storm. Maybe I should consider gluing them together and the axle with white glue or something before doing this again with green or dark grey.


My painting environment was a bit difficult this time, I did some of my painting in a bothersome shade, against the light. Still, the photos didn't reveal anything outrageous or missed major spots. Or I wasn't looking correctly.

Zvezda paints under test

So here we were, five tiny 16ml bottles of acrylic paints from the neighbouring country. My Russian skills were just about nonexistent, I only recognized the word Stahl for steel on the cap of 08. Google's translator was a bit better:

  • 20: black
  • 25: wood
  • 08: blue-shaded steel (gunmetal?)
  • 45: khaki
  • 55: camouflage (dark green

I know I should've recognized the last repeating word in each cap: akr/i/l/ - acryl, but I wasn't thinking so far because I didn't recognize the final character with its sound, so I just gave up before thinking of thinking. Funny thing, I with a tiny amount of headscratching I would've actually recognized a new word.

The sixth and unmarked bottle contained glue, that I didn't need. Maybe that was a good thing, as it didn't have an applicator.

Before trying it out I shook the camo green heavily and thoroughly, then added a bit to the airbrush and mixed an amount of Vallejo's acrylic thinner. TL;DR: I didn't manage to thin the paint enough, what little came out of my airbrush was too thick and then the paint got way too thin and only came out in strange bursts. I started with the turret's bottom surface, it really didn't work out at all. The colour was surprisingly dark, in my mind the Russian Green was lighter than that, but maybe different manufacturers had their own opinions on the proper shade.

After that debacle I decided to thin it for paintbrushing and then just paint it by hand for the first time on a tank in a long, long while. The tracks and rollers I was still going to airbrush dark grey, no matter what.

As you could see, the thinning operation didn't work like I wanted to, at all. I really started considering shifting to Vallejo's Russian Green over this crap.

Thanks to everyday life being very busy for a long while I didn't get to paint in ages. When I finally found some time, I decided to stop wasting time in unknowns and just use what I knew to work without a fight.

Vallejo Model Air

Unsurprisingly I was a bit displeased with my issues with the modelmaker's own paints. But what could you do when your skills weren't enough to accommodate? Change the solution instead of swearing about it. Using the trial-error method the Zvezda's Green n°55 would've run out way before the painting was done and what would I have done then? Used Vallejo's paints, because those I had.

I blasted the tank with the Russian Green (VMA 71017), and the antenna and the mine rollers with Panzer Dark Grey (VMA 71056). For a bit of a variety in the shading I applied a bit of a lighter green (VMA 71022 Light Green RLM82) from a zenithal direction. The contrast between the paints was small so it didn't show up strongly.

While painting the mine rollers the green on the support structure suffered a bit but that wasn't a problem.

Below: a set of photos after the first new airbrushing session. There was a bit of red showing here and there, somewhere the dark grey had gone over the green. Most of the red wasn't harmful because the green paint may have been chipped off. The rest was heading toward a muddy future, so having a bit of the rust protecting layer showing wasn't a bad thing.


My gap-filling skills were clearly worse than useless, as you could tell from this photo. Like I was pondering earlier, the back end was going to be pretty muddy-gooey, because I had to hide my crimes.


Painting the turret didn't make me feel sad, of course it was a bit clean as it was. I was thinking of trying something new again, as soon as I could carve some (=lots of) time and references for it first.


The tracks got a predicted dark grey basecoat for the rust-mud-graphite weathering. All the wheels got painted green, and if there was some rust-protector red inside, it was fine here as well.

Maybe this was most of it now. Once again this postful of action had eaten a mindnumbing amount of time in the calendar, even though it was less than 45mins of airbrushing in total. Especially painting the tracks showed me that it was good that I had started wearing nitrile gloves while airbrushing, because otherwise my left hand would've been almost completely green-grey and that wasn't good for the skin. Ah, getting older, what a fantastic thing it was!

3.1.24

Installations

Installing

After and despite all my ponderings I decided that I'd glue the mine rollers on before painting a thing. Surprisingly (or not so surprisingly) the most difficult part of the process was getting those cables into sensemaking positions and angles. I attempted to get this solved with some glue and using a pair of tweezers as weight.

All the unpredictable and uncontrollable wobbling of the rollers bothered me, so I attempted to glue them together. Like I mentioned the last time, this wasn't going to be played and rolled on the floor or table. Especially if someone was witnessing it.

Then I was about to install the custom antenna I had made some time ago, but it was indeed too short. I lit up a candle and stretched a new piece of sprue for a new antenna. This third attempt was the best one so far.


It could've been pulled a bit thinner even, had I thought of it. I sanded the end a bit narrower and glued it into its socket to the front right corner. This one was such a narrow piece of machinery that it was difficult to catch against a dark background or with suboptimal lighting conditions.


Dry-fitting

The tank looked fine. I would have to be careful when installing the running gear and the tracks, but I didn't feel like worrying about them at all. I was feeling that confident. Later on we'd find out if that was good thing :D


Next up: priming!

27.12.23

Mine-blowing rollers

Anti-tank mine detonation device

In a sense this was a pretty simple construct to be installed in front of a tank. A silly amount of steel wheels with little feet on them were set on an axle that was attached on a holder. The tank would just push this setup in front of it and its ground pressure would be enough to trigger the mines without the wheels specially flinching from the explosions - and if they did, they'd suffer less than the tank and its crew.

n+1 wheels

At a first glance I managed to shock myself with an expectation of a deranged (and unreliable result expectation) amount of work when I thought I had to install each and every single of the little feet on the rollers, but I I was mistaken again. Each roller required only two bits to be glued on, to places left by the sprue points.

Had one or both of each of the manually installed bits gone a bit wonky or funky, that wasn't going to be really noticeable in the whole wheel. And even if it did, that could've been just a sign of an explosion twisting some metal.

I started my roller build with four of them, because the numbers in the instructions dictated that you were to build two pairs, and then in a different step it showed two sets of three. I had to start somewhere and that somewhere happened to be this one: substep 11-b.

On my first building burst I didn't get to complete more than six rollers, so while waiting for some of them to set I built other subassemblies like the 11-a pair and the 11-c, the bit where the axle was going to be installed. I sanded off all the crap I could, as I expected them to be nicer to paint this way.

The next time I was low on optinos, so I kept churning out rollers. Out of the ten rollers I had already done six, so the remaining four were not a real problem.


I had to admit that I was wondering why the instructions had such a small amount marked, when there were quite a few still in the other sprue (a full copy of the ones I had now done, to be more exact). My alarms weren't ringing too hard but they were making some noises to keep me from gluing anything fixed yet. Of course I dry-fitted the rollers on the axle.


n+1 rollers * 2

At this point it ought to have been crystal clear: the numbers in the instrcution sheet didn't say how many rollers or roller pairs were to be done, you had to get it from the pictures and lines. Good thing that I wasn't any further in the process than this.

Just a bit bothered by this I decided to work on something else for a moment before jumping on the remaining ten rollers.

One silly day I used a working from home lunchbreak to build my remaining rollers. Like I said a bit further above, the rollers came off the sprue nicely and there was little to clean.

The original set of rollers I set as they were on the axle, this second half I at least attempted to glue into pairs first and then into bunches (two pairs into the inner bit, three pairs into the outer bit). The free-floating rollers felt a bit too loose and flimsy in a way, like the photo below showed.

I was a bit baffled by the amount of loose space for these relatively few rollers, as if a handful was still missing per section. There were no more bits, however, and this did look quite a lot like what the cover art and the instructions showed. Funny thing.

Assembly line

Now all my mine rollers were set together, some more and some less, and I could construct the rest of the device. The rolling frame was glued in (and attached with two intertwined metal loops so it wouldn't fall too far if an explosion broke their mechanical connection). The angle between these two was left to a tiny guiding wedge and my eyeballed feeling. Maybe it was straight enough.

After a short glue-curing break I glued the three final pieces into this setup: the curved bit to the end, the attachment hook for the cables, and the eyelet for said cables.


Painting-constructing mumblings

At this point I stopped, of course, to ponder on the soon upcoming painting operation. How would I get this beast painted so that there were no visible shadowed areas? Should I just prime and basecoat this and the tank separately, before joining them together forever? That sort of an approach only caused more problems, as the premeditated attachment points rarely hit as accurately as one planned.

One quickly conjured up idea was to build almost the full mine roller first and only leave the attachment part to be painted alongside the tank itself. That was I could spin this setup pretty freely and concentrate especially on the rollers in the most convenient way possible.

Except that this damn thing still needed the cables attached after it got glued onto the tank, the cables that somehow kept the mine clearer in a correct angle. Perhaps I would paint the rollers first somehow, to get them out of the way, and then attach this setup for the easier part of painting the static parts? Or maybe I would just glue the rollers in one fixed position, I wasn't going to be driving this model on the floors and tables anyway.

It was better to ponder on these things in advance instead of swearing like a pirate while attempting to paint... but it did make me grumble a bit anyway.