Choosing the unit
To be honest, I spent a long time thinking about the future home of this grengel. My Talon Cluster didn't need another lighter than Heavy-class 'Mech so I needed something else. I even thought about the puppies and their Beta Galaxy for the duration of a couple of blinks as the grey-tan scheme was pretty regonizeable. Luckily I remembered that I had two Ghost Bears in the Delta Galaxy, painted almost 13 years ago, from the 25th Anniversary Box. All the other minis from that box were made of that awful plastic, while the two Omnis were great.
This was easier than I feared, the space bears were going to get a third Point to their Star. Sounded like I was going to make two more in the future to round it up, was that was what I was doing here?
Painting process
I hadn't documented my earlier process too deeply. Before starting any sort of painting I took a look at my old photos only, because I didn't want to bother the cats sleeping to get my box.
Just to get a single mini painted quickly I left the airbrush in its resting place and just brushed the primer on.
Black primer
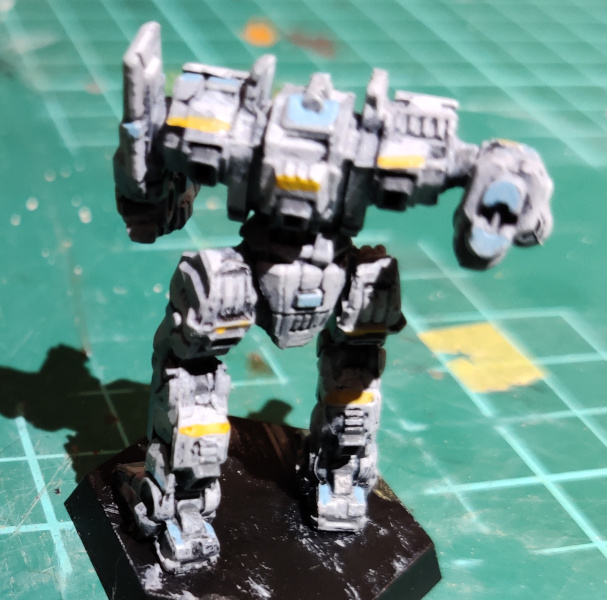
To prime the mini I used Vallejo's black primer. The modifications I had made looked much more reasonable now than mere minutes ago. The lasers were a bit bulkier than absolutely necessary, but I wasn't a weapons manufacturer by trade. Maybe they were just better protected this way.
Cold grey basecoat
Over the black I painted a layer of my trusty Cold Grey (VGA 72750) using a method that I only recently heard being called overbrushing (a bit like drybrushing but with more paint). The stronger grey concentrations I painted on the top and front surfaces that were supposed to be receiving more sunlight.
A perfect coverage wasn't a goal here and especially in the shadows I let the primer behave as bringer of shadows.
Stonewall grey shape-breakers
For the camouflage I spent some minutes with my other favourite grey (VGA 72749 Stonewall Grey) to paint camouflage shapes to attempt to break the physical lines of the 'Mech. As always, this wasn't anything I planned specially but something that just flowed.
Not-metallics
Despite the subtitle I hadn't gone mad and started doing NMM, I just stuck to my current method of painting the metallics with dark grey (VMA 71055 Black Grey RLM66). Today's menu of metallic bits included the visible joints, Jump Jet nozzles and a few random grilles and vents. The LRM-15 launchers were behind the armoured doors so I didn't get a pattern-breaker from those.
Hmh.
One thing that I most definitely didn't think of in time were the side torso CASE panels, as those have usually been pretty clearly visible. Maybe I could claim that they weren't just facing straight back and positioned in the shoulder blade area on this 'Mech?
Soviet blue trimming
According to Camospecs and Unit Color Compendium the Delta's trimmings were done with light blues. My earlier Points didn't get a specially light blue but now my collection was better (or worse?), with a quick go-through I decided to try out a blue I bought for the Su-27 years ago (VMA 71318 AMT-7 Greyish Blue).
For a change in painting behaviour, in addition to individual panels I now painted some blueish ribbons on the edges of some larger panels and hatches. As it was the Soviet greyish blue was a bit pale and didn't stand out spectacularly in a manner that'd increase the honour of a Clan Warrior. Maybe they could be highlighted with a brighter mix?
Looking at the last photo I remembered that I had to write a //TODO to rebase the canopy viewports black before any jeweling attempts. Would I remember to? Maybe.
Highlighting
Lucky me, I did remember. I also painted the laser barrels in the Right Arm with dark grey as they were supposed to be plain metal. While repainting the canopy viewports I also painted the lenses-to-be in black.
For an overall drybrushing I mixed a bit of white into the Stonewall Grey and drybrushed that mostly on the top surfaces for highlighting. Then I mixed a bit of the same white to AMT-7 and did some line-based highlighting on my blues. They still didn't jump out that much, but they were visible and that was good in my books.
Insignia
Thanks to the previous failure I might remember to do the markings before jumping head first into the weathering. Or I'd remember until this miniature, if nothing else. Before jumping in I checked some of my past mumblings so I could follow similar steps today as well.
Caution stripes
To belong in the gang, or the Star in this case, the new one needed a few clear caution stripes. I felt they were quite at home next to the JJ nozzles, not many other places felt as obvious to me. As before, I started this work by painting yellowish placeholders to map out the areas. Then I eyeballed a 45° angled (or in the tinies ones just plain right angled) lines to get about 50% fill. Not a single one was perfect.
While painting the tiny ones I also painted the front edge of the base.
Clan Ghost Bear roundel
This was a difficult thing to photograph at this scale with a phone, but I managed somehow in '11 so maybe I could repeat it now? I started with a dark grey circle-ish shape on the left armoured plate because it was pretty much the only big enough space I spotted in a visible place for Clan insignia.
Then I painted a blue (Citadel Ahriman Blue) horizontal line and an X for the Ghost Bear's arms.
After that I tried to get something bear paw -like inside the blue lines with clawlike things coming out a bit. I also tried to get a bear's head shape in the middle but like I have often said: my freehanding skills are on the negative.
Of course I forgot to take photos of the dark grey eyes and maw to the grey lump. Luckily these were never looked at this distance in real life or while playing.
Delta Galaxy insignia
Below the right knee I saw space for the lightning bolt -spitting bear of the Delta Galaxy, even if the space was a bit tight.
Over the crossed lightning bolts I painted a grey blob to represent the angry bear of Delta.
Unit number and the 73rd Battle Cluster's number
The Points appeared to be numbered 21n, where n > 1. Following this the current model ought to get a number 214, and it'd also get a 73 for the Cluster on its other shin.
First I painted the numbers with thin lines of dark grey. After a bit I painted new, top-left offset numbers with red.
Luckily the 314th Battle Trinary didn't have its own insignia, I really didn't think I'd have space (or daring) to attempt to freehand another. Thinking so much about the 314 I brainfarted and painted that number onto the Left Arm instead of the 214 I was planning. Sigh.