Mastodon

13.11.13

And you're rushing headlong you've got a new goal

The wings of inspiration

I really got carried away with these pieces. Every single evening I've done at least something to them, bigger or smaller jobs. I also managed to break a piece (a rubber pipe that goes in the paint pot) from my airbrush, but luckily only after I had done all I inteded to with it regarding this project.

Repriming

Being the last incomplete one, I finished the Mad Dog. Not that it was missing anything but the arms, so it was quick and easy. Then I sprayed the group all around with Vallejo's Grey Primer. I thought that it would work much better than the randomly applied Chaos Black that I preferred years ago. For some reason I just can't recall why that had been my way of working back then.


Green basecoat

I guess I've talked about this topic before, but do bear with me. The unit I'm working on is the 3rd Falcon Talon Cluster (that I chose semirandomly many solar cycles ago), also known as "the Jade Claymores" and it belongs to the Gamma Galaxy of the Clan Jade Falcon. Camospecs.com says the following regarding Gamma Galaxy's paint scheme: "Gamma Galaxy uses appropriate camouflage. Clusters trim their machines and equipment with jade". My artistic freedom was immense!

For another completely forgotten reason I had decided that my unit's theme would be a green-gray camo pattern. Therefore I loaded my airbrush with Vallejo's Field Green (Model Air 71093) and applied it all around. I think that most of my pre-existing OmniMechs were painted Goblin Green. Why did I change the paint now? That I did because I feel that not every single piece has to be exactly like the others, with the exact same paints and tones, but that different cans be varied. As long as the main colours stay.


Camouflage

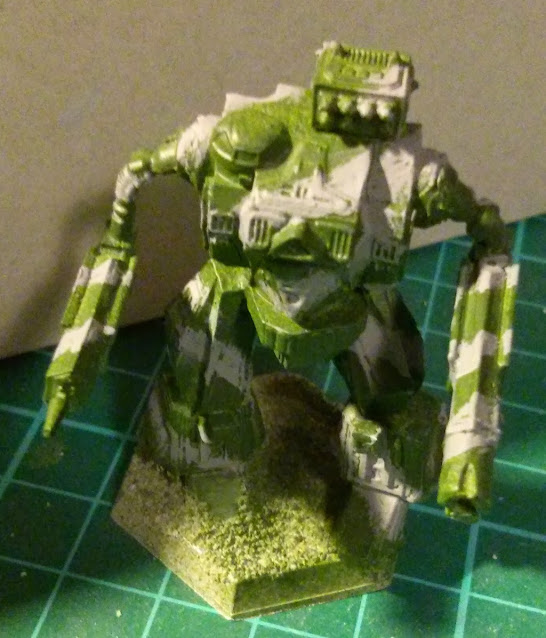
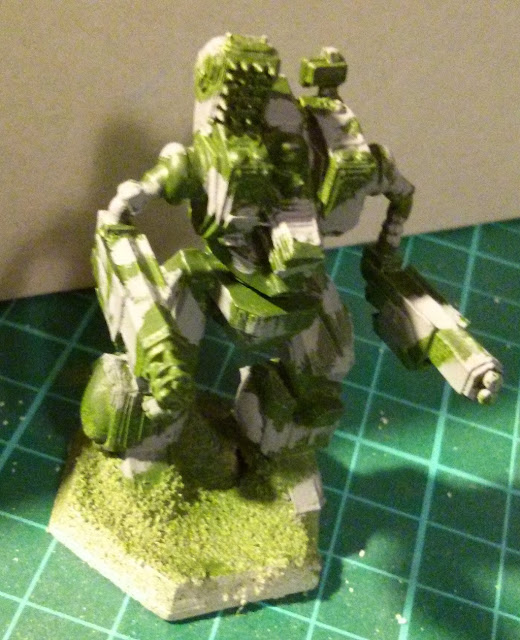
At this point I had packed my airbrush away and taken my brushes out to strike random, form-breaking grey patterns (Vallejo Cold Grey (Game Color 72050)) on the 'Mechs. Three of them got more or less randomly directed thinner or thicker lines, but when I got to the Mad Dog as the last piece, thanks to a moment's insanity, I went for some kind of tiger-like stripes. Or tried to.

Later the pieces got drybrushed with a lighter grey (Vallejo Stonewall Grey (Game Color 72409)), concentrating on the gray surfaces. If some of it got on a green part, it wasn't a problem because to me it didn't look wrong at all.


Decorations

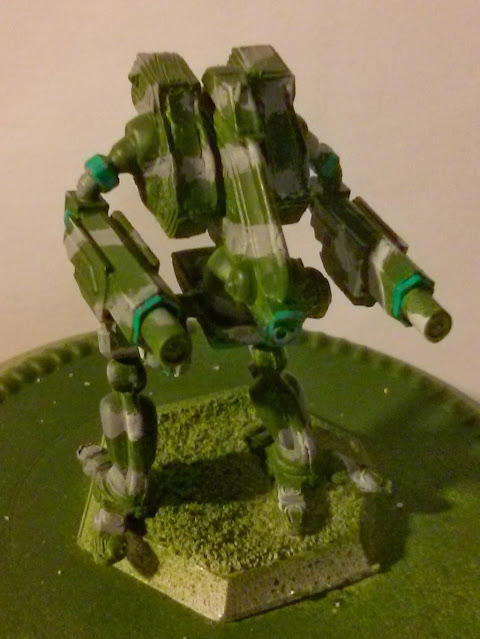
That was it for the most creative part. As my next task I picked out some random parts with jade green (Vallejo Game Color 72026). All this was done just like with my earlier 'Mechs, pretty randomly so that not all the same or similar parts would always be "highlighted", even in the same variants of the same 'Mech. I guess I've been trying to achieve some kind of non-staticness or something.

Actually the only parts that are consistently highlighted the same way are the LRM/SRM launchers: the edges are always lined with jade green. No other Omnimodule has been done that way in my projects. I guess I had a reason for that back in the day, but surprise surprise, I've forgotten it already. Maybe I wanted to add just one constant element into all the randomness? Let's agree that was my explanation.


The only LRM launcher of this set got a grey-black face. In my unit all the missiles are red so that the LRMs are always plain red and the SRMs have white tips. The red stands out nicely from the green main colour and the white tip separates the missile types from each other - as if you could confuse the huge ones with the tiny ones, anway.

Each gun I painted simply with Gunmetal Grey (Vallejo Model Color 70863). Then I mixed something like 80/20 of blood red and red (Game Color 72010 and Model Color 20926 respectively). This mix I applied to the ends of the lasers and to the cockpit windows. Earlier I had always painted the windows with Citadel's Black Ink (which, as everyone knows has been renamed a dozen times), but I thought that I'd give a new idea a try. To me it looked pretty nice so I decided to update all my existing miniatures to follow this new design (or similar) of cockpit viewports.

In my MiG-29 model the brown wash worked really well, so I thought that I'd try that one on these miniatures, too. If it ended up looking good, I could update my old pieces with this as well. My wish was that the wash would tie the camo together and maybe make the whole thing look a bit less cartoony. It felt like a good idea to me.


Insignia

Last evening I started with the insignia and numbers. Yes, each 'Mech in my Cluster has its own random unit number. I think that the idea came from the art I've seen and the fact that I can't remember seeing too many BattleTech miniatures with unit numbers on them. After my short painting session was done I checked the old minis and to my slight (but happy) surprise I found out that I hadn't duplicated any numbers, even though it had been quite close. Go me!

What I did was choosing places for the unit and Galaxy insignia and painted the white dots on those places. As the Cluster insignia is a jade sword impaling a white-ish planet and the Galaxy insignia is a Jade Falcon over a white-ish planet, even I can freehand those semirecognizeably in this scale. I was also scouting for places for the Clan insignia, but didn't get to start anything yet.

5.11.13

Basing the pieces

As soon as I had all the pieces - except the Mad Dog - assembled, I glued them on their hex bases. Because I remembered the Mad Dog's legs/hips being a bit funny to set up, I prepared the right leg on the base. This way the rest would be that much easier as one anchoring point would be already cured and solid.

Simple bases

Yesterday evening I was lazy and just filled the hex bases with white glue and applied liberal amounts of WS's ballast on it. The white glue would provide some more support to the feet of the miniatures. Of course I could've left the ballast for later (after the painting) but I thought I'd try a different approach this time. The working order I've chosen of course leads to another step of painting the base, but that's not necessarily a bad thing.


Morning assemblage

Because I had at least five extra minutes at my disposal this morning before I had to start moving and nothing special to do, I attacked my Mad Dog. In short this means that I glued the torso to the legs and the left leg to the base. Now all my last 'Mech is missing are its arms.


These arms are from a Hellb/Summoner model 'Mech, which means some more work for me. Both the torso pieces and the arms have female connections, so I must conjure up some sort of a piece to provide support. That won't be a huge problem, I would like to believe.

31.10.13

Semi-eternal Project II/13

The long break's duration

I was thinking that I haven't touched my metallic BattleTech miniatures in a good while. In that I was correct, but I was far off the mark with the duration. Based on the emails I ordered these pieces in the early 2009, and after the Pesterers diorama nothing else got even half-finished. We're talking about more than four years.


The todo list

Right now I have four slightly customized OmniMechs on my desk, none of them will be a Prime. Both the Summoner and Hellbringer are A variants, the Mad Dog is going to be a C and the ugly beast Gargoyle has a custom loadout. Looks like it has an (Ultra) AutoCannon in the left arm and a couple of beamers in the right one.


Gargoyle

Hellbringer A

Mad Dog C

Summoner A


There was supposed to be a Turkina in the shipment, but instead of that I got an IS can called Strider. So my target detachment grows in its own pace. As well as these 'Mechs I also received a bagful of 30 Elementals (6 Stars), of which I used 5 in the diorama. In no circumstances am I going to try to work on the small guys at the same pace as I'm working on the 'Mechs, just to save my poor nerves, if nothing else.

Ancient doings

Yeah, I had poked these a bit all these years ago. The pieces were more or less cleaned, cut, dremeled (I had opened up the feet of the Hellb & Summoner) and even partially assembled. Most of the pieces were also partially painted black. Whatever caused the project to be dropped, did that in the middle of it.

Rekickstarting


The first thing I did was to continue setting them up and wondering which variants I was working on after all. As I said, the Gargoyle is apparently just a random setup just so I didn't have to get another Prime of them in my glorious Cluster. Yes, I know, Falcons should have plenty of Gargoyles but because I find them so ridiculously repulsive, two are more than enough, thank you!

Brothers H & S didn't need anything special, just the assembly. At some point in the past I had chopped the Summoner's left leg from the knee for a different pose. Let's see what I do with that in the end.

That Mad Dog... Well, you can see in the photo that it was totally and completely unassembled. All the C variant is armed with is two Gauss Rifles, so the LRM racks need to be emptied or closed up or both. All the more violent modifications are to be done before the assembly, of course, because otherwise the smallest pieces would end up flying all around the house. And end up lost, most likely.

24.10.13

Completed: project I/13

Ta-da!

The first modeling project of the year is now completed. This took exactly five months, as I took the final photos yesterday. Reporting overflowed to today, but that's not important. Following the glorious traditions of Projectmumblings my pace has been random and everything (beginning from the weather) has affected it.


There's nothing really spectacular or special to say right now. Mostly I'm just content that this thing is finished and I even look at the results benevolently. Of course there's always room for improvement, so I don't get caught in that anymore. I'm so pleased, actually, that I have considered working on other flying deathtraps in the same scale. If I get even madder than I already am I could go for something modern, can you imagine?


A bunch o' photos

Without further ado, here's a load of photos with a hastily prepared A4 background. Each of the pictures needed to be straightened up afterwards, thanks to my ultraexcited photo assistant. While I was telling how the tripod is used and not to be poked around all the time, I noticed that one of the leg extension blocks had fallen out of its place...


This is one of my absolute favourite photos in 'Mumblings


22.10.13

The final wash

Decision making

As is very well known, I'd been pondering on washing the plane for a good while. Until yesterday my dominant thought had been "nah, I'd ruin it", but after staring at the model and the paintjob for weeks I just couldn't unsee the detail-loss on the panel lines. There was no alternative, my mind was set.

Surface wash

I dug out my Devlan Mud and applied it all around the damn thing, with long swipes along the lenght of the plane. The result I was looking for, as with the base, was a rain-beaten look. You'll see how it ended up:


What else?

The end is nigh. Though, I was still pondering if I should apply Badab Black on the mouth of the cannon before I declare this project finally done. At long last.

21.10.13

Enough is enough

The twinkling of the nested stars

Instead of playing even more with masking tape (or, as Lasse mentioned in an earlier comment (on the Finnish side), buing a thin, fine red marker) I picked up a narrow piece of plastic. Everybody knows those plastic things you find in the clothes tags, I assume. So, I dipped one of those in red paint and drew the borders. For a bothersome and yet again undocumented reason I made the border lines thicker than what they actually needed to be or what they could've been. Life is hard and art requires sacrifices.


Here we are today, I think I'll try to get the panel lines washed one of these evenings. Then we've reached the final photos stage both before and after attaching the plane on its base.

18.10.13

Edgy roundels

"Accepting the facts is the beginning of wisdom"

In case my memory serves me even half-decently, someone somewhere once said something like that at some point in the history. The fact that requires acceptance on this round of the Project Mumblings is this: had I decided to leave those white lines off my model, even though I knew they belonged there, I'd suffered plenty. So what else could I do but attack my stencils and masking tape...


Taking a deep breath and getting to work

This phase made me doubt myself quite a lot. I guess the main reason is that the previous attempt with slightly undersized roundels failed so miserably - luckily there's no evidence of it anywhere outside my brain. No guts, no glory, so I painted the edges of my stencils white. Six stars were easily ruined, but the waiting. Waiting was painful.


Intermediate result


After the paint had cured I was even more nervous than before I begun this step. Ultracarefully I peeled off my first target, the left horizontal stabilizier's masking tape star. Himmel! It actually looked like something!
Of course the red fill and the outer edges would need touching up but I wasn't nearly that concerned anymore.


A weight of tons fell off my poor heart. How in the name of the Empire can this hobby be so nervewracking sometimes? And right now I'm not talking about hunting sub-millimeter pieces from carpets, floors or wherever or fighting to get them where they belong. Those things are in a totally different league of issues :p


We're not done yet, oh no. There's still plenty to fix and touch up, but at long last we've reached that part of the project where one can actually believe to see the end somewhere. That is wonderful.