Mastodon

28.5.25

Three-Point metals and jades

Endosteel and jade

At this point I'd paint the last conveyor beltable main parts that were pretty much similar in all the three miniatures. Of course I could've smashed all this into the previous post, but I had to respect paint drying times.

Bare metal

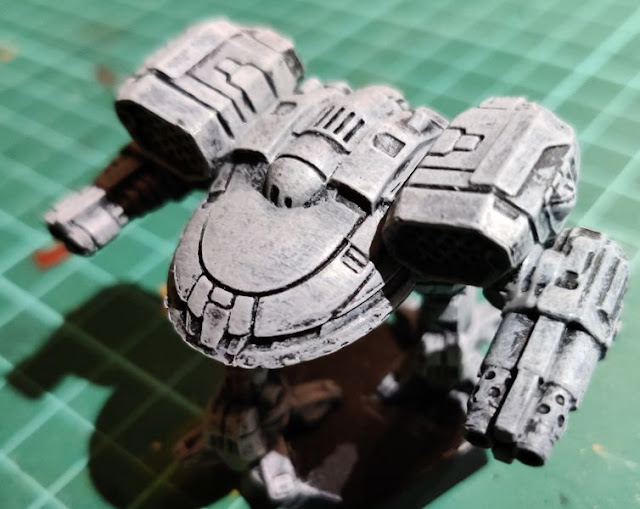
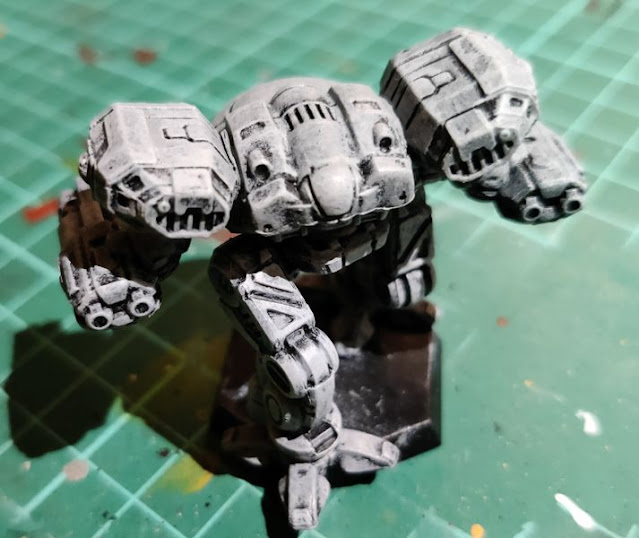
For my unpainted metal I thinned down some dark grey (VMA 71056 Black Grey) and applied it on all the relevant parts. Unsurprisingly my approach was now the same as it had been for a couple of years now: gun barrels, front-facing plates, grilles, and the joints that looked like they got any and all paint scratched off them. In plain English I followed my gut feeling.

I thinned my paint a bit more than normally so it was like a pretty thick wash. This way the earlier greyscale basic basecoat gave details on the darker surfaces too. On the guns of the Turkina and Ebon Jaguar this worked fantastically, so in hindsight I could've done the same on Warhawk to gain this visual variance. Complaining over a splilled coffee didn't make anything better, nor would it affect the end result.


This started to look like actual progress.

Before moving on I gently drybrushed the metal surfaces that were conveniently available, using Cold Grey. In practice this meant that I added some more texture on the guns and a couple of rear leg parts.


This wasn't yet the moment for blacking out the barrel openings or viewports. I also wanted to doublecheck what each of them had as their Prime loadouts, somehow I had no issues remembering what Warhawk Prime carried but the others and their variants were a bit more obscure in my books.

Cluster highlights

If metals were painted by the seat of my pants, it was even more true with the jade highlights:


Yeah, this was a good moment to stop. Next I'd start ruining my paintjobs with the freehanded stuff.

21.5.25

Three-Point greens

The green camo part

The camouflage as a term was a term that sounded a bit too planned in this case. Each of my Points or their components had their own style and sometimes even shades. All I ever intended was a shape-breaking with the mess(es) I made.

Taping first and foremost

I spent a single evening (about 40 minutes) playing with masking tape. This was quite simple, I just set a length of it on the cutting mat and started slashing different shreds and triangles out of it. None of this had any specific plan or a thought-out goal, until I got the idea of the Warhawk having a flamelike thing in the top CT.

My partner was half-observing this nonsense from the next seat while doing her own stuff, and after a while said that she'd thrown all of this into the wall after mere moments, as it was so frustrating to see. I, on the other hand, found it incredibly relaxing because it required enough concentration to drive all work-related things from my mind.

Then the colour

Again I was forced to realize that I simply didn't own any medium or light green Vallejo * Air series paint, but the darker ones I had a bunch. Instead of airbrushing I then returned to the overbrushing mode. The green I used (VMC 70942 Light Green) was a bit thicker than the Model Airs so I thinned it down a bit with Vallejo's acrylic thinner before anything else.

Over this layer I also drybrushed with a lighter mix. On my jam jar lid the difference between shades was clear but it didn't show that much on the miniatures.


Tapelessness

Actually finding and then peeling off the tinies of tape fractions took almost as much time as cutting and placing them, or painting the greens. That was quite a bit of tinkering. Of course I also missed a few and found them on my wip photos afterwards.


Next up: bare steel surfaces!

14.5.25

Three-Point greyness

For the grey stripes

My overall approach to these Gamma Galaxy miniatures had been pretty much unchanged for a while. First they got the grey basecoat, then a lighter drybrushing, then the camo pattern was painted on with greens, with or without masking. I even checked from my older posts, how did I do this the last time and thought of ways to improve on it.

Cold Grey

This time I didn't want to go for a 100% coverage with grey paint, I let the black primer to show in the panel lines and darkest shadows. On the first quick round I left the arms alone, so I wouldn't slap my sausage fingers onto wet paint. When I was done with the first cycle, I painted the missing bits out of the way.

Overbrushing was the general name of this method, and I used VGA 72750 Cold Grey as a trusted shade of grey:

Warhawk


Ebon Jaguar

Turkina


Stonewall greybrushing

At some point last Autumn I encountered some discussion about drybrushing and there some folks were enthusiastic about the differences between wet-brush and dry-brush drybrushing. The claim was that a water-moistened brush made the results [a bit] smoother, so I thought I'd give it a shot just out of curiosity with the one semibad drybrushing brush I owned. For this I used, predictably, my go-to highlighter VGA 72749 Stonewall Grey.

Warhawk


Before I got any further I took a comparison shot between a drybrushed and the not-airbrushed surface:

A Warhawk was always a fantastic view, especially from the viewpoint of infantry.

Ebon Jaguar


Turkina

On these three only the Warhawk's ER PPCs were modeled so that I could just leave them alone at this point. Both the Ebon Jaguar and the Turkina had structures in their hands that I wanted to have painted, so the barrels also got painted, even as they were going to be repainted dark grey not much later on.

Next I should come up with a plan for the camo pattern I would do. Maybe I'd do wavy lines like the previous time.

Had I been smarter, I'd done all this now for my Elementals as well, as I had an assigned Star of them waiting in a box.

7.5.25

Project II/25

More Points for Jade Falcons

After a long stint with the diorama, I wanted something simpler to spice up my life, so I checked my Operation:REVIVAL minis. I only had about two Binaries unpainted so I took the most fitting ones for the 9th Falcon Talon Cluster, and the remaining, less prominent Points would become some enemy troops or other.

Every once in a while the enginerd inspiration struck and I improved my BattleTechTracker, which I originally set up just to get rid of my A4 paper with the Point numbers and have something more updateable. As you might imagine, that got out of hand quickly and repeatedly. While writing this post, my setup had 8 sheets of which was dedicated to following the state of the 9th Talon Cluster: there was the overall painting status based on the completed minis; the positions of individual Points in the org with their variants, numbers and weight classes; and a table for the weight distribution through the Cluster. This one made me drop almost a Binaryful of 'Mechs from my original setup, which included a pair of Cougars and Fire Moths each, for example.


I wasn't staring at tables when I picked which minis to paint, no worries. From the Clan Heavy Battle Star box I got a Turkina and an Ebon Jaguar, and from the Clan Fire Star box I took only the Warhawk.

Partially primed init();

During some evenings last Autumn I had primed a Binary of miniatures, the other Binary or the last two untouched boxes were still waiting. So this project started with 33,333...% of the initialization already done out of the way.


Like I said, the Warhawk had been primed several months ago, mostly likely while waiting for some other paintjob to dry.

30.4.25

Finished: Project I/25

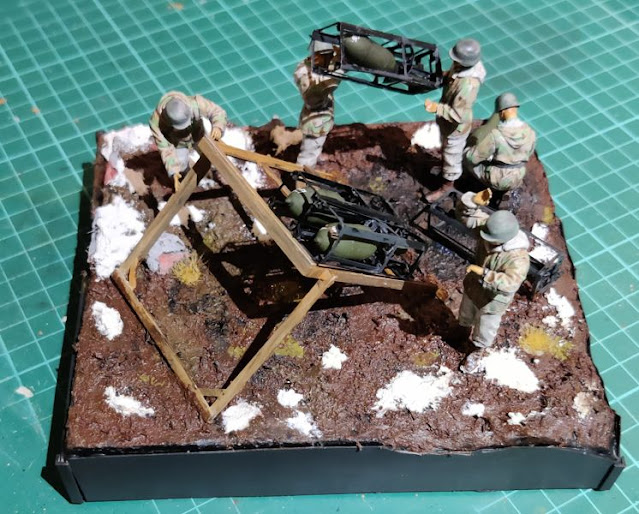
Schweres Wurfgerät 41 im Vorfrühling - diorama

When I started on this model I mentioned that I got it as one of my farewell gifts when I last changed my job. A couple of cups of water had flown through river Vantaa since that, but the model was now done with the extra stuff brought by delusions of grandeur.

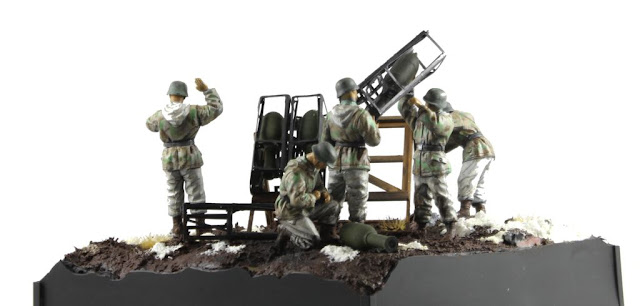
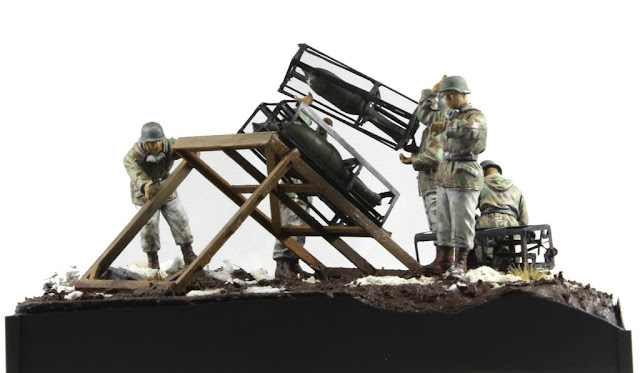
At a first glance the model was simple: a wooden frame, five guys, four rockets and their crates. It took a silly amount of time, not only because of the PE but also the unplanned scene base for the diorama. I had to admit it was much more impressive this way than as random pieces laid on a flat surface.

Photos

Below was, again, a couple of so-called better photos, or at least they were taken with an actual camera and edited more than just cropped. My white background caused some funny glitches with the snow and the winter uniforms when tweaking them in Krita.

What I intended to be a subtle little detail, the "rocket-scorched-earth" effect pleased me greatly, I was astonishingly happy with it in the end. It had taken a good few iterations, so it ought to have become at least acceptable.


Someone may have noticed that there were some unexpected differences between these and the last ones from last week. A funny thing happened after I had put the finished diorama into the kit's box and set the lid on carefully before leaving the box on a table.

One or both of our cats had done what cats do, running over the box and the three victims were the boss guy and the carriers. Two heads and three arms snapped off. I swore and fixed the bits, then set the Pacckiste onto the hands, but it didn't find as good a place as before.

23.4.25

Launcher weathering

Vallejo effects

Weathering was quite a wide term in this case, when the goal was to cover the diorama base with who knew what, and to get it to look like anything but a piece of styrofoam. Luckily I had a few products handy, so I didn't have to rely on just one type of goo.

These'd be a good start. The largest and newest jar (Vallejo DFX 26811 Brown Mud) was maybe predictably the one I'd use to cover most of the terrain. That'd be accompanied with european mud (VWE 73807) and maybe some of the mud and grass (VWE 73826). Finally I'd add use some snow (VWE 73820) to produce something like the end of Winter or early Spring.

All on brown mud

My first mud layer was pretty quickly spread on the terrain. I then added some euromud into the adjuster guy's lower right corner to make it a bit different in general. To the edges of the bumps I added some mud and grass, as far as it was spreadable.

Now was the moment to glue the wooden launcher rack into place. I used white glue as I didn't want to melt the XPS foam with the plastic glue at this point in the process.

Let it snow, let it snow

I gave the snow stuff a go and it behaved surprisingly well. The trial lumps were just tiny dollops, due to my worrying with a completely new product.

Earlier in life I had taken some reference photos of melting snow, just in case I needed them. The tiny mounds here had more vegetation in than what I was going for.


Another muddy layer

To make my terrain a bit more elevationally varied I add some more brown mud in various places. Over that I built more remains of melting snow banks, especially to the raised corner. That corner didn't feel right being both raised and also covered in runny-looking mud.

My second idea here was that where the launcher rack was, and especially right behind it, would be pretty much clear of snow, and more blown clear by the fiery jets of the rocket engines. I had no real life experience or self-witnessed memories of how any sort of a recoilless rifle or any rocket weapon's backblast area looked like. And I had not really paid that much attention of how the front side of the shield line of an artillery battery looked like after some rounds in the winter. So, like so much of my hobbying, it was done based on an unscientific gut feeling.


So far I had kept the black mud (VWE 73812) off my palette, because it was so strong in colour compared to the different browns. The fireblasting made me have a change of heart and I did use it, thinned and especially where I imagined the backblast to scorch the nature.


Detailing without mud

This made the muddy goo look pretty done to me. It wasn't all done yet, of course, I wanted some muddy puddles especially behind the launcher. While waiting for that to be done I superglued three tufts of grass (NOCH 07132 Grasbüschel Herbst) that had somehow remained half-alive from the Autumn. They'd give some tonal variety to this brownness.

That also gave me an idea how to improve the tinkerer's corner. I painted the straighter parts as rocks using cold grey (VGA 72750) and drybrushing them with stonewall grey (VGA 72750). Now this felt more reasonable, visually.

Adding some granite

The next day I realized that just grey stones were a bit boring if good addition. I took some more cold grey and mixed in some red and yellow ochre. This mix I tested into the first photo's lower left corner's rocklike piece and it felt good. Then I continued to another grey bit that I turned into a piece of granite. After a few corners and shades of grey-red I was content and stopped painting.


Mud puddles and meltflow

For the nasty mud puddles I mixed a bit of Dirt (VMA 71133) into gloss varnish (V 70510). With that I made a couple of puddles. When they flashed, we'd see how this worked in my terrain.

After doing the puddles I used some plain gloss varnish and added that along all the edges of the melting snow piles. The point of this was to emphasize the idea of the snow melting away, and that this patch of terrain was simply a disgusting place to walk in.

Crew

Painting the five-head crew of Germans got started by oil washing their camo coats and exposed skin with brown (ABT080 Brown Wash). My idea was to highlight especially the seams of the coats, and to make them a bit less pale. I was a bit concerned of how this'd work with the snow pants, so I didn't at least start with them. Being full white they would definitely benefit from their few highlights (or in this case the opposite) getting a bit of attention.

After some time I made some very thin Sepia wash (ABT002) and attacked the snow sides of the winter gear. When the paint had sat in for a bit, I cleaned up most of the paint while leaving the knees a bit dirtier than the rest. Those things could not remain pure white in the field, even if the weather was good.

These photos were taken immediately, so the guys needed a day or two to set. I didn't expect the difference to be enormous enough to take separate photos later on.

Mr A

This guy who was tinkering with the fuzes of the warheads was clearly someone who had crappier pant knees. Sadly there was nothing I could've put in his hands.


Mr B

One of the ammo carriers had remained relatively clean.


Mr C

This guy who had taken the heavier end of the Packkiste had also crawled more in mud than his buddy.


Mr D

The tinkerer's expression was a bit sad. Maybe his snow pants were already wet and cold.

Mr E

Sir team leader sir was clearly an old school superior who didn't waste time on the ground. His left boot showed how I had tried to use him as a footprint maker on mud and snow. That hadn't worked as I had hoped, but on his boot the snow looked good.

Attaching the loose pieces

Now, many evenings later, I was deep enough in the project that I could start gluing these guys onto the terrain. The big boss was the first one to go, being the one stanging alone on that side. Next one was the tinkerer on the opposite side of the launcher. Third one getting set was the kneeling dude, after which I did some figure-assisted measuring and glued the guy with the lighter end, because he had the worse ground options.

When these supergluings had been setting for a while I glued the last guy in while also playing with the Packkiste and its position. I never got the hands and the frame aligned perfectly, so I had them now as they ended up. Looking close up this made little sense, but from a distance it worked.

I also glued the final, empty Pacckiste, and the free-rolling 280mm HE rocket on the opposite side of the fuze-setter. There was a bit of an element of danger for someone falling, luckily there was no banana peel on the ground.


This was just about done now. I left the superglue to flash before going for the last touchups.

The final mud/snow tweaks

I devoted the melting snow piles some more attention. A few got more mass from fresh lumps, and a couple of others I expanded a bit. Those shoes that were next to snow piles, got some snow applied on them to make them fit in better.

Using the same idea I applied some brown mud by almost everyone's feet and on many boots, as far as they stood next to this stuff. Mostly the guys had crowded behind the rocket launcher, which was somehow dominated by the darker mud, so I used plain black mud to include them. I also used some black mud to reinforce the rocket-scorched look here and there. A few knees also got some mud on them to make it so very clear that this was a nasty place and time.


These latest photos showed the freshly modified parts more shiny than what they'd be after a bit of time. I also used some satin varnish on the exposed skin of all five crewmembers, just like I did with the ancient submarine captain.

While on the varnishes I was thinking if the helmets ought to be satin-varnished as well, being made of stell and all, but I let them be. Just like I had thought of whitewashing a helmet or two some dozens of hours earlier. Sometimes one had to know when to stop :)