Mastodon

24.2.16

Ordnance

After a very noticeable break I returned to the Warthog. The first thing I did was to file off a few millimeters off the wheels so that the bugger would stand on its own. Despite the weights glued into the nose it was still a tailsitter, so I was facing the prospect of making a sort of a baseplate in the future.

Prepping

As is known, I'm not too well informed about these things and I have never bothered to get worried if a TER can carry three MOABs or not, as long as my model has had something decent installed under it. I just started painting some of the random bits I possessed based on my gut feeling. The A-10A kit's sprues contained a few different types of pylons (I assume that at least one of the types is TER) and brushpainted all quickly green (VMA 096 Panzer Olive Green).

While I was at it I also painted a few bombs and four/six LAU units with the same green. In the photo below you can see a couple of lazily positioned old tv-antenna -like pylons, a couple of long-nosed bombs (GBU-10 Paweway II), a pair of GBU-8's (which I had already google-identified while working on the F-16) and a set of heretically (I assume) green-painted AGM-65s.


Some research

I thought that I'll let this weaponizing part of the project to get completely and totally out of hand. To get an idea of how to get things looking the best they could I searched the net for the colours and markings of the bombs. My first idea was to make all the Mavericks to look exactly the same, but the quote below opened up my eyes for some possibilities.

"When it comes to the actualy seeker head section (meaning the glass up front): Clear means it is a EO (TV or CCD) or a laser variant, and the dirty tan/yellow color means it's an IR variant." [source]

Shamefully I have to admit that I once found an awesome source for these markings, but guess if I every wrote it down, saved it anywhere or found it again? Of course not. Later on (yesterday, actually) I encountered a table that you can see in pic 2 that provided me with what I needed. Some of those I had actually remembered correctly, but having a proper cheatsheet has always been a necessity to me.


A yellow band (VMA 71002 Medium Yellow) signified a HE warhead, a brown one (VMC 70872 Chocolate Brown) a rocket motor (as far as the 'mumblings was concerned at the moment). Under these you could use whatever colour you wanted to, which suited me perfectly. The heresy I had blamed myself for earlier was not iconoclasy but an accepted approach.

Just for the fun of it I decided to make a couple of them somewhat questionable, at least if you consider the Geneva conventions. So I painted three little bombs grey (VMA 71120 USAF Medium Grey) and later I tried to apply a green (VMA 71124 USAF Green) dashed band to signify a toxic warhead.

To accompany these buggers I wanted at least a couple of napalm bombs, because why not? These'd get a red band (VMA 71085 Ferrari Red) on them, as the table above tells us. That's what I had planned on before I actually got the paintbrush in my hand...

From the plans to the workbench

Optimizing my time and all I started with the rocket motor markings of the Mavericks, because I only needed to do six of them and I didn't need brown anywhere else. Cleverly those bits had the panel lines in them for the bands (or they were intended for something else but I didn't care) in the front and back. So I painted the brown bands between the wingsets.

Then I went through all the bombs from the known to the unknown ones (the GBUs 8 and 10 I had also recognized from the A2G box's instructions, of the rest I'm still blissfully ignorant) and painted a few layers of yellow on each. All this was done with a paintbrush because I was feeling way too lazy to go through with the hassle of masking tiny bands and fooling with the airbrush.


Just when I was done with that I noticed that I had done a bit too many of the yellow bands. To fix it I just painted the triplet's halves green again (see second to the last pic above). Then I glued the halves together and a bit later I painted th red bands around them. Those units just had the "I've eaten napalm" look on them.


Next to the napalm bombs you can see three small bombs with double wingsets. I painted them grey and tried to get some kind of a dashed green line painted on them. This I accomplished simply by painting a green band and then cutting it with grey length-wise strokes. I guess they'll do their jobs.


Customizing

During the earlier weeks (as a result of that aforementioned googlage) I had got an idea that I thought was awesome, would look awesome if it worked and didn't sound difficult at all to make. A subset of the Maverick missiles would have an IR seeker head, the others a laser-or EO seeker. I decided that two out of six would be the easy ones and simply painted their tips (VMC 860 Medium Fleshtone). The rest I cut off and filed off the tip that was unnecessary in my plan.


Would this be worth anything? Perhaps. At leat I hoped that the result would be something more than one to entice "what have you done, you fool?" kind of comments.

17.2.16

Endless abhorrent hours

"They" keep saying that the thirhd time's the charm. I was on my way to get to the decals phase, that as everyone knows, I dislike quite strongly. For the third time in a row I was about to apply the varnish-decals-varnish method that had worked nicely twice so far.

A glossy layer

What would I say about this part? Not much, as I just applied a layer of Vallejo Gloss Varnish on all the surfaces that would get decals on them. That being: over and under the wings and the airframe.


A deep breath

I gathered my nerves, the decals, tweezers, my hobby knife and a saucerful of warm water on my workstation. I had also decided to ignore the fact that the decalset and the camo pattern didn't even belong in the same millenia. Just before I started I removed the canopy masks and noticed that the masking had been a bit misaligned and I'd need to fix the paintjob a bit later on.


Session 1

The first decals to go on were the most important ones with the stupidest shapes, also known as the sharkmouths. €%£#€#¤.... No, it didn't go as planned. For some reason the airframe-hugging decals didn't follow the contours of the nose of the plane. Instead, they flapped like the cheeks of Chief o'Hara and didn't grab a hold of the damn thing at all.


After a few failed fixing attempts I decided that I should do something else to save my nerves and went on applying the larger decals around the plane. My plan was to change the area I worked on after every decal so that the last one applied would get to dry in peace and I wouldn't find out that it had got stock to my thumb or something while I had been applying another decal right next to this one.

During this first session I finished applying the decals in the nose, the roundels, and some coats of arms or whatever they were. Those, and the bigger markings on the horizontal stabilizers. Why didn't I paint the tops of them blue instead of using silly blue decals? That's because I hadn't looked at the decals properly (as I didn't expect anything as weird as this). Oh, I also decided that if those sharkmouths don't start behaving, I'd tear them off and paint something myself.


Session 2

There wasn't anything special to tell about this session. I was just applying decals here and there, going from the largest towards the tiny ones. Getting the decals on was so insanely time-consuming, thanks to the "soak it first, then fight it into its place and repeat" way of working.

Somehow I think that especially in this scale those smudgy pseudo texts are juts pointless. They seem to be more of a hindrance than an asset, especially if they end up being a bit off in the end. The same (or even neater) effect would be gained with a tiny hand-painted irregular line and that would be a) exactly where and how you want, b) without the danger of silvering and c) ludicrously faster to do...


The decals in the last photo were somewhat more challenging than the others. And the worst of them was the tiny non-text between the Pave Penny pod and the front  landing gear. Getting anything of that size into that kind of a tiny space was not too simple. But there it ended up, after a long time and a good handful of swearing.

Session 3


On this third and hopefully last sting I wanted to get the last markings applied. As the photo above shows, there were just a few silly texts and the "NO STEP" markings for the wings. And the photo below shows both the model and the cut but not yet soaked decals.


In all honesty I have to admit that they went surprisingly painlessly and relatively quickly (did I spend only 45 mins on them?). Still, while working on them I decided that I would not do the even larger amount of "2" decals that were to go on the wings and the horizontal stabilizers. Instead, I threw them all away and was happy.

Oh, and for about the fifth time I tried in vain to get the sharkmouths to set without success. I had one last idea, though...


The finishing matt layer

I had got it into my small mind that as playing with water didn't help with the floppy decal pair (too much water and everything moves out of place, too little and their glue doesn't dissolve enough to get a grip on anything), maybe if I could force them in place with the dullcoat! They couldn't end up looking any stupider than how they already were so what did I have to lose?

So I started applying the Vallejo Matt Varnish starting from the nose, and my first idea was just to use it to press (and stickify) the floppy decals flush against the nose cone. That didn't work, as the lower parts sprung out again after a short while. Then I got the brilliant idea of applying a bit of said varnish on the glue-side of the decals and then swiping them down. That finally did the trick and I got those monstrosities where they more or less belonged to!


Because I was still going to work on the canopy's paintjob, I left a glossy area around it untouched. As I was also prepared to touch up some of the matt surfaces later on, I was completely prepared for at least a second round. That's why I didn't touch the engine units yet, so that I'd have something to grab a hold of while working (on the bottom side I had the landing gear units). At least I made my work that much easier this way.

One evening I painted those parts of the canopy that needed to be fixed and after the paint had dried I applied a wash to achieve a uniform style. The next time I worked on the model I applied the matt varnish on every glossy bit I encountered.

The next time I'd return back to the building bench and maybe even a bit of painting, on the underside of the Hog. All the wheels would need to be modified to be in a proper shape (so that the plane'd stand upright), painted and glued on. Also the  defined amount of weaponry (I fully expect that to be both rules-breaking and mindboggling) for the Hog hadn't been started at all yet.

10.2.16

Fixing and painting details

Patching

The last time I nailed the camo pattern, so now I proceeded to do some touching up. A couple of funnily painted areas on the wings I fixed with a dab of green (VMA 096 Panzer Olive Green), some darker patches on the airframe I touched up with the other green (VMA 71124 USAF Green) and that was it. Next I painted the fronts of the engines grey (VMA 71123 USAF Dark Grey), because it felt like the prettiest choice.


Detailing

All the landing gear bays, their doors and the landing gear themselves I painted white (VMA 71001 White), as the instructions told me to do. While I remembered, I also painted the pilot's ladder's container and the inside of its door as well. At this point I didn't dabble with any door art and I don't know if I ever will. Maybe I should, but we'll see later, much later.


While I was working on the ladder, I painted the topmost part and all the steps yellow (VMA 71002 Medium Yellow) and all of the telescope-parts metallic (VMC 70865 Oily Steel). Embracing the KISS approach I used that same metallic paint on rear parts of the engines and some tubes in the landing gear, maybe even properly.


Greenifying

Right now I felt that the main job was done. I then washed the plane green (VMW 76512 Dark Green for green vehicles) and I felt that this was a good choice. For a change I had not forgotten the wingtip lights and painted them after the wash had dried, as I had planned. One of the lights was, as is customary, red (VMA 71085 Ferrari Red) and the other was surprisingly blue (VMA 71111 UK Mediterranean Blue), not green.


3.2.16

Hogging the airbrush

European 1

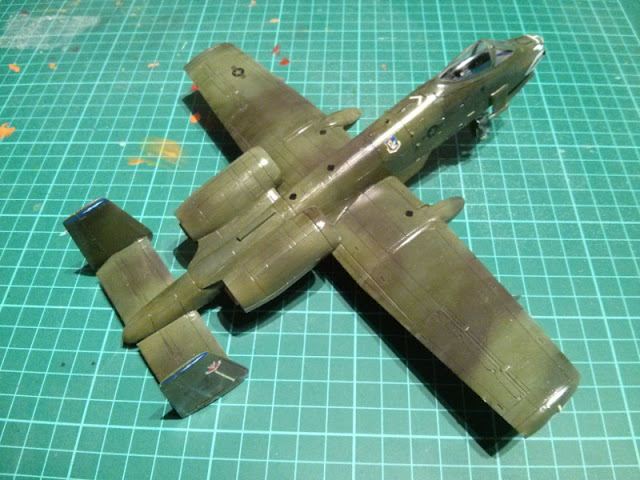
After slacking off for a considerable time I finally got myself at a table with my paints, airbrush and the compressor. This time choosing the paints was an easy operation, for some reason I had just chosen the earlier avoided European 1 ("Charcoal and lizard") pattern. While checking up my sources I had just written a note for myself saying ""Euro1: dark green; light[er] green; d-grey" and with that in hand I started going through my bottles.

To accompany the grey primer I had dug out some grey (VMA 71123 USAF Dark Grey), green (VMA 71124 USAF Green) and some other green (VMA 096 Panzer Olive Green). From the different options available these pleased my eyes the most. After that was done I took one last look at a couple of sample photos on the computer and went to my painting station.

To work

On top of the primer I airbrushed a proper layer of the lighter of greens, over and under. This'd be the base on which I'd build the rest of the weird pattern.


Without further ado I loaded my Badger with the darker of the greens and tried to build up a pattern that somehow worked for me. As is well and widely known, I don't really give a rat's arse about real life examples, individual photos or anything but instead freehand these things.

Of course I didn't remember to take a photo of this intermediate step but I guess that wasn't a cardinal mistake. As soon as that was done I added grey into the paint container and touched up some tactically chosen spots on my model.


In case you, dear reader, notice something being a bit off, you aren't alone. I noticed that myself while checking the photos. Yes, the rear wing setup is slightly tilted, thanks to the bad fit and the filing it required. Life is hard and the plane is twisted, can't do a thing about it now, as I'm no way going to tear it off and potentially destroying the whole construction.

The freshest status of the project can be seen below. I don't think the pattern ended up looking too shabby. A purist might of course yelp, especially as I intend to use whatever weapons I happen to feel like using, not caring if they were even a daydream in their designer's minds when E1 pattern was in use :)