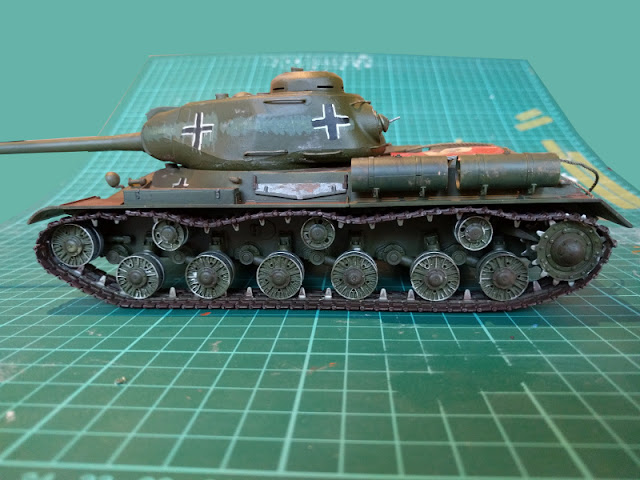
Spoils of war
Perhaps my choice wasn't specially surprising. In short the IS-2 would be in the desperate hands of Wehrmacht. To make this apparent I used a different shade of green (VMA 71096 Panzer Olive Green) to paint over the Soviet white markings so that they'd be both covered and they'd seem to be painted quite hastily. I also tried to get some runny paint effect done here and there to make the whole cover-up look more panic-driven.You can recognize the krauts by their markings
Of course the tank had to have some Balkenkreuz so that the other germans would recognize it as a friendly unit. Based on some googling for german-captured soviet tanks they always had much, much larger and kind of overdone block crosses and there were more of them, sometimes in weirder places than normally. That made sense, as it wouldn't be of much consolation if you had some friendly markings but the Panzerfaust-wielding Volkssturm member just couldn't see it and fired in panic.I freehanded an amount of black plus signs both in the hull and the turret. For the placing I rotated the model in my hands in different angles and I tried to choose so that whatever the rotational angle between the turret and the hull were, you would always see clearly at least one or preferably more of the Balkenkreuz.
When the black paint had dried I took a smaller paintbrush and painted white edges to each of the pluses. I kept up the theme of hastiness and maybe even frantic sloppiness with some paint running down and general imperfection of the shapes. These weren't painted with stencils, but quickly slapped on as soon as they knew that their captured tank was useable.
What about our dear friends in the Luftwaffe?
Otherwise that was all good and nice, but you couldn't necessary tell that from the air, if (when) the Luftwaffe pilot was busy and maybe not too well informed. At that time in the history this may not have been too far from the truth (or it could be overoptimistic for the Germans, even). I decided to try making a scale model flag.My first attempt was just misusing some tin foil from the kitchen. I had read and heard that if you painted kitchen paper with a 50:50 diluted white glue you'd get something neat. In case the tin foil approach failed I could try that one. Or I'd try the kitchen paper or tissue paper flag some other time.
This approach was simple. I tore off a decent piece of the tin foil (1) and airbrushed it with white primer. Being the lazy bastard I am I then just put a paint bottle cap in the middle of the white area to act as a mask. Then I blasted red (VMA 71085 Ferrari Red) from different angles while holding the cap in place with one hand (3).
Just as soon as the paint had dried decently I cut off the excess to get a more or less flag-shaped and proportioned piece. Then I painted a skinny swastika on it by hand.
While checking it out I noticed that this flag was way too large to be draped over the turret, so I put it to the next best and clearly visible place: on the rear deck. That pair of tow cables could be lying on top of it to keep the rag somehow in place. In the next photo the foil sheet was there just lying freely and without too much of a care in the setup, but you could tell it was quite thin.
Weathering a bit
Of course the tank was way too clean and nice. Just like the nazi rag was way too ... well ,the way it was. Something was to be done. First of all I loaded my airbrush with more or less aptly named dirt (VMA 71133 Dirt) and then sprayed that broadly and from an unusually long distance. My idea was just to get a sort of a filter over the monster, a dusty layer, if you will.Pigments
My weathering subproject progressed the next evening as I worked on the bolt heads and some random edges with a HB pencil. To add to that I dug out my pigments (that included Vallejo pigment bottles, a Tamiya Weathering Master kit and two Tamiya Weathering Sticks - "Light Earth" and "Sand" (the third one, "Mud" I had apparently misplaced completely)).On the muzzle brake and the regions around the ends of the exhaust pipes I used black pigment ("Carbon"). Then on some selected spots, such as the glacis plate track links and the ends of the fuel drums I used "Fresh Rust". On the hull itself I mostly used "Natural Umber", "Burnt Umber" and "Burnt Siena" powders. This time I didn't work that much on the track dirtification. My main attention was on the hull, especially the walkable areas, and the turret, the handlebars and wherever people would've been walking with their filthy boots. Oh and on top of the flag, that wasn't going to stay clean at all.
As you may have noticed I didn't plug the two extra drill holes - I poked around them with an old and dull xacto knife to get them a bit uglier and angled. Then I painted their interior surfaces with steel (VMA 71065 Steel), maybe to represent the holes made by AP ammunition, from the time this tank was still owned and operated by the Soviets.


No comments:
Post a Comment