Dusting
My weathering got started by picking through my pigment containers and choosing the ones that felt the most fitting ones. From the Tamiya Weathering Master set's triplet I chose sand, as my tank's inner floors would have some sand (not light sand nor mud) on them. This small box with three pigment tablets also contained a two-headed applicator, one end had a brush and the other a small dabbing sponge. During a good bunch of years the sponge had gotten dry and on the first careful poke half of it was lying in crumbles on the cutting mat. So yeah, that one wasn't going to be useful.
From the Vallejo Pigments series I chose some rust (VP 73118 Fresh Rust), burn umber (VP 73110 Burnt Umber) and black (VP 73116 Carbon Black). To get all of this to stay on I'd use some of their binder (26233 Pigment Binder).
Ages ago I had bought a set from AK Interactive, specifically for this kit, and I chose a couple of products from that packet. I had to skip the engine oil and track wash, as they were enamel-based and I had no handy products to clean my tools after those). Instead, I picked Dark Steel and Track Rust pigments to try them out.
Blackness
Easy targets first: I begun by applying carbon black to the muzzle brake, the exhaust pipe ends and as I thought of it, also on the rear deck's I/O vent grilles. Perphaps black wasn't the perfect option, but I felt it'd work nicely if applied lightly enough.


Sand
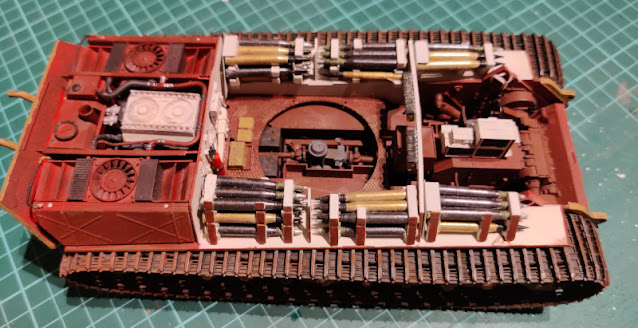
My sand cakes got spread mostly to the turret basket's floor and wherever my crew stomped around with their boots, such as the combat compartment's floors. My story was that the Jerries just made a mess of their otherwise cleanish tank.


At this stage the binder liquid was still wet, as you could tell by the photos. The results would look much better in a short while.
Track rust
Ignoring the most obvious use case suggested by the product's name I also applied it inside my tank, not just gently on the tracks. There were so many red-brown areas and I wanted to give them a bit of an effect that was something else than very visible dirt. I also applied this stuff a bit more heavy-handedly onto the heat exchangers, as they were a bit more subjected to the elements.


Steel powder
There weren't too many surfaces I could think of for the dark steel powder. To try it out somewhat safely I applied it onto the teeth of the turret ring.

That didn't look halfway bad so I proceeded to a bit more noticeable area: to the turret. My first clear place was the commander's machine gun rail. In addition to that I also poked some of this powder to the lifting loops and the corners of a couple of the hatches.

Finally I used some of the steel powder onto the edges of the tracks. I thought that'd compensate a bit for the rust pigment that had covered some of my earlier drybrushed gunmetal highlights.
The very next day
First thing I did the next afternoon was to take a few photos to record the state of the set pigments, as they didn't look too convincing in the in progress photos. Especially the gently sandied surfaces looked much better now. Also the effect on the red-brown areas was nice.

The King Tiger's tracks were the absolute main weapon in the set of my weathering attempts. I felt they were very successful.


As said, I was working on these while waiting for the other effects that were being delivered from some corner of brexitland. The transports didn't seem to be in any sort of a rush, that was certain.
No comments:
Post a Comment