Benzine and motor oil
I started my testing with the gasoline spills (VW:E 73814 Fuel Stains). The best starting point, I figured, was the rear deck's fueling cap's base. Hans had apparently been somewhat careless.

Of course, the outer deck being nasty mean that the engine compartment also had to be nasty around the same pipe. This stuff looked disgusting, just like it was meant to be.
After the fuel stains I applied some oily stains (VW:E 73813 Oil Stains) around the cap of the smaller tank I had expected to be some sort of an oil tank. There and nearby. Hans really hadn't done his work carefully at all. Or maybe they got shot at while he was trying to get something done?

Then I added the same oily mess around the axle's joints and to the whateveritwas-machine below the turret. A few of these stains and spills got applied to the bottom of the hull and those boxes, because they added a bit of story to the otherwise clean setup.

Someone had oiled up the driver's pedals or rather their hinges pretty liberally. Maybe the driver had been kicking sand all around while using his hatch, so the oil may have been sorely needed.

Had I not sealed the turret up ages ago, I'd used this wonderful effect inside the turret as well. But as I had, I couldn't, so this is where we were left.
Muds
The more unusual weathering product for me was the thick mud. I had used a similar goo, the "mud and grass" in the T-35 project a few years ago, maybe I ought to check if that gunk was still alive and useful. I was absolutely sure it'd work fantastically with these other mud types.
Upper hull
The nastier mess-making got started on the upper deck, with the black mud (VW:Thick mud 73812 Black Mud). What the instruction sheet suggested for a most natural spray pattern was to blast air from an airbrush into a mud-loaded brush. Sounded cool, but this time I hadn't enough time to set up everything this required.

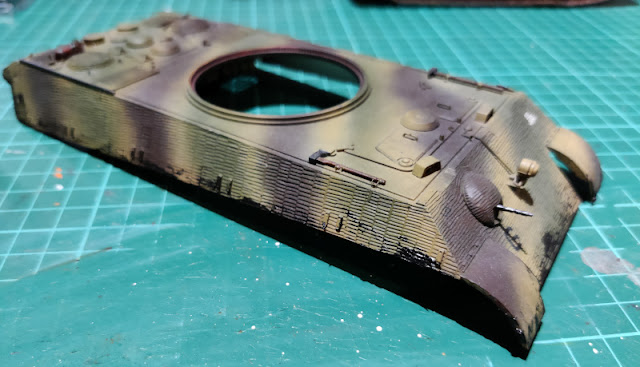
In addition to the bottom edge of the upper front glacis plate I mostly concentrated on the rear edges of my tank. The sides got a much lighter mud load, despite this unit missing the overhang plates.


Lower hull
My King Tiger's lower hull and the track setup got first a healthy amount of euromud (VW:Thick mud 73807 European Mud), and some black mud here and there randomly applied. As if there was some lighter and more dried up goo, with some fresher and wetter goo on, and beyond it.


The amount of crap I applied was a bit random and mostly unplanned. To be honest I had also not researched how especially the track-touching surfaces of road wheels collected and removed mud.


Yet another dry-fit
Over all, the tank was pretty much done now. In case my grass-mud crap was still useable, I'd add it to a couple of tactical spots. Then, before my last attempt of attaching the top hull with the main body I'd take the final photos for documentation purposes.


If my attachment attempt worked, despite all my very reasonable doubts, the project that started in May 2021 would be finished, about ten months later. In case that someone was interested in silly details, this was clearly my most heavily photographed project: the last photo above was #423.
No comments:
Post a Comment