Finalization rounds
My fifteen accomplished Warriors in their equipment were just about done now. Only their surroundings were missing from the photos, the black hex bases were supremely boring and all the previous ones were either sand-based or watery (or a mix of those). Now that I had a set of fresh and nasty mud types I had to put them to good use.
Icky icky goo for the legs
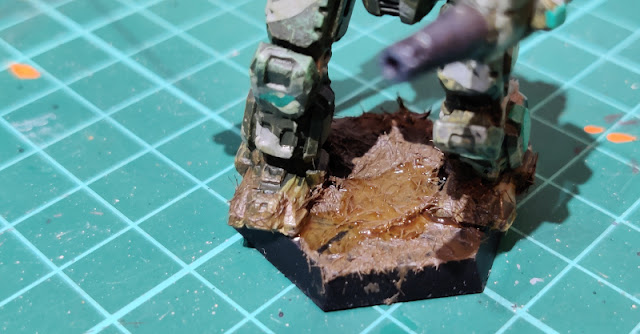
For starters I just made a decent mess on the bases and the feet of the 'Mechs, using my arsenal of crap. Euromud (VWE:Thick Mud 73807 European Mud) provided the first layer in pretty silly amounts. The bits that didn't get covered with the euromud got topped up with some black mud (VWE:Thick mud 73812 Black Mud), with the edges mixed and messed a bit to prevent it looking too planned and artificial.
After these main layers I used here and there some mud-grass glop (VWE:Environment 73826 Mud and Grass). My partner was looking at this from the side and said that they honestly looked disguting. I took that as high praise in this context.
The way my poor elementals were trodding in waste was looking really, really unpleasant. Luckily they were wearing Power Armour anyway, unlike traditional ground troops.
An attempt at the heat effect
Over the years I have encountered a couple of articles and picture series of how to achieve a decent-looking heat-ruined metal surface. Mostly these have been about exhaust pipes and whatnot. I thought that the boring and uninteresting Executioner would be fruitful ground for a test that could always be overpainted again, if needed.
For this attempt I used the Citadel washes I had bought a good bunch of years, one of which I had put into such a good place that I couldn't even find it anymore, so I didn't use the full possible array. What I did was to generally follow the example: first I washed almost the full barrel's lenght with sepia (Citadel Shade: Seraphim Sepia); then starting from the business end, working on a shorter length, I mixed in some violet (Citadel Shade. Druchii Violet); and finally the shortest length got some sort of blue (Citadel Shade: Drakenhof Nightshade).
Time was of the essence, so that they colour layers didn't dry up while I was working on the Gauss cannon. I mixed the washes around the layer edges, but pretty gently as I didn't want the whole barrel to be just covered in some undescribable mess. This effect wasn't very trong, but I also wasn't looking for anything comic-like and bright.
Add some muddy water
When my mud effects had cured I wanted to add a bit more to their nastiness. Each of the bases got some randomly sized and -shaped puddles of Vallejo's acrylic water (Vallejo
Water Texture: 26235 Still Water) and when that had cured in turn I used some water texture (Vallejo Water Texture: 26591
Transparent Water) on the puddle edges. This step could've or maybe even should've been done in the reverse order. Didn't look wrong this way, either.


No comments:
Post a Comment